🧢 Beautiful ✨ Detailed πŸ’ Adorable

Irish Lace Floral Dress Pattern

Irish Lace Floral Dress Pattern
4.3β˜… Rating
12-15 Hours Time Needed
1.7K Made This
βœ‚οΈ

Advanced Level

Designed for experienced crocheters, these patterns involve intricate designs and complex techniques to challenge and inspire.

⏱️

Multi-Day Project

A rewarding 12+ hour journeyβ€”perfect for dedicated crafters who love detailed work.

🌟

Elegant Drape

Soft flow with graceful movement, designed to flatter all body types with sophisticated comfort.

About This Irish Lace Floral Dress Pattern

This pattern guides you through creating an elegant full-length dress composed of many small Irish-lace motifs. You will make flowers, leaves and connecting nets, then wash and block motifs, compose the layout and join them into a dress. The design showcases colorful floral motifs on a neutral background and uses fine cotton threads for delicate structure.

Irish Lace Floral Dress Pattern crochet pattern - detailed view of completed project

The instructions include material suggestions, practical tips for motif finishing, and guidance on using a styrofoam tablet for sleeves. Detailed diagrams and symbol charts are included to help you follow the lace net and motif joining.

Why You'll Love This Irish Lace Floral Dress Pattern

I absolutely love this pattern because it celebrates slow, detailed crochet and the joy of composing many little motifs into a single wearable artwork. I enjoy the meditative rhythm of making each flower and seeing them come together into a flowing dress. The techniques of hiding thread tips, wet-steaming and blocking always elevate the finished look and make the motifs feel professional and lasting. The pattern allows so much room for creativity β€” color choices and motif placement make every dress unique and personal.

Irish Lace Floral Dress Pattern step 1 - construction progress Irish Lace Floral Dress Pattern step 2 - assembly progress Irish Lace Floral Dress Pattern step 3 - details and accessories Irish Lace Floral Dress Pattern step 4 - final assembly and finishing

Switch Things Up

I love how flexible this motif-based approach is β€” you can change colors, motif sizes and spacing to create totally different looks from the same pattern.

Try pastel tones and smaller motifs to make a soft summer skirt, or use bold saturated colors for a statement piece similar to the sample dress.

To make the design larger or smaller, change the thread weight and hook size: bulky yarn and a larger hook give a chunkier, more textured version, while finer thread and a smaller hook create a delicate, lacey mini version.

I often add embroidered centers or beads to the flower motifs for sparkle and depth; be sure to decorate before joining and blocking so details align nicely.

For a subtler garment, keep the background net dense and use motifs sparingly; for maximum drama, pack motifs tightly and leave minimal netting between them.

You can also use the same motifs to make coordinated accessories β€” collars, cuffs, bags or a headband β€” for a matching set.

If you want sleeves with more structure, sew a fabric lining to the motif sleeve and finish the seam with crochet to keep everything neat and comfortable.

I sometimes insert small, flexible wire elements into larger motifs for shaped leaves that hold their form β€” just be sure to seal ends and avoid stiffness against the body.

To create a two-tone effect, work the motif centers in one color and the petals in a contrasting color; join with a neutral or accent color net to tie everything together.

Finally, play with placement and negative space β€” moving a few motifs to different rows or clustering them into bouquets changes the dress silhouette and visual flow dramatically.

Common Mistakes & How to Fix Them

βœ— Crocheting motifs too loosely causes irregular shapes and poor joining; work tightly and consider a smaller hook if motifs appear loose. βœ— Cutting thread tips too short makes hiding them difficult and visible on the right side; leave 10-12 cm tails and hide with a needle stitching through dense sections. βœ— Skipping the washing and steam-blocking step results in inconsistent motif sizes; wash, wet-steam and press-steam motifs on both sides to ensure stable shrinkage before composing. βœ— Joining motifs without pinning can lead to poor alignment and gaps; lay out motifs wrong side up, pin them tightly on the pattern and adjust spacing before joining the net. βœ— Using a thick yarn or wrong hook for the net distorts the lace composition; use the same thread as motifs or a slightly thinner thread, and insert the hook under the two loops when connecting.

Irish Lace Floral Dress Pattern

Create a stunning Irish-lace floral dress made from individually crocheted motifs joined into a flowing garment. This pattern teaches motif making, blocking, joining with a crochet net and assembling onto a dress form. You will learn finishing techniques (hiding thread tips, washing, steam-blocking) and how to use a styrofoam tablet for sleeve shaping. Perfect for creative crocheters who love detailed, floral, couture-style projects.

Advanced 12-15 Hours

Materials Needed for Irish Lace Floral Dress Pattern

β€” Main Fabric

  • 01
    Iris Kutnor - 100% mercerized cotton, Length 450 m, Weight 50 g
  • 02
    Pelican - 100% double mercerized cotton, Length 330 m, Weight 50 g
  • 03
    Violet Melange YarnArt - Length 282 m, Weight 50 g
  • 04
    Iris (Vita Cotton) - 100% double mercerized cotton, Length 125 m, Weight 20 g
  • 05
    Yarn Canarias - 100% mercerized cotton, Length 203 m, Weight 20 g
  • 06
    Egypto 16 (MAFIL) - 100% mercerized cotton, Length 453 m, Weight 50 g
  • 07
    Iris Altin - cotton thread (model Iris Altin, Altin Basak)
  • 08
    FILO di SCOZIA No8 - 100% mercerized cotton, Length 453 m, Weight 50 g
  • 09
    Madame Tricote - 100% Egyptian cotton, Length 340-350 m, Weight 20 g
  • 10
    Sewing thread for irregular mesh - sewing number 40 (hook 0.35 mm)
  • 11
    Fine crochet thread for motifs - use hook number 1 (or recommended by thread label)

β€” Tools Required

  • 01
    Crochet hook size 1 (for motifs)
  • 02
    Micro crochet hook No.25 / 0.35 mm (for irregular mesh and sewing thread)
  • 03
    Alternative small hooks for netting (0.35mm - 1mm depending on thread)
  • 04
    Sewing needle for hiding thread tips
  • 05
    Tailor pins for pinning motifs to pattern
  • 06
    Styrofoam tablet (plate) 5 cm thickness (for sleeves)
  • 07
    Scissors
  • 08
    Iron and moist cloth for press-steaming
  • 09
    Towels for drying motifs
  • 10
    Polyester stuffing (optional for 3D details)
  • 11
    Pins for blocking
  • 12
    Measuring tape

Progress Tracker

0% Complete

β€” Materials & Threads :

Info :

A thread for motives. Hook number 1

Info :

A thread on an irregular mesh - sewing number 40, hook 0.35

Info :

But choose the colour of thread you need.

β€” Yarn Samples :

Info :

Iris Kutnor - Country: Italy. Composition: 100% mercerized cotton. Length: 450 m. Weight: 50g.

Info :

Pelican - Country: India. Composition: 100% double mercerized cotton. Length: 330 m. Weight: 50g.

Info :

Violet Melange Yarn Art - Length: 282 m. Weight: 50g.

Info :

Iris (Vita Cotton) - Composition: 100% double mercerized cotton. Length: 125 m. Weight: 20g.

Info :

Yarn Canarias - Country: Turkey. Length: 203 m. Weight: 20g. Composition: 100% mercerized cotton.

Info :

EGYPTO 16 (MAFIL) - Country: Italy. Composition: 100% mercerized cotton. Length: 453 m. Weight: 50 g.

Info :

Iris Altin - Brand: Altin Basak. Model: Iris Altin. (Beyaz sample image shown)

Info :

FILO di SCOZIA N08 - Country: Italy. Composition: 100% mercerized cotton. Length: 453 m. Weight: 50 g.

β€” The principle of ready motifs :

Round 1 :

Crochet motif very tightly. If the motif is loose, try to work with a smaller number of the crochet hook.

Round 2 :

Leave all the tips in the motif 10-12 centimeters, thoroughly hide them with a needle stitching from the bottom 3-4 times, moving the needle along dense sections of the motif, without nodules and knots. TRY TO MAKE YOUR WORK HIGH-QUALITY ON BOTH SIDES WRONG AND ON THE FRONT SIDE.

Round 3 :

I prefer to hide the tips right after I finished crocheting motif.

β€” Washing :

Round 4 :

After I hide the tips, I always wash all motifs of any color before putting out a draft of the product. I add liquid detergent to the warm water 40-50 Β° C (100-122 Β° Fahrenheit). This is the first stage of wet-steaming processing, which gives shrinkage of motifs, and avoids distortion of finished product size.

β€” Drying :

Round 5 :

After washing, spread the motifs on a bulk (bath) towel or fabric, roll together with the elements into a tube so that the fabric absorbs moisture. I do this several times, each time changing the towel to dry. Then spread the motifs on a horizontal flat surface onto a dry cloth or towel, spreading the elements with your hands, giving them the desired shape. Flip heavy and voluminous motives in 3 hours. If necessary, change the fabric base to dry. Avoid direct sunlight during the drying. Leave them for a day.

β€” Press-steaming (block steaming) :

Round 6 :

Next day I do the second stage of wet-steaming processing (block steaming). I do press-steaming of motifs from both sides through moist tissue. Then leave them to dry for another day.

β€” Making the Composition :

Round 7 :

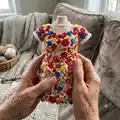
You can start creating a work composition. Lay out the motifs wrong side up in the desire sequence. Pin all the motifs tightly. Fill the background between motifs using chain and double crochet. For beginners I recommend to start with the first small works and use a large number of motifs and smaller voids. As your get more experience in netting, strengthening the hand muscles in the right position, you can spread the motifs, increasing the space for the background.

β€” Sleeve :

Round 8 :

The pattern of the sleeve is always flat, design on a paper and make on a tablet. Ready sleeves need to wash. Then make press - steaming both sides through wet tissue. Put ready sleeve on the pattern, check it and make corrections if it is necessary to get the right size. Connect the joint along the seam (stitch ). Crochet into the fabric.

β€” Working on Sliding Tailor's Dummy :

Round 9 :

I recommend starting to master Irish lace with small products - a napkin, a handbag, a collar. And then - from the easiest to the most difficult, from small to large. Your will learn to surprise the world with the unique beauty of your skillful fingers.

Round 10 :

Working on a sliding tailor's dummy allows me to AVOID errors in the construction of drawings and REMOTELY FALL INTO THE SIZE OF THE CUSTOMER BY 100%, since it is possible to put a copy of the figure. Mechanisms can be regulated separately for the breast, the waist, and the hip volumes. If it is necessary to build a drawing, I ask professionals in sewing atelier to make a draft from cotton single-tone fabric. The color of the fabric has to be contrast color than color of the work.

Info :

More details about how to attach a sleeve into a fabric and about working with the mannequin and its kinds on page 8.

β€” Crochet the motives and finish them :

Info :

Crochet the motives. Hide thread tips, use a sewing needle. Pull thread gently into motif. Wash all the motives. Spread them to dry. Steam them using an iron.

Info :

Lay out the motives face down on a right size pattern. Pin the motives to the pattern using tailor pins. Attach motives carefully and strong (motives don't have to move).

β€” Joining motifs, crochet net :

Info :

Now join the motives, crochet net to fill the space between the motives. There is no "correct" or "incorrect" way to join the motives together. It depends on your preferences. Use a crochet hook to join the motives.

Info :

To crochet net use the same thread as for the motives but thinner one or take a sewing thread. Join the motives on the back side at a few points to each other. Don't cut thread at each point. Pull it accurately inside motif from one point to another. Use chains, double or treble crochet to make net. Connect them to motives or each other, insert hook under the two loops.

β€” Begin crocheting the irregular mesh :

Info :

Begin crocheting the irregular mesh on the tablet from the sleeves. on a tablet, you can print a grid pattern and knit on it. An example is like this napkin. Where the arrow is - vosushny loops, where 2 stripes - a column with 2 yarns.

β€” Handmade Tablet (Plate) :

Item Name (P1) :

HANDMADE TABLET (PLATE) - YOU CAN DO A TABLET YOURSELF. 1. Buy a building polystyrene foam (Styrofoam) plate 5cm thickness (2 inch), 25 kg/mΒ³ density. The higher the density, the better! Usually it is sold 1x2 m panels (24 in. * 48 in. or 48 in. * 8 feet).

Item Name (P2) :

2. Cut the tablet desired size with a stationery knife.

Item Name (P3) :

3. Wrap with food plastic wrap - and crochet with pleasure!

Info :

ATTENTION - CUT THE FOAM OUTSIDE - LOTS OF FOAM CRUMBS!!!

β€” Crochet Symbols & Stitch Conversions :

Info :

CROCHET SYMBOLS: chain (us/uk); crochet beginning; turning chain (us/uk); 5 chain join into a ring (us/uk); slip stitch (us/uk); 6 chain arch (us/uk); single crochet (us) = double crochet (uk); half double crochet (us) = half treble crochet (uk); double crochet (us) = treble crochet (uk); treble (triple) crochet (us) = double treble crochet (uk); double treble crochet (us) = treble treble crochet (uk); crossover stitches (us/uk); double crochet 3 stitches together (us) = treble crochet 3 stitches together (uk); double crochet increase by 2 more stitches (us) = treble crochet increase by 2 more stitches (uk); puff stitch (us/uk); mirror reverse sc (us) = mirror reverse dc (uk); reverse sc (us) = reverse dc (uk); picot (us/uk)

Info :

United states / United kingdom abbreviations conversion: sl st (slip stitch) = sc (single crochet) etc. See symbol chart images for full list and diagrams.

β€” Diagrams and Joining Sequence :

Info :

Reference motif chart shows numbered joining sequence for a section of the dress where motifs are joined in order labelled 1 through 23 to create irregular mesh and connect circular tops into the net; follow the diagram to replicate the sample composition.

β€” Final Notes & Assembly :

Info :

Use a styrofoam tablet for sleeves. Collecting a dress with a mesh on a sliding tailor's mannequin. Pin motifs wrong side up and perform joining from the back side at several points. Check fit on the mannequin and adjust spacing and net until satisfied before final permanent joins.

Assembly Instructions

  • Lay out all motifs wrong side up on a pattern of the dress and pin them tightly in the desired composition before joining.
  • Join motifs from the back side at several points using chains, double or treble crochet; do not cut thread at every pointβ€”pull the thread along inside motif to the next joining point.
  • Use a styrofoam tablet wrapped in plastic to build and block sleeve patterns, steam-press both sides of ready sleeves, check on pattern and make corrections before attaching.
  • After joining motifs into panels, attach panels to a sliding tailor's dummy to check fit; adjust composition and net spacing to match desired size before final seams.
  • Hide thread tips by stitching tails 3-4 times through dense areas of motifs, then wash and press-steam motifs before final assembly.

Important Notes

  • πŸ’‘Work motifs tightly and consistently; if your motif is loose, try a smaller hook to keep shapes uniform.
  • πŸ’‘Always leave 10-12 cm thread tails for hiding; use a sewing needle to pull and secure tips inside motif to avoid visible knots.
  • πŸ’‘Wash and wet-steam (press-steam) motifs on both sides through a moist cloth to stabilize sizes and prevent distortion after joining.
  • πŸ’‘Pin all parts firmly on the pattern before sewing to ensure accurate placement and symmetry.
  • πŸ’‘When making the net between motifs, use the same or slightly thinner thread and insert the hook under two loops for secure joins.

This Irish-lace floral dress pattern shows how small motifs become coutureβ€”made by hand and full of character. Follow the step-by-step finishing, blocking and joining tips to create a durable, beautiful garment. Use a tablet for sleeve shaping and a sliding mannequin for perfect fit. 🧡🌸✨

You ask,

we answer.

FAQs

What size will the finished dress be?

The final size depends on how many motifs you make and how you compose them; use a sliding tailor's dummy and the pattern layout to customize fit to the customer's measurements.

Can I use different thread weights for motifs and net?

Yes. The pattern suggests using the same thread for motifs and a slightly thinner thread or sewing thread for the net to keep the mesh delicate and unobtrusive.

Do I need to wash and steam motifs before joining?

Yes. Washing and both wet-steaming and press-steaming motifs stabilizes shrinkage, ensures consistent sizes and prevents distortion of the finished garment.

Is this suitable for beginners?

This pattern is advanced due to many small motifs, precise finishing and complex assembly; beginners should start with smaller Irish-lace projects first.