🧢 Beautiful ✨ Detailed πŸ’ Adorable

Hermione Granger Amigurumi Pattern

Hermione Granger Amigurumi Pattern
4.4β˜… Rating
5-7 Hours Time Needed
3.0K Made This
βœ‚οΈ

Intermediate Level

Ideal for those with basic crochet experience, featuring slightly more advanced stitches and techniques to expand your skills.

⏱️

Weekend Treat

Takes 5-7 hours, making it an enjoyable project to finish over a couple of days.

🧸

Cute Companion

An adorable friend to cherish, handcrafted with love to bring comfort and joy for years to come.

About This Hermione Granger Amigurumi Pattern

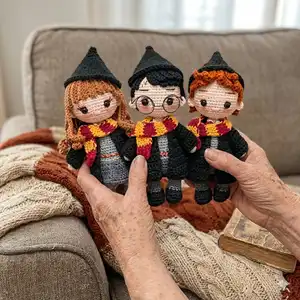
This pattern makes a Hermione Granger inspired amigurumi complete with school uniform, hat, scarf, and book. The project includes detailed instructions for head, body, limbs, hair strands, jacket and accessories. It uses cotton thread and small hook for a detailed, collectible-sized doll.

Hermione Granger Amigurumi Pattern crochet pattern - detailed view of completed project

Includes clear abbreviations, stitch counts, and placement notes for eyes and ears. Perfect if you enjoy adding tiny embroidered details and sewing small accessories.

Why You'll Love This Hermione Granger Amigurumi Pattern

I absolutely love this pattern because it captures character details in a small, handmade doll that tells a story. I enjoy working the tiny scarf and the layered hair strandsβ€”they bring so much personality. The construction is satisfying as you join legs into the body and attach arms seamlessly. I also love that you can customize colors and tiny accessories to make unique versions.

Hermione Granger Amigurumi Pattern step 1 - construction progress Hermione Granger Amigurumi Pattern step 2 - assembly progress Hermione Granger Amigurumi Pattern step 3 - details and accessories Hermione Granger Amigurumi Pattern step 4 - final assembly and finishing

Switch Things Up

I love customizing this pattern by changing scarf colors or hair tones for unique characters.

I often make a mini set: try different house colors to create other students with the same base pattern.

I sometimes use a slightly thicker cotton thread and a larger hook to make a chunkier, cuddlier version.

For a tiny keychain, use a thinner thread and smaller hook to scale down the doll size.

I add embroidered freckles or blush for more personalityβ€”use soft pastel embroidery for subtle shading.

If you want posable limbs, I add a thin wire inside the arms and legs before stuffing for gentle posing.

Change the book to different colors, or embroider initials on the cover to personalize gifts.

Try felt or tiny crocheted glasses as an accessory to change the doll's look instantly.

I occasionally add a removable cape or hat made with contrasting yarn for seasonal variations.

Play with hair styles: longer strands, braids, or shorter curls change the whole character feel.

Use metallic thread sparingly for tiny details like buttons or tie highlights to add sparkle.

I recommend testing changes on a small swatch before committing to the whole doll to ensure scale and proportion work well.

Common Mistakes & How to Fix Them

βœ— Skipping the safety eye placement note can misplace the eyes; place safety eyes between rounds 8 and 9 separated by 6 or 7 stitches as instructed. βœ— Forgetting to leave the thread of the second leg attached will make joining to the body harder; do not cut the thread of the second leg so you can continue into the body smoothly. βœ— Overstuffing the legs and body creates a lumpy or distorted shape; stuff lightly and gradually to maintain smooth shaping and proportions. βœ— Not working in the correct loop (FLO or BLO) will change the texture and fit of jacket or hair rows; follow BLO/FLO instructions exactly where indicated for proper finish.

Hermione Granger Amigurumi Pattern

Create your own Hermione Granger amigurumi complete with school uniform, scarf and curly hair. This pattern guides you step-by-step through crocheting small accessories and carefully placed hair strands so your doll looks full of character. You will enjoy making the Gryffindor outfit and adding tiny details like the book and necktie. Perfect for gifting or adding to a handmade collection.

Intermediate 5-7 Hours

Materials Needed for Hermione Granger Amigurumi Pattern

β€” Main Fabric

  • 01
    Cotton thread: peach (skin tone) - as needed for head, arms and legs
  • 02
    Cotton thread: black - used for shoes, jacket, and details
  • 03
    Cotton thread: yellow - small amounts for scarf stripes and tie detail
  • 04
    Cotton thread: red - small amounts for scarf stripes and tie detail
  • 05
    Cotton thread: dark gray - for hat and jacket details
  • 06
    Cotton thread: gray - for skirt and legs
  • 07
    Cotton thread: white - for neck and book pages
  • 08
    Cotton thread: brown - for hair and book cover
  • 09
    Fiberfill stuffing - for body, head and limbs
  • 10
    Embroidery threads: red and yellow - for tie detail
  • 11
    Button - for book closure or decoration
  • 12
    Safety eyes - as listed in materials

β€” Tools Required

  • 01
    Crochet hook 1.10 mm
  • 02
    Fiberfill for stuff
  • 03
    Safety eyes
  • 04
    Tapestry needle
  • 05
    A button
  • 06
    Embroidery threads red and yellow

Progress Tracker

0% Complete

β€” Arms :

Info :

Start with peach color.

Round 1 :

5 sc in a MR (5)

Round 2 :

5 sc (5)

Round 3-8 :

5 sc (5)

Info :

Change to gray color. Do not stuff. Close with 2 sc.

β€” Legs :

Round 1 :

6 sc in a MR (6)

Round 2 :

6 sc (6)

Info :

Change to gray color.

Round 3-4 :

6 sc (6)

Info :

Change to peach color.

Round 5-6 :

6 sc (6)

Info :

Stuff lightly. Make 2. Do not cut the thread of second leg. Continue with the body.

β€” Body :

Round 1 :

Continue with peach color: Ch 4, 6 sc (first leg), 4 sc over the ch, 6 sc (second leg) (20)

Round 2 :

20 sc (20)

Round 3 :

7 sc, 1 dec, 8 sc, 1 dec, 1 sc (18)

Info :

Change to gray color.

Round 4 :

6 sc, 1 dec, 8 sc, 1 dec (16)

Round 5 :

BLO; 6 sc (6)

Round 6-7 :

6 sc (6)

Round 8 :

Attaching the arms: 1 sc (body and arm), 5 sc in body only, 2 sc (body and arm), 7 sc in body only, 1 sc (body and arm) (16). Stuff.

Round 9 :

2 sc, 1 dec, [1 dec, 2 sc] x 3 (12)

Info :

Change to peach color.

β€” Head (Cabeza) :

Round 1 :

2 sc, 1 dec (8)

Round 2 :

Inc x 9 (18)

Round 3 :

1 sc, 1 inc (27)

Round 4 :

2 sc, 1 inc (36)

Round 5 :

3 sc, 1 inc (45)

Round 6-10 :

45 sc (45)

Info :

SAFETY EYES: between rounds 8 and 9, separated by 6 or 7 stitches.

Round 11 :

7 sc, 1 dec (40)

Round 12 :

8 sc, 1 dec (36)

Round 13 :

4 sc, 1 dec (30)

Round 14 :

3 sc, 1 dec (24)

Round 15 :

2 sc, 1 dec (20)

Round 16 :

1 sc, 1 dec (12)

Round 17 :

6 dec (6)

Info :

Embroider the eyebrows.

β€” Ears :

Round 1 :

3 sc in a MR (3)

Info :

Sew them between rounds 7 and 9.

β€” Hair :

Round 1 :

With brown color: 6 sc in a MR (6)

Round 2 :

6 inc (12)

Round 3 :

BLO: 1 sc, 1 inc (18)

Info :

Now we are working each strand over the stitches of round 3. When you finish each strand move to the next stitch of round 3 with a slst.

Round 4-8 :

1 to 5: Ch 6: from the third ch: 4 hdc (4)

Round 9-21 :

6 to 18: Ch 18: from the second ch: inc of sc x 4, 8 sc, 5 hdc (21)

Info :

Work now in FLO of round 2, the same way.

Round 1-12 :

1 to 12: Ch 12: 12 sc (12)

Info :

Strands 1-5 go on the forehead. The others cover the head.

β€” Jacket :

Info :

BACK PART x 1: With black color, working in turning rounds, ch1 at the beginning.

Round 1 :

Ch 9: from the second ch, 8 sc (8)

Round 2-10 :

2 to 10: 8 sc (8)

Info :

FRONT PART x 2: With black color, working in turning rounds, ch1 at the beginning.

Round 1 :

Ch 4: from the second ch, 3 sc (3)

Round 2-10 :

2 to 10: 3 sc (3)

Info :

Sew the shoulders of the back and the front part (only 3 stitches on each shoulder). Sew the side part only 6 stitches (the rest of stitches are the armhole). Make an edge with sc.

β€” Sleeves :

Info :

Working on the armhole:

Round 1 :

[2 sc, 1 inc] x 3, 1 sc (13)

Round 2-3 :

2 to 3: 13 sc (13)

Info :

Cut.

β€” Book :

Info :

Brown part x 2: in turning rounds with ch 1 at the beginning.

Round 1 :

Ch 5: 4 sc (4)

Round 2-5 :

2 to 5: 4 sc (4)

Info :

Cut.

Info :

White part: in turning rounds with ch 1 at the beginning.

Round 1 :

Ch 5: 4 sc (4)

Round 2-10 :

2 to 10: 4 sc (4)

Info :

Cut. Fold in half the white part, put it between both brown parts, sew them finishing the book.

β€” Scarf :

Info :

Start with red color and then change to yellow every other 2 rounds. Working in turning rounds, ch1 at the beginning.

Round 1 :

Ch 3: from the second ch, 2 sc (2)

Round 2 :

2 sc (2)

Info :

Change to yellow color.

Round 3-4 :

3 and 4: 2 sc (2)

Info :

Change to red color. Continue to round 42 (finishing with red color).

β€” White neck :

Round 1 :

With white color: Ch 18: from the third ch: 1 inc of hdc, 14 sc, 1 inc of hdc (18)

β€” Tie :

Info :

Work with two strands of embroidery threads: yellow and 2 red, together.

Round 1 :

Ch 5: from the second ch, 3 sc, inc of 5 hdc, 3 sc on the other side of the ch. Cut.

β€” Skirt :

Info :

Join dark gray color in FLO of round 4 of the body.

Round 1 :

[3 sc, inc] x 4 (20)

Round 2 :

[4 sc, inc] x 4 (24)

Round 3-4 :

3 to 4: 24 sc (24)

Info :

Cut.

β€” Final details :

Info :

Sew or glue the White neck around the neck of the amigurumi.

Info :

Put her the tie. Sew on the book and scarf as desired. Embroider eyebrows and facial details.

Assembly Instructions

  • Place safety eyes between rounds 8 and 9 of the head, separated by 6 or 7 stitches, before stuffing the head fully.
  • Attach head to body by continuing from the body rounds as instructed; stuff and close the head after round 17 of the head section and embroider eyebrows before final closing.
  • Sew the jacket shoulders by joining back and front parts with only 3 stitches on each shoulder, then sew side seams leaving 6 stitches for the armhole; finish with a sc edge.
  • Fold the white book part in half, place it between the two brown book covers and sew around the edges to finish the book.
  • Sew or glue the white neck around the doll's neck and secure the embroidered tie in front; position scarf and small accessories before final fastening.

Important Notes

  • πŸ’‘All pieces are worked in a spiral unless otherwise indicated in the pattern.
  • πŸ’‘Place safety eyes between rounds 8 and 9 and ensure they are separated by 6 or 7 stitches for correct placement.
  • πŸ’‘Do not cut the thread of the second leg so you can continue seamlessly into the body construction.
  • πŸ’‘Stuff lightly and gradually to keep smooth shaping and avoid lumps in small parts.
  • πŸ’‘Embroider eyebrows and facial details before closing the head for easier placement and neater results.

This Hermione Granger amigurumi pattern captures playful school-day charm with tiny details like a scarf, tie, and book. Make a sweet Gryffindor doll to gift or display. Enjoy stitching the curly hair strands and personalizing colors! 🧢✨

You ask,

we answer.

FAQs

What size will the finished piece be?

The finished amigurumi measures approximately a small collectible doll size depending on your yarn and hook; using the recommended cotton thread and 1.10 mm hook yields a detailed small doll suitable for display.

Can I use different yarn weights for this pattern?

Yes, you can change yarn weight but the final size will vary; use a suitable hook for the yarn you choose and expect proportion adjustments.

Do I need prior crochet experience for this pattern?

This pattern is rated intermediate, so basic crochet knowledge of magic ring, single crochet, increases, decreases, and working in FLO/BLO is recommended.

How long does this project typically take to complete?

Most crocheters finish this project in 5-7 hours, though time may vary based on experience and how much time you spend on hair strands and details.