🧢 Beautiful ✨ Detailed πŸ’ Adorable

Bunny-Carrot Amigurumi Pattern

Bunny-Carrot Amigurumi Pattern
4.9β˜… Rating
5-7 Hours Time Needed
2.8K Made This
βœ‚οΈ

Intermediate Level

Ideal for those with basic crochet experience, featuring slightly more advanced stitches and techniques to expand your skills.

⏱️

Weekend Treat

Takes 5-7 hours, making it an enjoyable project to finish over a couple of days.

🧸

Cute Companion

An adorable friend to cherish, handcrafted with love to bring comfort and joy for years to come.

About This Bunny-Carrot Amigurumi Pattern

This pattern creates a tiny bunny tucked into a carrot-shaped shell, complete with embroidered facial details, removable ears that close like a shell, and leafy greens. It uses sport-weight yarn and small hooks to achieve tight stitches and fine shaping. The design is perfect for a unique gift, keychain-style decoration, or an Easter tabletop friend.

Bunny-Carrot Amigurumi Pattern crochet pattern - detailed view of completed project

Detailed round-by-round instructions are provided for body, head, limbs, ears, tail, greens and assembly. The pattern includes embroidery guidance, attachment techniques, and exact placement tips.

Why You'll Love This Bunny-Carrot Amigurumi Pattern

I absolutely love this pattern because it combines a classic amigurumi bunny with a playful carrot-shell design that feels magical to assemble. I enjoy how the ears fold into the orange shell β€” it adds a charming hiding-place element that surprises friends and family. The tiny embroidered face details let me personalize each bunny with different expressions. Making each little green curl and sewing it into place is a satisfying finish that makes the piece feel truly handmade.

Bunny-Carrot Amigurumi Pattern step 1 - construction progress Bunny-Carrot Amigurumi Pattern step 2 - assembly progress Bunny-Carrot Amigurumi Pattern step 3 - details and accessories Bunny-Carrot Amigurumi Pattern step 4 - final assembly and finishing

Switch Things Up

I love how this pattern adapts to color swaps β€” try pastel oranges and mint greens for a soft spring version that looks great on a baby nursery shelf.

I sometimes make a tiny keyring version by using thinner yarn and a 1.5 mm hook; this creates a pocket-sized charm perfect for bags.

I often experiment with facial expressions: move the eyes slightly higher or lower, or change the mouth curve to give each bunny a unique personality.

Swap the pink tummy for cream or beige to give a different contrast against the gray body, or use variegated yarn for a marbled effect.

For a more plush finish, use slightly heavier stuffing and a tighter tension, or use thinner stuffing for a more delicate look β€” I choose based on how the bunny will be handled.

I sometimes sew a small bell or charm inside the carrot shell for a playful surprise when it opens.

To make the ears posable, add a thin wire inside before closing, then secure ends so they are safe and won’t poke through the yarn.

Try embroidering freckles, eyelashes, or tiny teeth for extra character; I personally enjoy adding tiny embroidered accents to make each bunny special.

If you want a larger display piece, use aran or worsted weight yarn and a larger hook β€” increase the greens and carrot pieces proportionally to match the scale.

I also like crafting themed variations β€” a Halloween bunny in orange-and-black or a Christmas version in red and green β€” small color changes make it festive instantly.

Common Mistakes & How to Fix Them

βœ— Placing safety eyes too late can misposition them; insert the safety eyes between rounds 23-24 with 10-12 single crochets between them to ensure correct spacing. βœ— Overstuffing the head and body will distort shape and make sewing difficult; stuff gradually, adding small amounts while shaping to maintain a smooth surface. βœ— Skipping stitch markers causes round miscounts and uneven shaping; place a marker at the start of each round and move it after each round to keep track. βœ— Changing colors carelessly leaves long visible tails along seams; weave in ends as you work and leave long tails where pieces will be sewn for easier finishing. βœ— Not counting stitches after increases or decreases leads to incorrect shaping; count stitches after each shaping round and before continuing to the next round.

Bunny-Carrot Amigurumi Pattern

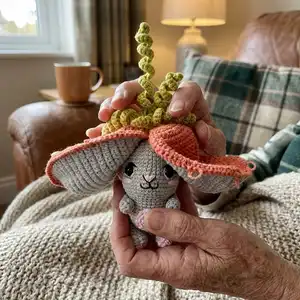
Make a charming Bunny-Carrot amigurumi that doubles as a tiny gift or tabletop decoration. This pattern guides you through crocheting the bunny body, ears that become a carrot shell, leafy greens and tiny details. You'll get step-by-step rounds, embroidery instructions, and assembly tips so your little bunny looks polished and adorable.

Intermediate 5-7 Hours

Materials Needed for Bunny-Carrot Amigurumi Pattern

β€” Main Fabric

  • 01
    Sport weight 4ply yarn (Yarn Art Jeans 50g / 160m) - N23 Orange (for carrot shell) - approx one skein or 50g
  • 02
    Sport weight 4ply yarn (Yarn Art Jeans 50g / 160m) - N29 Light Green (for greens) - small amount, 10-20g
  • 03
    Sport weight 4ply yarn (Yarn Art Jeans 50g / 160m) - N49 Gray (main bunny body) - approx 50g
  • 04
    Sport weight 4ply yarn (Yarn Art Jeans 50g / 160m) - N53 Black (embroidery details) - small amount
  • 05
    Sport weight 4ply yarn (Yarn Art Jeans 50g / 160m) - N62 White (eye whites) - small amount
  • 06
    Sport weight 4ply yarn (Yarn Art Jeans 50g / 160m) - N74 Pink (tummy, nose, cheeks) - small amount
  • 07
    Polyester stuffing / fiberfill - small bag for stuffing head, body and limbs

β€” Tools Required

  • 01
    Crochet hook size 1.75 mm
  • 02
    Safety eyes 10 mm (2 pieces)
  • 03
    5 Buttons (small) for ear closure
  • 04
    Sewing pins for positioning
  • 05
    Needle for sewing pieces and embroidery
  • 06
    Scissors
  • 07
    Yarn needle for weaving ends and sewing parts together
  • 08
    Stitch markers
  • 09
    Polyester stuffing (fiberfill)

Progress Tracker

0% Complete

β€” Body-Head :

Info :

Body With Gray yarn.

Round 1 :

6sc in MR

Info :

Place row marker here.

Round 2 :

6inc (12)

Round 3 :

(1sc, inc) *6 (18)

Round 4 :

(2sc, inc) *6 (24)

Round 5 :

(3sc, inc) *6 (30)

Round 6 :

(4sc, inc) *6 (36)

Round 7 :

(5sc, inc) *6 (42)

Round 8-10 :

42sc (3 rounds) (42)

Round 11 :

(2sc, dec) *6, 18sc (36)

Round 12-16 :

36sc (5 rounds) (36)

Info :

Stuff with fiberfill in the process.

Info :

Head

Round 17 :

(1sc, inc) *18 (54)

Round 18-21 :

54sc (4 rounds) (54)

Round 22 :

(7sc, dec) *6 (48)

Round 23 :

(6sc, dec) *6 (42)

Round 24-28 :

42sc (5 rounds) (42)

Info :

Insert the eyes between rounds 23-24 at a distance of 10-12 sc.

Round 29 :

(5sc, dec) *6 (36)

Round 30 :

(4sc, dec) *6 (30)

Round 31 :

(3sc, dec) *6 (24)

Info :

Stuff the head with fiberfill.

Round 32 :

(2sc, dec) *6 (18)

Round 33 :

(1sc, dec) *6 (12)

Round 34 :

6dec

Info :

Fasten off, cut the yarn, weave in the ends.

β€” Embroidery :

Info :

Embroider the nose with pink thread.

Info :

Embroider the whites of the eyes with white thread.

Info :

Embroider the upper eyelids and the outline of the nose with black thread.

Info :

Embroider the cheeks with pink thread.

Info :

Embroider the mouth with black thread.

β€” Tummy :

Info :

With Pink yarn.

Round 1 :

6sc in MR

Info :

Place row marker here.

Round 2 :

6inc (12)

Round 3 :

(1sc, inc) *6 (18)

Info :

Leave a long tail for sewing.

Info :

Pin the tummy in the center of the body with pins. Sew the tummy to the body.

β€” Legs :

Info :

Legs (make 2) With Pink yarn.

Round 1 :

Chain 6. Start in the second chain from the hook: inc, 3sc, 3sc in the last chain, 4sc (12)

Info :

Place row marker here.

Round 2 :

Change color to Gray. 2inc, 3sc, 3inc, 3sc, inc (18)

Round 3 :

8sc, (4-dc Bobble st, sc) *3, 4sc (18)

Info :

Stuff with fiberfill in the process.

Round 4 :

4sc, 6dec, 2sc (12)

Round 5 :

(2sc, dec) *3 (9)

Round 6 :

(1sc, dec) *3 (6)

Round 7-11 :

6sc (5 rounds) (6)

Info :

Fasten off, cut the yarn, weave in the yarn ends.

Info :

Fasten the legs with a thread mount. Attach the legs using a long needle and thread (look at the pictures below).

β€” Arms :

Info :

Arms (make 2) With Gray yarn.

Round 1 :

6sc in MR

Info :

Place row marker here.

Round 2 :

(1sc, inc) *3 (9)

Round 3 :

9sc (9)

Info :

Stuff with fiberfill in the process.

Round 4 :

(1sc, dec) *3 (6)

Round 5-8 :

6sc (4 rounds) (6)

Info :

Fasten off, cut the yarn, weave in the yarn ends.

Info :

Fasten the arms with a thread mount. Attach the arms using a long needle and thread (look at the pictures below).

β€” Tail :

Info :

With Pink yarn.

Round 1 :

6sc in MR

Info :

Place row marker here.

Round 2 :

6inc (12)

Round 3 :

12sc (12)

Round 4 :

6dec

Info :

Stuff with fiberfill. Leave a long tail for sewing.

Info :

Sew the tail to the body.

β€” Ears :

Info :

Ears (make 2). Crochet 2 pieces in Gray and 2 pieces in Orange color. Work in rows.

Round 1 :

4sc in MR, turn (4)

Round 2 :

ch1, 4inc, turn (8)

Round 3 :

ch1, (1sc, inc) *4, turn (12)

Round 4 :

ch1, (2sc, inc) *4, turn (16)

Round 5 :

ch1, (3sc, inc) *4, turn (20)

Round 6 :

ch1, 20sc, turn (20)

Round 7 :

ch1, (4sc, inc) *4, turn (24)

Round 8 :

ch1, 24sc, turn (24)

Round 9 :

ch1, (5sc, inc) *4, turn (28)

Round 10-28 :

ch1, 28sc, turn (19 rows) (28)

Round 29 :

ch1, (5sc, dec) *4, turn (24)

Round 30 :

ch1, 24sc, turn (24)

Round 31 :

ch1, (4sc, dec) *4, turn (20)

Round 32 :

ch1, 20sc, turn (20)

Round 33 :

ch1, (3sc, dec) *4, turn (16)

Round 34 :

ch1, 16sc, turn (16)

Round 35 :

ch1, (2sc, dec) *4, turn (12)

Round 36 :

ch1, 12sc, turn (12)

Round 37 :

ch1, (1sc, dec) *4, turn (8)

Round 38 :

ch1, 4dec, turn (4)

Round 39 :

ch1, 2dec

Info :

Cut and fasten the yarn for Gray piece. Continue crocheting on the Orange part.

Section :

Connecting the Gray and Orange parts together

Round 1 :

Crochet with Orange yarn through both pieces (do not turn): sl st, ch1, 84 sc (84)

Round 2 :

84sc, sl.

Info :

Cut the yarn, weave in the ends.

Info :

Embroider the stripes on the orange part with a black thread.

Info :

Sew the ears to the head: attach the ear exactly to the center of the head, while making sure that the bunny is exactly half closed with the ear. Sew the ears in the center of the head.

Info :

Close the bunny in the ears. Align the halves and fix them with pins. Pull one ear slightly over the other.

Info :

Sew buttons at an equal distance along the edge of first ear.

Info :

Make loops on the edge of the second ear, opposite the buttons.

β€” Greens :

Info :

With Light Green yarn. Leave a long tail for sewing.

Round 1 :

ch31, from the second chain: 30inc (60)

Round 2 :

ch41, from the second chain: 40inc (80)

Round 3 :

ch51, from the second chain: 50inc (100)

Round 4 :

ch41, from the second chain: 40inc (80)

Round 5 :

ch31, from the second chain: 30inc (60)

Info :

Sew the greens to the junction of the orange parts.

Info :

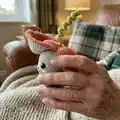
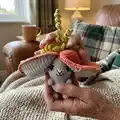
Congrats! Your Bunny is ready!!!

Assembly Instructions

  • Insert the safety eyes between rounds 23-24 of the head, spacing them 10-12 single crochet apart before continuing to round 24.
  • Pin the tummy into the center front of the body and sew the pink tummy piece to the body using the long tail left from the tummy, sewing evenly around the edge.
  • Fasten the legs with a thread-mount technique and attach the legs using a long needle and strong thread, following the picture guide for positioning and stability.
  • Fasten the arms with a thread mount and attach them to the sides of the body using a long needle and thread, ensuring symmetry and a natural pose.
  • Sew the ears (orange and gray halves) together and attach to the head center, then close the carrot shell, add buttons to one side and loops to the opposite side to secure the shell closed over the bunny.

Important Notes

  • πŸ’‘Use stitch markers to track the beginning of each round, especially during increases and decreases, to avoid losing your place.
  • πŸ’‘Stuff gradually and evenly as you shape each piece; overstuffing can distort the amigurumi and make seams hard to close.
  • πŸ’‘Pin parts in place and check symmetry before sewing; this simple step ensures the face, tummy, arms and legs are aligned correctly.
  • πŸ’‘Weave in ends as you go and leave long tails for pieces that will be sewn together to simplify assembly.

This tiny Bunny-Carrot is perfect for gifting, decorating, or keeping on your shelf as a pocket-sized friend. It combines careful shaping, sweet embroidery and a clever carrot-shell ear design for a lovable finished piece. Make one as a special handmade surprise for someone you love. 🧢😊

You ask,

we answer.

FAQs

What size will the finished piece be?

The finished amigurumi measures approximately 14-16 cm (5-6 inches) tall when using the recommended sport weight yarn and 1.75 mm hook.

Can I use different yarn weights for this pattern?

Yes, you can use different yarn weights, but this will affect the final size; choose an appropriate hook for your yarn and expect size changes.

Do I need prior crochet experience for this pattern?

This pattern is rated intermediate β€” basic amigurumi experience and familiarity with increases, decreases, bobble stitches and sewing pieces are recommended.

How long does this project typically take to complete?

Most crocheters complete this project in 5-7 hours, though time may vary depending on experience, stitching speed, and assembly time.