🧢 Beautiful ✨ Detailed πŸ’ Adorable

Herbie Hedgehog Amigurumi Pattern

Herbie Hedgehog Amigurumi Pattern
4.9β˜… Rating
5-7 Hours Time Needed
1.6K Made This
βœ‚οΈ

Intermediate Level

Ideal for those with basic crochet experience, featuring slightly more advanced stitches and techniques to expand your skills.

⏱️

Weekend Treat

Takes 5-7 hours, making it an enjoyable project to finish over a couple of days.

🧸

Cute Companion

An adorable friend to cherish, handcrafted with love to bring comfort and joy for years to come.

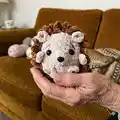
About This Herbie Hedgehog Amigurumi Pattern

This pattern creates Herbie, a plush velvet hedgehog amigurumi with a full spiral of spikes and a sweet expressive face. The pattern uses bulky velvet yarn for a soft, squishy texture and medium yarn for facial details and spikes. Instructions include head/body shaping, eye shaping, nose, ears, legs, arms and step-by-step spike application. Helpful photos and shaping instructions guide you through finishing and assembly.

Herbie Hedgehog Amigurumi Pattern crochet pattern - detailed view of completed project

Designed for intermediate crocheters comfortable with continuous rounds and hand-sewing, this pattern rewards you with a cuddly 6" hedgehog. Detailed tips for eye shaping, spike placement and finishing ensure a professional look.

Why You'll Love This Herbie Hedgehog Amigurumi Pattern

I absolutely love this pattern because it turns simple stitches into a charming, tactile character that everyone adores. I love the contrast between the plush velvet face and the textured spiral spikes β€” it makes Herbie feel like a tiny, huggable animal. The shaping techniques for the eyes and nose give so much personality with only a few finishes, which always delights me. I enjoy how customizable the pattern is β€” you can change colors, eye size or spike density to create unique versions every time.

Herbie Hedgehog Amigurumi Pattern step 1 - construction progress Herbie Hedgehog Amigurumi Pattern step 2 - assembly progress Herbie Hedgehog Amigurumi Pattern step 3 - details and accessories Herbie Hedgehog Amigurumi Pattern step 4 - final assembly and finishing

Switch Things Up

I love how easy this design is to customize by color β€” try soft pastels for a nursery-friendly Herbie or deep autumn browns for a rustic look.

You can make a mini keychain version by swapping to a lighter weight yarn and a smaller hook to shrink the whole pattern.

I often change eye size for different personalities β€” small safety eyes for a shy look or larger eyes for a cuter expression.

Try using variegated or boucle yarn for the spikes to give a textured, multi-tonal appearance that hides small gaps between spirals.

I sometimes embroider a tiny smile or freckles instead of using a safety nose for a softer, handmade feel.

For a poseable version, add thin wire inside the arms so you can bend them into different positions for display.

Add tiny accessories like a crocheted scarf, bow, or tiny felt props to create seasonal or gift-ready versions.

Play with spike density by changing the chain length and spacing β€” shorter chains for denser spikes, longer chains for more pronounced loops.

I like offsetting spike spirals slightly for fullness; you can also trim very slightly for a bristly look, but be careful with velvet yarn.

Make a family set by altering yarn weights and hook sizes to create small, medium and large Herbies to display together.

Use safety noses or embroider the nose in different colors to vary expression β€” black for classic, brown for a gentler look.

Common Mistakes & How to Fix Them

βœ— Skipping the stitch marker when working in continuous spiral will cause lost row counts; place a marker at the start of each round and move it after each round to stay on track. βœ— Forgetting to stuff gradually results in lumps or a misshapen body; stuff a little after round 17 and continue stuffing after each subsequent row until complete to maintain even shape. βœ— Not leaving long tails when finishing small pieces makes sewing difficult; always leave a 12" tail when slst and tying off so you have enough yarn to securely sew pieces on. βœ— Placing safety eyes too early or too close together changes expression; place eyes between rounds 9 and 10 with 4-5 stitches between and check placement before securing. βœ— Pulling yarn too tightly while shaping the eyes can distort the head shape; pull gently and tie off once the desired indentation is achieved, then weave in ends to secure.

Herbie Hedgehog Amigurumi Pattern

Make your own cuddly Herbie Hedgehog with this friendly amigurumi crochet pattern. You'll follow clear step-by-step instructions, photos, and helpful shaping tips to create a 6" hedgehog full of personality. Perfect as a handmade gift or a cute addition to your nursery or shelf. Grab your velvet yarn and start stitching this charming little companion today.

Intermediate 5-7 Hours

Materials Needed for Herbie Hedgehog Amigurumi Pattern

β€” Main Fabric

  • 01
    Colour A: 60g bulky size 6 velvet yarn (I used Baby Snuggle in beige)
  • 02
    Colour B: 100g super bulky size 6 velvet yarn (I used Baby Snuggle in Teddy Bear)
  • 03
    Colour C: 5 yards medium size 4 yarn (Brown) for eyebrows and spike framing
  • 04
    Colour D: 5 yards medium size 4 yarn (Black) for eye shaping and details
  • 05
    Fiber fill (approx 24oz) for stuffing
  • 06
    14mm safety eyes (2 pieces)
  • 07
    Safety nose (1 piece)

β€” Tools Required

  • 01
    Crochet hook size 5.5mm (for head/body, bulky yarn)
  • 02
    Crochet hook size 3.5mm (for spikes, smaller hook)
  • 03
    Darning needle for sewing and shaping
  • 04
    Scissors
  • 05
    Fabric pins for positioning pieces
  • 06
    Stitch marker to mark beginning of rounds
  • 07
    Polyester stuffing (fiber fill, approx 24oz)
  • 08
    14mm safety eyes (2 pieces)
  • 09
    Safety nose
  • 10
    Pins for spike framing (optional)

Progress Tracker

0% Complete

β€” Head/Body :

Round 1 :

mr, sc 8 (8)

Round 2 :

[inc] x8 (16)

Round 3 :

[sc, inc] x8 (24)

Round 4 :

sc 24 (24)

Round 5 :

[sc 2, inc] x8 (32)

Round 6-15 :

sc 32 (10 rounds) (32)

Round 16 :

[sc 2, dec] x8 (24)

Round 17 :

sc 24 (24)

Info :

Stuff with fiber fill after row 17 and continue to stuff every row until complete.

Info :

Place eyes between rounds 9 and 10 with 4-5 stitches in between.

Round 18 :

[sc, dec] x8 (16)

Round 19 :

[dec] x8 (8)

Info :

Slst to next stitch. Weave through outside loops of 8 remaining stitches and pull tight to close. Then tie off and weave in ends.

β€” Shaping the Face :

Info :

1) Using your darning needle and Colour D Yarn, insert into the top inner corner of one eye.

Info :

2) Push the darning needle over from the top of eye one to the top of eye two. You should now have one strand of yarn hanging from both eyes.

Info :

3) Take the darning needle and now insert one strand into the bottom inner eye.

Info :

4) Push the needle through the body to the back of the head.

Info :

5) Repeat steps 3 and 4 for the other eye. Then tie the two strands together once you have pulled the eyes to their desired shape. Weave in ends.

Info :

6) Eye shaping complete.

β€” Nose :

Round 1 :

mr, sc 4 (4)

Round 2 :

[sc, inc] x2 (6)

Round 3 :

[sc 2, inc] x2 (8)

Info :

Slst and tie off. Leave 12" strand of yarn to sew*

Info :

1) Place safety nose on the top of round 1.

Info :

2) Using fabric pins, place nose on round 9-12 centered between the eyes. Sew on using a darning needle. *if no safety nose you can also embroider a nose in the same place*

Info :

3) Once sewn halfway on, place a small amount of fiber fill if required.

β€” Eyebrows and Spike Framing :

Info :

EYEBROWS - 1) Using darning needle and Colour C Yarn, insert the needle into the top of round 9, one stitch over from the top of the eye.

Info :

2) Then insert the needle 2 rounds up and about 1-2 stitches over so it’s in line with the top centre of the eye.

Info :

3) Push the needle over and repeat for the other eye.

Info :

SPIKE FRAMING - 1) Using a darning needle and any colour medium yarn, insert the needle into the bottom of round 3 centered between the eyes.

Info :

2) Continue around the head marking the area that the spikes will start. You want to be about 2-3 stitches from the corner of the eyebrows, 5 stitches from the nose. On the bottom it should be on the bottom of round 16.

β€” Spikes :

Info :

1) With colour B yarn, make a slip knot on your smaller 3.5mm hook.

Info :

2) Using the spike framing as a reference, insert the needle in the top center point that we placed on the bottom of round 3. Make a slst.

Info :

3) Chain 4. Skip the first chain and place one slst in each of the remaining 3 chains.

Info :

4) Then on the head, skip one stitch and place a slst into the next stitch over.

Info :

5) Repeat steps 3 and 4 all the way around the head in a spiral until the entire head is covered.

Info :

6) Once the first spiral is done, work the second and subsequent spirals the same way as close to the first as possible to avoid gapping between rows. You also want to try and offset the spikes so it looks more full. Remove spike framing when done.

β€” Ears X2 :

Round 1 :

mr, sc 4 (4)

Round 2 :

[inc] x4 (8)

Info :

Slst and tie off. Leave 12" strand of yarn to sew on*

Info :

1) Create two ears.

Info :

2) Pinch ear in half and using a darning needle, sew one end together.

Info :

3) Using fabric pins, attach ears to round 4 and 5 of the head, directly against the spikes.

Info :

4) Using a darning needle, sew the ears on.

Info :

5) Ears attached.

β€” Legs X2 :

Row 1 :

Slip knot, ch 5 (5)

Row 2 :

Skip first chain, sc in the remaining 4 ch and then 4 sc in bottom 4 ch (8)

Info :

Slst and tie off. Leave 12" strand of yarn to sew on*

Info :

1) Using fabric pins, attach the feet to the bottom of the head directly against the spikes with 2-3 stitches in between.

Info :

2) Using a darning needle, sew on both feet.

Info :

3) If you want to sew down the feet more, insert the needle 2 rows above where you sewed the foot on.

Info :

4) Then push the needle down one stitch over. This will secure the foot in place. Tie off and weave in ends.

β€” Arms X2 :

Row 1 :

Slip knot, ch 4 (4)

Row 2 :

Skip first chain, sc in the top 3 chs and then 3 sc in bottom 3 ch (6)

Info :

Slst and tie off. Leave 12" strand of yarn to sew on*

Info :

1) Make two arms.

Info :

2) Using fabric pins, attach arms to round 11 and 12 right against the spines.

Info :

3) Using a darning needle, sew on arms. Tie off and weave in ends.

Assembly Instructions

  • Place and secure 14mm safety eyes between rounds 9 and 10 with 4-5 stitches between them before continuing to stuff; shape eyes using a darning needle and Colour D yarn as instructed.
  • Sew the nose onto rounds 9-12 centered between the eyes using fabric pins to position it, securing with a darning needle and leaving a small amount of fill if needed.
  • Attach ears to rounds 4 and 5 directly against the spikes, pinning in place for symmetry and sewing with a darning needle using the 12" tail left when finishing the ear.
  • Attach legs to the bottom of the head directly against the spikes with 2-3 stitches in between, then reinforce by inserting the needle two rows above and securing the foot.
  • Attach arms to rounds 11 and 12 right against the spines using fabric pins for placement and sew with a darning needle, then tie off and weave in ends.

Important Notes

  • πŸ’‘Work this project in a continuous spiral and use a stitch marker to mark the beginning and end of each round.
  • πŸ’‘Different tension will change the final size; this pattern is created with a slightly tighter tension for better shape.
  • πŸ’‘Leave approximately 12" yarn tails when finishing small parts to make sewing the pieces to the body easier.
  • πŸ’‘Stuff gradually and evenlyβ€”start stuffing after round 17 and continue stuffing each row until the head/body is fully formed.
  • πŸ’‘Remove spike framing when the spikes are fully worked to reveal a full, even coverage of spikes.

Herbie Hedgehog is a squishy velvet amigurumi that brings instant smiles and cozy charm. Make one as a gift or keep it on your shelf for daily delight. Perfect for gift-giving and relaxed weekend crochet sessions! 🧢🧑

You ask,

we answer.

FAQs

What size will the finished piece be?

The finished amigurumi measures approximately H: 6" W: 6" when using the recommended yarn and hook sizes (bulky velvet for the body and medium yarn accents).

Can I use different yarn weights for this pattern?

Yes, you can substitute yarn, but the finished size and texture will change; use a hook appropriate to your yarn and expect changes in the final dimensions.

Do I need prior crochet experience for this pattern?

This pattern is rated intermediate because it uses continuous rounds, shaping techniques, and hand-sewing; basic knowledge of single crochet, increases, decreases and slip stitches is recommended.

How long does this project typically take to complete?

Most crocheters complete this project in 5-7 hours, though time may vary based on experience, spike density and finishing details.

Where should I place the safety eyes?

Place safety eyes between rounds 9 and 10 with 4-5 stitches between them, and double-check placement before securing to achieve the desired expression.