About This Hammerhead Shark Friend Amigurumi Pattern
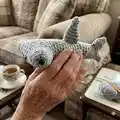
This pattern creates a sweet, small hammerhead shark amigurumi with a distinctive wide head and simple fins. You will work the head flat in rows then join and crochet around to form the body, finishing with a big fin and several small fins. The instructions include shaping tips so your shark looks smooth and neat. Ideal for gifting or creating a charming shelf buddy.

Techniques include single crochet, decreases, back loop work and simple finishing for the face. The pattern is written in US terms and includes notes on yarn and hook sizing for different finished sizes.
Why You'll Love This Hammerhead Shark Friend Amigurumi Pattern
I absolutely love this pattern because it captures the charm of a hammerhead with surprisingly simple shaping. I enjoy the mix of working in rows for the head and then joining to work in the round for the body — it feels creative and satisfying. I also love how customizable it is: switching yarn weight or hook size gives you such different results, from tiny keychain pals to chunky, cuddly friends. Finally, stitching the little smile and positioning the fins is such a small finishing touch that brings the shark to life.
Switch Things Up
I love experimenting with yarn weight and hook size to create different sizes of this shark; try DK for the original size or bulky yarn for a chunky pal.
If you'd like a tiny keychain friend, use fingering yarn with a 2.5-3.0mm hook and smaller safety eyes to match.
I often switch colors to make a two-tone shark or add a pale belly for contrast — this adds visual interest with minimal effort.
Try embroidering different mouth shapes or eye expressions with black yarn to change the shark's personality.
For a posable version, add a thin wire to the fins before stuffing, securing the ends inside the body so it can be gently posed.
Make a family of sharks by changing eye sizes and fin counts; mix tiny, medium and large to create a playful set.
Add felt or crocheted accessories like little bows, hats, or scarves to personalize each shark for gifting.
Use safety eyes, embroidered eyes, or French knots depending on the recipient's age and safety preferences.
Consider felting a subtle blush or using a slightly darker grey for shading along the back for a more lifelike look.
I also sometimes stuff more firmly in the nose to keep it pointed or add a small bead in the tail for balance when displayed.
Common Mistakes & How to Fix Them
✗ Skipping the direction to place decreases at the edges of the head will distort the shape; ensure decreases are worked into the edge stitches so the head curves correctly.
✗ Not inserting safety eyes into the beginning/end spaces can leave them misaligned; place the eyes while the head is open and count stitches to match both sides.
✗ Forgetting to stuff as you go creates lumps and uneven shaping; add stuffing gradually throughout the body shaping to keep the silhouette smooth.
✗ Using the recommended hook without adjusting for your tension can make the fabric too loose or too tight; if stitches are loose, go down 0.5mm-1mm in hook size for a firmer result.