🧢 Beautiful ✨ Detailed πŸ’ Adorable

Grumpy Mini Octopus Amigurumi Pattern

Grumpy Mini Octopus Amigurumi Pattern
4.3β˜… Rating
2-3 Hours Time Needed
4.0K Made This
βœ‚οΈ

Intermediate Level

Ideal for those with basic crochet experience, featuring slightly more advanced stitches and techniques to expand your skills.

⏱️

Bite-Sized Project

Finishes in 2-4 hoursβ€”perfect for an afternoon of creative relaxation.

🎁

Tiny Treasure

Small, sweet, and gift-worthy creations that fit perfectly in the palm of your hand with detailed charm.

About This Grumpy Mini Octopus Amigurumi Pattern

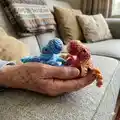
This pattern creates a Grumpy Mini Octopus amigurumi with a rounded head, small nose, and eight curled arms that wrap around branches or sit nicely as a tiny toy. The design uses variegated Red Heart Super Saver yarn to give each octopus a unique color pattern. Simple shaping, eyelid details and safety eyes create the grumpy expression that makes this little creature full of character.

Grumpy Mini Octopus Amigurumi Pattern crochet pattern - detailed view of completed project

You will work small rounds, a few shaping decreases, and four short arm patterns repeated to create eight tentacles. The finished octopus is quick to make and perfect for ornaments or pocket-sized gifts.

Why You'll Love This Grumpy Mini Octopus Amigurumi Pattern

I absolutely love this pattern because it turns simple stitches into a lot of personality β€” that grumpy face always makes me smile. I enjoy how the variegated yarn creates surprising color patterns so each octopus is unique. The curling arms are fun to make and let you play with direction to get different poses. I also love that it's small and quick, making it a great gift or ornament you can finish in an afternoon.

Grumpy Mini Octopus Amigurumi Pattern step 1 - construction progress Grumpy Mini Octopus Amigurumi Pattern step 2 - assembly progress Grumpy Mini Octopus Amigurumi Pattern step 3 - details and accessories Grumpy Mini Octopus Amigurumi Pattern step 4 - final assembly and finishing

Switch Things Up

I love customizing this pattern by swapping yarn colors to create different personalities β€” try pastel variegated yarn for a softer, whimsical octopus.

I also change the hook size and yarn weight to make tiny keychain versions or larger cuddle-sized versions; a thicker yarn and larger hook make a chunkier octopus.

I sometimes replace safety eyes with embroidered eyes for a fully washable toy or to make it suitable for babies.

Try adding tiny felt or crocheted accessories like a mini hat, bow, or scarf to personalize each octopus for gift-giving.

For posable tentacles try inserting a thin wire inside each arm before final weaving to allow shaping and display options.

Experiment with the arm patterns: mix and match Arm 1-4 to create uneven lengths and more natural looking curling.

If you want a hanging ornament, use a short loop of yarn at the top of the head before closing to hang on a branch or hook.

I like to embroider small freckles or a mouth for expression variations β€” tiny stitches can dramatically change the personality.

Make a whole series in a gradient of colors for an eye-catching display or advent calendar set of tiny sea creatures.

Use sparkly or metallic thread for occasional arms to add a bit of shimmer without changing structure.

Try stuffing the body a bit more for a plumper toy, or less for a flatter, ornament-like look; adjust according to how you plan to use your octopus.

I often create matching sets with different eyelid shapes (V-shaped, droopy, or arched) to change the emotion from grumpy to sleepy or surprised.

Common Mistakes & How to Fix Them

βœ— Skipping placement checks for the safety eyes will make the face look off-center; position eyes between rounds 2 and 3 and count 4 to 5 stitches between them before fastening. βœ— Overstuffing the body will make the octopus too round instead of somewhat flat; stuff gradually and keep stuffing light to preserve the squashed look described. βœ— Not leaving a long tail after the nose will complicate sewing; do not close the nose, leave a long tail and stuff it before setting aside to ease attachment. βœ— Ignoring arm curl direction can change the finished look dramatically; decide whether you want arms to curl up or down and work clockwise or counterclockwise accordingly. βœ— Failing to close the hole left when joining arms will leave a visible gap; use the tail and a needle to go around and close the hole left from skipping a stitch, then weave in ends.

Grumpy Mini Octopus Amigurumi Pattern

Make a tiny, grumpy mini octopus perfect as an ornament, keychain, or small toy. This pattern walks you through every stitch, round, and assembly step so you can create a charming little sea creature with curled arms and a grumpy expression. It uses variegated yarn for fun color changes and simple shaping for a polished finish. Ideal for crafters who love quick, detailed amigurumi projects.

Intermediate 2-3 Hours

Materials Needed for Grumpy Mini Octopus Amigurumi Pattern

β€” Main Fabric

  • 01
    Red Heart Super Saver variegated (examples: Ocean, Marrakesh, Stillwater Pooling) - approximately 2 oz (small skein or scraps will suffice)
  • 02
    Worsted weight yarn (#4) recommended (variegated gives best color pooling effect)
  • 03
    Small amounts of contrast yarn for eyelids or detailing (a few yards)
  • 04
    Polyester stuffing - small amount for nose and body

β€” Tools Required

  • 01
    Crochet hook size 3.5 mm (or preferred hook to match yarn)
  • 02
    6mm Safety Eyes (2)
  • 03
    Embroidery needle for sewing (or yarn needle)
  • 04
    Yarn needle for weaving ends
  • 05
    Scissors
  • 06
    Stitch markers (recommended)
  • 07
    Polyester stuffing

Progress Tracker

0% Complete

β€” Nose :

Rnd 1 :

6 sc in a mc

Rnd 2 :

(inc) 6 times (12)

Rnd 3 :

(1 sc, inc) 6 times (18)

Rnd 4-5 :

1 sc in each st around (18)

Rnd 6 :

(1 sc, dec) 6 times (12)

Rnd 7 :

(2 sc, dec) 3 times (9)

Info :

TO but do not close, leave long tail for sewing. Stuff the nose at this time. Set aside.

β€” Body :

Rnd 1 :

Ch 9 slst into first chain to close

Rnd 2-3 :

1 sc in each st around (9)

Rnd 4 :

(2 sc, inc) 3 times (12)

Rnd 5 :

(2 sc, inc) 4 times (16)

Rnd 6 :

BLO 1 sc in each st around (16)

Info :

Add eyes between rows 2 and 3 about 4 to 5 stitches apart (See Picture A). At this time you can add the eye lids in a 'V' shape to make it appear a bit grumpy (See Picture B).

Info :

Stuff the body but not too much as it should be some what flat.

Rnd 7 :

(dec) 8 times (8)

Info :

Close then reattach to FLO from round 6

Rnd 6 :

FLO 1 sc in each st around (16)

Rnd 7-8 :

1 sc in each st around (16)

Info :

We will begin making the Octopuses arms now.

β€” Arms :

Info :

Arms can be done in any number of ways. If you work the arms Clockwise they will curl up, if you work the arms counterclockwise they will curl down (See pictures C and D). Either way is fine and gives you a unique look! I prefer working counter clockwise so they curl down, if I can figure out how to alternate to get them curling in both directions I will update the pattern!!

Info :

Here are 4 arm patterns. Once you complete Arm 4 go back and repeat all arms again to get 8 arms.

Arm 1 (P1) :

Ch 20 turn, slst into 2nd chain from hook, 5 sc, sc3tog, 2 sc, 5 hdc, 3dc (should be at base of chain), skip st, sc into next st.

Arm 2 (P2) :

Ch 15 turn, slst into 2nd chain from hook, 7 sc, 6 hdc, skip st, sc into next st.

Arm 3 (P3) :

Ch 18 turn, slst into 2nd chain from hook, 3 sc, hdc3tog, 7 hdc, 3 dc, skip st, sc into next st.

Arm 4 (P4) :

Ch 20 turn, slst into 2nd chain from hook, 4 sc, 3 hdc, hdc3tog, 5 hdc, 3 dc, skip st, sc into next st.

Info :

Once you have 8 arms slst into 1st chain of 1st arm. TO leave tail. Using a needle and the tail go around and close hole left from skipping a stitch (See picture E). Weave in ends.

β€” Assembling :

Info :

Using the tail from the nose and an embroidery needle, sew the nose on. I start at the top of the head sewing the opening closed and tucking in any extra starting tail from the first chain. Try to center it between the eyes with the eyelids positioned so it is looking towards the nose. Weave in any loose ends.

Assembly Instructions

  • Attach the nose using the long tail from the nose and an embroidery needle; start at the top of the head, sew the opening closed and tuck in any extra starting tail from the first chain.
  • Position safety eyes between rounds 2 and 3 about 4 to 5 stitches apart; add small 'V' shaped eyelids above the eyes to create the grumpy expression.
  • Once you have made 8 arms, slst into the 1st chain of the 1st arm to join; leave a tail then use a needle to go around and close the hole left from skipping a stitch, then weave in ends.
  • Stuff the nose and body at the specified steps but do not overstuff; the body should remain somewhat flat for the correct silhouette.
  • Weave in all loose ends securely and check placements (eyes, nose, eyelids) before final trimming to ensure symmetry.

Important Notes

  • πŸ’‘Place eyes between rounds 2 and 3 and keep them about 4 to 5 stitches apart for best facial proportions.
  • πŸ’‘Work arms consistently clockwise or counterclockwise to control whether they curl up or down and decide before making all arms.
  • πŸ’‘Leave long tails when instructed (nose and arm joins) to make sewing and closing gaps much easier.
  • πŸ’‘Stuff gradually and keep the body slightly flattened rather than overstuffed to achieve the intended look.

This little Grumpy Mini Octopus is perfect for gifting, decorating an ornament branch, or tucking into a pocket for a tiny smile. Each one takes on unique character with variegated yarn and curled arms, making every creation special. Enjoy crafting this charming miniature sea friend β€” it will brighten your day and make a lovely handmade gift! 🧢✨

You ask,

we answer.

FAQs

What size will the finished piece be?

The finished amigurumi measures approximately 2 inches from top of nose to bottom of body and about 4-5 inches from nose to end of arms depending on yarn and tension.

Can I use different yarn weights for this pattern?

Yes, you can use different yarn weights but the final size will change; use an appropriate hook for your yarn and expect a smaller piece with thinner yarn or a chunkier result with bulkier yarn.

Do I need prior crochet experience for this pattern?

This pattern is rated intermediate, so basic knowledge of single crochet, increases, decreases, chains and working in the round is recommended for best results.

How long does this project typically take to complete?

Most crocheters complete this project in 2-3 hours depending on experience, whether you make eight arms and how much time you take to assemble and add facial details.