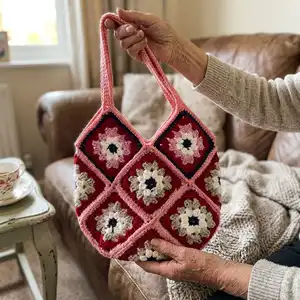
Make a charming granny square purse using leftover yarn and simple crochet techniques. This pattern walks you through making a 4" x 4" granny square, joining 13 squares, and constructing a sturdy strap for a finished 12" x 12" bag. You can customize colors and sizes to suit your style and stash. Includes step-by-step photos and a video tutorial link for extra help.
Progress Tracker
0% Complete
— Granny Square :
Round 1 :
Take your dark blue yarn and hook and begin with a magic loop.
Round 2 :
Place 8 sc stitches inside the magic loop, join with a slip stitch whit wite yarn.
Round 3 :
Join white yarn in one of the sc stitches and chain 3.
Round 4 :
First petal: after the ch 3, you need to do a 3dc crochet cluster. yo, insert hook, yo, pull through, yo pull through 2 loops only. repeat 2 more times until you have 4 loops on your hook. yo and pull through all 4 loops. ch 2. (the chain 3 counted as a dc).
Round 5 :
Remaining petals: make a 4 dc cluster in each remaining sc stitch for a total of 8 petals. yo, insert hook, yo, pull through, yo pull through 2 loops only. repeat 3 more times until you have 5 loops on your hook. yo and pull through all 5 loops. ch 2.
Round 6 :
Once petals are complete, join with a slip stitch at the top of the initial ch 2 and change color.
Round 7 :
Join gray color yarn and ch 3.
Round 8 :
Make 3 dc stitches in the next ch 2 space.
Round 9 :
In the next ch 2 space, 3 dc, ch 2, 3 dc for the first full corner.
Round 10 :
Repeat steps 8 and 9 until you get back to your ch3. 2 dc in the space before the ch 3 and change color.
Round 11 :
Join red color yarn and ch 3.
Round 12 :
Make 3 dc stitches in the next ch 2 space.
Round 13 :
In the next ch 2 space, 3 dc, ch 2, 3 dc for the first full corner.
Round 14 :
Make 3 dc stitches in the next ch 2 space.
Round 15 :
Repeat steps 12,13 and 14 until you get back to your ch3. 2 dc in the space before the ch 3 and change color.
Round 16 :
Join pink color yarn and sc all around and fasten off.
Info :
Crochet to the end of the round. Finish crocheting the last stitch with the old color. Insert your hook into the first stitch of the round. Now, yarn over with the new color of yarn, and pull through both the stitch and the loop on the hook to finish the slip stitch. This simple move accomplishes three things – it finishes the slip stitch, joins the round, and changes the yarn color all at the same time. Now you can chain up and start the next round in the new color.
— Assembly :
Info :
Arrange your squares in the order you want them, like the Assembly Chart photo below, then connect or join them together in numerical order 1-13, all with RS facing.
Info :
Connect, in numerical order, 1-13, as in photo below. Fold lines are in dashes. SM = stitch marker at top of Squares 1 & 2 where handles go. Arrows indicate fold on top of each other, 5 & 8, and 4 & 7.
Flip Stitch Granny Join Step 1 :
Color E yarn to join. Squares (blocked), hook, and yarn for the joining.
Flip Stitch Granny Join Step 2 :
a. Place the squares with the right side showing up as we are going to work on the right side of the square. b. Make a slip knot on the hook to begin, insert the hook into the back loop of the corner stitch of the first square, bring a loop out and make a slip-stitch.
Flip Stitch Granny Join Step 3 :
Insert the hook into the same back-loop corner stitch from front to back.
Flip Stitch Granny Join Step 4 :
Insert the hook into the back loop of the corner stitch of the second square, from front to back too.
Flip Stitch Granny Join Step 5 :
Yarn should be always at the bottom of your work. Now, hook the yarn and bring it up from the second square loop followed by the first square loop.
Flip Stitch Granny Join Step 6 :
Slip stitch to the first loop on the hook.
Flip Stitch Granny Join Step 7 :
Repeat the process on the second pair of stitches and so on.
Flip Stitch Granny Join Step 8 :
Continue until you reach the corner stitch right after the last double crochet stitch on this edge.
Flip Stitch Granny Join Step 9 :
Bring in squares 3 and 4, continue like the beginning of squares 1 and 2 except that you don’t have to make a slip knot onto the hook.
Flip Stitch Granny Join Step 10 :
Continue joining stitch on square 3 and 4 till the end.
Flip Stitch Granny Join Step 11 :
Follow the same instructions when you do the column join until you reach the end of your first square.
Flip Stitch Granny Join Step 12 :
Make a chain stitch to cross over the row joint and repeat the same whenever you need to cross the following row joints.
Flip Stitch Granny Join Step 13 :
Continue with the normal flat slip-stitch until you reach the end. Fasten off.
Flip Stitch Granny Join Step 14 :
Here is an example of a 13-square join.
Flip Stitch Granny Join Step 15 :
This is how the joint looks like at the back of the squares.
Fold Step 1 :
After the 13 squares have been seamed together, fold the piece upwards as shown so that the top tips of the granny squares are lined up.
Fold Step 2 :
Next, fold the side granny squares in half inwards upon themselves so that the side tips are pointing towards the granny square in the middle.
Whip Stitch Step :
Whip stitch the edges as indicated by the dotted lines: the edges of the side granny squares and the diagonals of the bottom granny squares.
Info :
You have completed the body of the bag! Weave in the ends and get ready to crochet the strap. The 13 granny squares have been seamed together and folded in a special way to create the body of the bag. It is now time to work on the top edging and sturdy strap. To begin, start in the right corner of the lower edge as indicated by the red circle. Work single crochets along all the stitches of the top edge until the blue circle.
Strap Step 1 :
As you approach the tip of the second granny square, get ready to crochet the first strap. Chain 60 and join to the tip of the first granny square with a single crochet (be careful not to twist the chain).
Strap Step 2 :
We will insert our crochet hook into back loop in top of the first granny square. Work single crochets three the stitches.
Strap Step 3 :
Turn and insert hook into the 2nd chain from the hook, pull up a loop, insert hook into the next stitch, pull up a loop and insert hook into next stitch (in the chain), pull u a loop (4 loops).
Strap Part 1 :
Part 1: Pull through in every 2 loops. Until the end of the row.
Strap Part 2 :
Part 2: *Insert hook in front loops, pull up* twice and insert hook into next stitch (in the chain), pull up (4 loops).
Strap Continue :
Repeat Part 1 and Part 2 until the end of the chain.
Final Step :
Pull through in every 2 loops until the end of the row. Then keep working single crochets along all the stitches of the top edge to the end of the second square. Repeat the above process with the other side of the bag. Your bag is ready.
This granny square purse pattern makes a beautiful and functional bag that's perfect for gifts or everyday use. Customize colors to match your wardrobe or use up leftover yarn for a scrappy, unique look. Follow the step-by-step photos and the video link to make assembly easy and enjoyable. 🧶✨👜