🧢 Beautiful ✨ Detailed πŸ’ Adorable

Batman Amigurumi Pattern

Batman Amigurumi Pattern
4.1β˜… Rating
5-7 Hours Time Needed
3.8K Made This
βœ‚οΈ

Intermediate Level

Ideal for those with basic crochet experience, featuring slightly more advanced stitches and techniques to expand your skills.

⏱️

Weekend Treat

Takes 5-7 hours, making it an enjoyable project to finish over a couple of days.

🧸

Cute Companion

An adorable friend to cherish, handcrafted with love to bring comfort and joy for years to come.

About This Batman Amigurumi Pattern

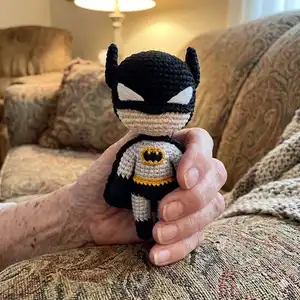
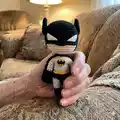
This pattern creates a 12 cm tall Batman amigurumi complete with a stitched mask, embroidered emblem and a small cape. You will work small pieces in rounds with color changes to build the legs, body, arms, head and ears. The instructions include clear round-by-round steps, tips for changing colors and finishing notes for tidy assembly.

Batman Amigurumi Pattern crochet pattern - detailed view of completed project

Make a collectible superhero perfect for gifting, keychains or pocket pals. Detailed photos and embroidery instructions help you add the signature Batman details.

Why You'll Love This Batman Amigurumi Pattern

I absolutely love this pattern because it captures Batman's iconic look in a tiny, approachable amigurumi. I enjoy the simple color changes and the satisfaction of embroidering the little emblem by hand. The construction is compact but allows for creative finishing like a removable cape and expressive mask. I find it rewarding to see the toy come together quickly while still having small techniques to practice.

Batman Amigurumi Pattern step 1 - construction progress Batman Amigurumi Pattern step 2 - assembly progress Batman Amigurumi Pattern step 3 - details and accessories Batman Amigurumi Pattern step 4 - final assembly and finishing

Switch Things Up

I love how versatile this pattern is and I often change colors to make my own characters β€” swap the gray and yellow for pastel tones to soften the look.

You can make a chunky version by using a thicker yarn and a larger hook; the shape stays the same but the finished toy will be larger and cuddlier.

I sometimes add wire inside the arms for poseable limbs or a small bell inside the cape for an extra playful touch.

If you prefer glue-on details, you can cut small shapes from felt or fleece for the emblem and eyes instead of embroidering them.

I enjoy experimenting with face expressions by shifting the embroidered eye placement slightly up or down to change the personality.

Try making a matching robin or joker by changing the color palette and modifying small details like belt and emblem shapes.

I recommend practicing embroidery on a scrap piece of crocheted fabric before doing the emblem so you get comfortable with the tiny stitches.

For travel-friendly versions, omit the cape and make the emblem with a glued felt cutout to avoid loose threads on the go.

Don't be afraid to mix yarn weights for texture; for example a cotton blend body with a softer acrylic cape can add interesting contrast.

I always pin pieces before sewing to adjust placement β€” that small step drastically improves final symmetry and makes finishing much faster.

Common Mistakes & How to Fix Them

βœ— Not securing color changes properly can leave loose loops; when changing color, finish the last stitch with two loops and pull the new color through both loops to secure it. βœ— Skipping stitch counts after each round causes shape errors; count your stitches after each increase and decrease round to maintain the correct final stitch count. βœ— Overstuffing small pieces creates bulging seams and makes sewing hard; stuff gradually and only firm enough to hold shape, especially for the head and body neck area. βœ— Not hiding tails or tying knots can lead to untidy finishes; leave long tails for sewing, tie and hide them inside the piece, and weave ends with a needle to secure.

Batman Amigurumi Pattern

Make your own tiny Batman amigurumi with this detailed crochet pattern. You will create a charming pocket-sized superhero with a removable cape, embroidered emblem and worked mask. The pattern walks you through color changes, shaping and assembly so you can finish a polished, gift-ready toy.

Intermediate 5-7 Hours

Materials Needed for Batman Amigurumi Pattern

β€” Main Fabric

  • 01
    YarnArt Jeans yarn in Black (53)
  • 02
    YarnArt Jeans yarn in Gray (80)
  • 03
    YarnArt Jeans yarn in White (62)
  • 04
    YarnArt Jeans yarn in Yellow (35)
  • 05
    YarnArt Jeans yarn in Beige (05)
  • 06
    YarnArt Jeans yarn in Mustard (84)

β€” Tools Required

  • 01
    Crochet hook size 2mm
  • 02
    Stuffing material (polyester fiberfill)
  • 03
    Scissors
  • 04
    Pins
  • 05
    Needle for sewing/embroidery
  • 06
    Yarn needle for weaving ends
  • 07
    Stitch markers (optional)

Progress Tracker

0% Complete

β€” Arms :

Round 1 :

In black: 4 sc into MR

Round 2 :

In black: inc*4 (8)

Round 3-6 :

In black: 8 sc (4 rounds)

Info :

Switch to gray yarn: To change the color, do not work the last stitch of black color till the end (2 loops on the hook). Take the gray yarn and close the stitch with it by working through 2 loops. Tie a knot and hide them inside the legs. Change the color this way every time.

Round 7 :

In gray: 8 sc through blo

Round 8-11 :

In gray: 8 sc (4 rounds)

Info :

Cut the thread leaving a long tail for sewing. Stuff the piece (not firmly).

β€” Legs :

Round 1 :

In black: 5 sc into MR

Round 2 :

In black: inc*5 (10)

Round 3-6 :

In black: 10 sc (4 rounds)

Info :

Switch to gray yarn:

Round 7 :

In gray: Through blo: 10 sc

Round 8-11 :

In gray: 10 sc (4 rounds)

Info :

Stuff the piece till the middle.

Instruction :

Cut the thread on the first leg. Make the second one in the same way, but also work 1 sl st at the end of the last round. Don’t cut the gray thread.

Instruction :

Tie the black and gray tails in a knot and cut them off. Take the second leg and pull the gray loop out from the black one.

β€” Body :

Instruction :

Go back to the first leg. Take the black yarn and pull it out, working 1 sl st. Chain 1.

Round 1 :

In gray: 10 sc along the leg, In black: 2 sc along the chain, In gray: 10 sc along the leg, In black: 2 sc along the other side of the chain (24)

Round 3-5 :

In black: 24 sc (3 rounds). Stuff the legs.

Round 6 :

In yellow: 24 sc

Round 7 :

In gray: 24 sc through blo

Instruction :

Cut the black thread and tie it with the yellow one in a knot. Hide them inside the piece. Don’t cut the yellow one for now.

Round 8 :

In gray: (4 sc, dec)*4 (20)

Round 9-10 :

In gray: 20 sc (2 rounds)

Instruction :

Stuff the piece.

Round 11 :

5 sc, 8 sc along the arm (leave the threads from the arms in the armpit area), skip 1 sc on the body, 1 sc along the body, In yellow: 5 sc, In gray: 2 sc, 8 sc along the arm, skip 1 sc on the body, 5 sc (34)

Instruction :

Sew the armpit area with the remaining threads. Fasten the tails and hide them inside the body.

Round 12 :

In gray: 4 sc, dec, 5 sc, dec, In yellow: 7 sc, In gray: dec, 5 sc, dec, 5 sc (30)

Round 13 :

In gray: 3 sc, dec, 4 sc, dec, 1 sc, In yellow: 1 sc, dec, 2 sc, In gray: 1 sc, dec, 4 sc, dec, 2 sc, dec (24)

Instruction :

Fix and cut the yellow thread.

Round 14 :

(1 sc, dec)*8 (16)

Info :

Stuff the body (don’t stuff the arms).

Round 15 :

(2 sc, dec)*4 (12)

Round 16 :

12 sc, 1 sl st

Instruction :

Cut the thread leaving a long tail for sewing. Add some stuffing material to the body.

Round 6-16 (reference) :

6. (4 sc, inc)*6 (36) 7. (5 sc, inc)*6 (42) 8. (6 sc, inc)*6 (48) 9-16. 48 sc (8 rounds)

β€” Head :

Round 1 :

In black: 6 sc into MR

Round 2 :

In black: inc*6 (12)

Round 3 :

In black: (1 sc, inc)*6 (18)

Round 4 :

In black: (2 sc, inc)*6 (24)

Round 5 :

In black: (3 sc, inc)*6 (30)

Round 6 :

In black: (4 sc, inc)*6 (36)

Round 7 :

In black: (5 sc, inc)*6 (42)

Round 8 :

In black: (6 sc, inc)*6 (48)

Round 9-16 :

In black: 48 sc (8 rounds)

Round 17 :

In beige through blo: 18 sc, In black: 12 sc (48)

Round 18-19 :

In gray/beige/black: 18 sc in beige, 12 sc in black (2 rounds)

Round 20 :

In black: (6 sc, dec)*2, 2 sc, In beige: 4 sc, dec, 6 sc, dec, 4 sc, In black: 2 sc, dec, 6 sc, dec (42)

Round 21 :

In black: (5 sc, dec)*2, 2 sc, In beige: 3 sc, dec, 5 sc, dec, 4 sc, In black: 1 sc, dec, 5 sc, dec (36)

Round 22 :

In black: (4 sc, dec)*2, 2 sc, In beige: 2 sc, (dec, 4 sc)*2, In black: dec, 4 sc, dec (30)

Round 23 :

In black: (3 sc, dec)*2, 2 sc, In beige: 1 sc, (dec, 3 sc)*2, In black: dec, 3 sc, dec (24)

Info :

Stuff the piece.

Round 24 :

In black: (2 sc, dec)*2, 2 sc, In beige: (dec, 2 sc)*2, In black: dec, 3 sc, dec (18)

Round 25 :

In black: (1 sc, dec)*3, In beige: 1 sc, dec, 1 sc, In black: dec, 1 sc, dec (12), 1 sl st

Instruction :

Fix and cut the threads. Hide them inside the head. Add some stuffing material.

β€” Ears :

Round 1 :

In black: 6 sc into MR

Round 2 :

In black: inc*6 (12)

Round 3 :

In black: (1 sc, inc)*6 (18)

Round 4 :

In black: (2 sc, inc)*6 (24), 1 sl st

Instruction :

Cut the thread, leaving a long tail for sewing. Fold the ear in half and sew, grabbing the back loops of the stitch. Pin both ears to the head and sew them till the middle. Sew the ears.

β€” Design :

Mask :

Attach black yarn (leave a long tail for hiding it with a needle) to the first front loop on the head with 1 sl st, keeping the head facing you.

Mask Round :

1. 6 sl st, 1 sc, 2 hdc, 1 sc, 7 sl st

Instruction :

Cut the thread. Hide the tails inside the head with a needle. Using a needle, embroider two triangles and fill them with stitches. Sew the ears.

Emblem :

Cut the yellow thread and also divide it in half into 2 thin threads. Align the emblem with the thread, making an oval.

Emblem Instruction :

Cut the black thread and divide it in half. Embroider the bat, first outlining, and then filling it with stitches. To do this, divide the thread in the same way and embroider the imitation of sl st, as shown below. Do the same with the belt.

Alternative :

If you don’t want to embroider, draw or glue a figure cut out of fleece.

Instruction :

Sew the head to the body stuffing the neck very firmly.

β€” Eyes :

Instruction :

Cut a long white thread and divide it in half into 2 thin threads. Use these to embroider the white eye shapes. You can also hide the extra yellow spots with gray yarn so that everything looks neat.

β€” Cape :

Instruction :

Chain 10 in black, leaving a long thread, and work in turning rows – chain 1 and turn the piece at the end of each row.

Row 1 :

From the second loop from the hook: inc, 3 sc, inc, 3 sc, inc (12)

Row 2 :

12 sc

Row 3 :

inc, 10 sc, inc (14)

Row 4 :

14 sc

Row 5 :

inc, 12, inc (16)

Row 6-7 :

16 sc (2 rounds)

Row 8 :

inc, 14 sc, inc (18)

Row 9-10 :

18 sc (2 rounds)

Row 11 :

inc, 16 sc, inc (20)

Row 12-13 :

20 sc (2 rounds)

Row 14 :

inc, 18 sc, inc (22)

Row 15-16 :

22 sc (2 rounds)

Row 17 :

inc, 20 sc, inc (24)

Row 18-19 :

24 sc (2 rounds)

Instruction :

Cut the thread. Hide the tail inside the stitches with a needle. Wind the first tail around the neck and sew it to the other corner of the cape with a needle. Fasten the thread and hide it inside the body.

β€” All Done! :

Finish :

If desired, you can also add the mustard edging. Final checks: hide all tails, secure emblem embroidery, sew head to body firmly and position ears symmetrically.

Assembly Instructions

  • Sew the head to the body, stuffing the neck very firmly and using the long tail left at round 16 on the body and the head tail to sew securely.
  • Attach arms to the body by aligning the armpit area, sewing through the remaining threads from the arms into the body and fastening tails inside the body.
  • Pin both ears to the head and sew them until the middle; fold each ear in half and sew grabbing the back loops before attaching to the head.
  • Sew the cape by winding the cape tail around the neck and stitching the corner to the other side; fasten threads and hide inside the body for a tidy finish.
  • Embroider the emblem on the chest: divide yellow and black threads as directed, outline the oval in yellow and fill and outline the bat in black, then hide tails inside the body.
  • Weave in and hide all yarn tails with a needle, knot and trim excess threads and use small stitches to secure any loose embroidery or mask threads.

Important Notes

  • πŸ’‘When changing colors, do not finish the last stitch of the previous color; pull the new color through the two loops to secure a neat color change.
  • πŸ’‘Leave long tails when cutting threads for sewing so you can sew parts together and hide the ends inside the pieces.
  • πŸ’‘Stuff gradually and sparingly in small pieces to keep shaping even and avoid overstuffing small limbs which can distort the toy.
  • πŸ’‘Use pins to position ears and cape before sewing to ensure correct symmetry and placement.

This tiny Batman amigurumi makes a perfect handmade gift or collectible toy with delightful embroidered details and a tiny cape. The pattern includes step-by-step instructions for shaping, color changes and assembly so you can achieve clean, professional results. Have fun stitching every detail and enjoy gifting your handmade superhero! 🧢🧡

You ask,

we answer.

FAQs

What size will the finished piece be?

The finished amigurumi measures approximately 12 cm tall when using the recommended yarn and 2 mm hook.

Can I use a different yarn or hook size?

Yes, you can use a different yarn weight or hook, but the final size and stitch tension will change; choose a hook appropriate for your yarn and be prepared for a larger or smaller finished toy.

Are the abbreviations US terms?

Yes, the pattern uses US crochet terms such as SC for single crochet, INC for increase and DEC for decrease.

How do I change colors without gaps?

Do not finish the last stitch of the old color completely; with two loops on the hook, draw the new color through both loops to close the stitch and continue with the new color to avoid gaps.