🧢 Beautiful ✨ Detailed πŸ’ Adorable

Granny Square Bag Pattern

Granny Square Bag Pattern
4.5β˜… Rating
5-7 Hours Time Needed
1.6K Made This
βœ‚οΈ

Intermediate Level

Ideal for those with basic crochet experience, featuring slightly more advanced stitches and techniques to expand your skills.

⏱️

Weekend Treat

Takes 5-7 hours, making it an enjoyable project to finish over a couple of days.

🏑

Cozy Accent

A warm touch for your space that transforms ordinary corners into inviting nooks filled with handmade charm.

About This Granny Square Bag Pattern

This pattern shows you how to crochet a roomy, structured Granny Square Bag from cord or thick yarn. You will make two square panels, a long side strip and assemble them to create a flat-bottomed tote with neat edges and optional leather handles. The design uses simple repeating rounds, working in rounds and rows, and finishes with back-loop-only rounds to tighten the base.

Granny Square Bag Pattern crochet pattern - detailed view of completed project

Detailed step-by-step photos and a magic ring tutorial are included to help you follow along. The pattern is adaptable β€” change cord thickness or hook size to scale the bag up or down for different looks.

Why You'll Love This Granny Square Bag Pattern

I absolutely love this pattern because it transforms simple stitches into a stylish, sturdy bag that holds its shape and looks handmade in the best way. I enjoy how quickly the square grows with double crochet rounds and how the diagonal eyelets create a subtle decorative detail. The method for joining the parts and working BLO rounds at the base makes the bag feel professional and long-lasting. I also love that you can easily customize the size by changing cord thickness or the number of side rows β€” it is truly versatile and satisfying to finish.

Granny Square Bag Pattern step 1 - construction progress Granny Square Bag Pattern step 2 - assembly progress Granny Square Bag Pattern step 3 - details and accessories Granny Square Bag Pattern step 4 - final assembly and finishing

Switch Things Up

I love how easy it is to customize this bag by changing cord thickness and hook size; I often experiment to get oversized or mini versions.

If I want a softer, slouchy bag I use a thinner cotton yarn and a smaller hook; for a structured market tote I switch to thicker polyester cord and larger hooks.

I sometimes add a lining for extra durability and to hide the slip-stitch joins; it's simple to sew a fabric lining to the inside once the bag is assembled.

For handles I either sew leather straps or make crocheted straps reinforced with webbing β€” both give a different aesthetic and strength to the bag.

I like to change colors every few rounds for a striped version or use two-color squares for a bolder graphic look; stripes are a fun way to personalize the design.

Try using recycled t-shirt yarn for an eco-friendly, chunky version that works great for beach bags and heavy-duty totes.

Want pockets? I make a small rectangular panel and sew it to the inside of one square before joining the pieces, which keeps keys and phones tidy.

To make a smaller wristlet, scale down by using thinner cord and reducing the number of side rows; you can also make a mini square for keychains.

I occasionally add decorative stitch rows or a fringe along the bottom edge for a boho touch β€” totally optional but fun to try.

If I want a water-resistant bag I choose polyester cord and add a spray-on fabric sealer after assembly to protect the yarn and keep it looking fresh.

Common Mistakes & How to Fix Them

βœ— Starting rounds without placing a stitch marker causes you to lose track of the beginning; always mark the first stitch of each round so increases and corners align correctly. βœ— Forgetting to count the ch3 as a dc will give you an incorrect stitch count; remember ch3 counts as first double crochet and count accordingly at the end of each round. βœ— Cutting the cord too short when finishing a round makes it hard to close and hide the end; leave about 15 cm when cutting and use a needle to hide the tail on the wrong side. βœ— Not working the last 10th single crochet slightly on the side during side rows causes uneven edges; crochet the last stitch of each row a little on the side for a neat seam.

Granny Square Bag Pattern

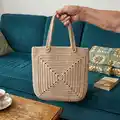
Make a stylish, handmade Granny Square Bag using cord and simple crochet techniques. This pattern guides you through creating two square panels, joining them, adding a side panel and finishing with handles. Perfect for making a durable, everyday tote with a textured, modern look you'll love to carry.

Intermediate 5-7 Hours

Materials Needed for Granny Square Bag Pattern

β€” Main Fabric

  • 01
    3-4 mm cotton, acrylic or polyester cord - 300-350 meters (main requirement)
  • 02
    3 mm polyester cord - used in sample (amount included above)
  • 03
    Thicker cord will produce a larger bag; adjust quantity accordingly

β€” Tools Required

  • 01
    Crochet hook size 5 mm
  • 02
    Scissors
  • 03
    Stitch markers
  • 04
    Yarn needle for sewing and hiding ends
  • 05
    Handles for bag with buttons or sewn ones 50-60 cm (2 handles)

Progress Tracker

0% Complete

β€” Description :

Info :

Make a Magic Ring. Step by step guide for making a Magic Ring (MR) can be found on page 14.

Round 1 :

in MR: ch3, 2dc, [ ch2, 3dc ]*3, ch1, tighten the ring firmly, sl st in 3rd ch (12)

Info :

you should count ch3 as 1dc

Info :

ch2 space will be referred to as the corner chain space = corner (pic 5)

Round 2 :

into the corner just behind: (1sc, ch1, 1dc) 1sc and a ch1 counts as 1dc here and throughout pattern (pic 8-12) [ dc in the next 3 stitches, in the corner: (2dc, ch2, 2dc) ]*3, (pic 12-15) 3dc, in the corner: (2dc, ch1, sl st in ch1) (28) (pic 16)

Round 3 :

into the corner just behind: (1sc, ch1, 1dc), [ 7dc, in the corner: (2dc, ch2, 2dc) ]*3, 7dc, in the corner: (2dc, ch1, sl st) (44) (pic. 18)

Round 4 :

into the corner just behind: (1sc, ch1, 1dc), [ 11dc, in the corner: (2 dc, ch2, 2 dc) ]*3, 11dc, in the corner: (2 dc, ch1, sl st) (60)

Round 5 :

into the corner just behind: (1sc, ch1, 1dc), [ 15dc, the corner: (2dc, ch2, 2dc) ]*3, 15dc, in the corner: (2dc, ch1, sl st) (76)

Round 6 :

into the corner just behind: (1sc, ch1, 1dc), [19dc, in the corner: (2dc, ch2, 2dc) ]*3, 19dc, in the corner: (2dc, ch1, sl st) (92)

Round 7 :

into the corner just behind: (1sc, ch1, 1dc), [ 23dc, in the corner: (2dc, ch2, 2dc) ]*3, 23dc, in the corner: (2dc, ch1, sl st) (108)

Round 8 :

into the corner just behind: (1sc, ch1, 1dc), [ 27dc, in the corner: (2dc, ch2, 2dc) ]*3, 27dc, in the corner: (2dc, ch1, sl st) (124)

Round 9 :

into the corner just behind: (1sc, ch1 , 1dc), [ 31dc, in the corner: (2dc, ch2, 2dc) ]*3, 31dc, in the corner: (2dc, ch1, sl st) (140) (pic. 19)

Info :

Using a needle, weave in the loose thread that began the magic ring between stitches on the wrong side (pic. 17)

Info :

Cut off the cord, leaving the end about 15 cm. Pull the cord out as shown on pic. 20. Using a needle close the round as it is shown on pic. 21-23. Hide the end on wrong side and cut it off (pic. 24)

Info :

Crochet the second square using rounds 1-9

β€” Side of the Bag :

Chain :

ch11 (pic 26)

Row 1 :

start from the second ch from the hook: 10 sc, ch1, turn (10) (pic 27-28)

Row 2 :

skip 1 stitch, 8 sc, inc, ch1, turn (10) (pic 29-31)

Rows 3 - 109 :

skip 1 stitch, 10 sc, ch1, turn (10) (pic 32-35) Take note, the last 10th sc in each rounds must be crocheted a little on the side (pic. 32)

Info :

Do not cut the end of the cord

β€” Assembly :

Info :

Steam the parts. Follow the recommendations for your cord or yarn.

Step :

Put a square piece with the front side. Insert your hook in ch as it is shown on pictures 36-37 then insert hook in the stitch of a rectangular part. Work through both parts with sl st joining them (109 sl st)

Step :

Make 1 sl st as shown on pictures 42-43.

Step :

Turn the part on the wrong side and work 9sc, to the end of a square part (pic. 44-45)

Step :

Pull out a hook. Take second square part and join with sl st (110 sl st). The place where to start look on the picture 47.

Step :

When finish to join, go to the top side of the square part and work with sc all around (pic. 51-54)

Step :

Then work in a spiral. Crochet 6 rounds sc BLO. When working BLO, also crochet in the 3rd back loop of each stitch to make your work tighter (pic. 57)

Step :

Put the base of the bag evenly. Hang markers on the places of the handles on both sides of the bag (4 markers). The distance between markers is 1-2 or 3-4 - 24 stitches (pic. 59). Work sc till the first marker, ch60, sc in the stitch after the second marker. Then work sc till the third marker, ch60, sc in the stitch after the forth marker, work sc to the end of the round.

Step :

Crochet 3 rounds sc BLO. Finish at the fold.

Step :

At the end of the last row do 4 slip stitches (pic. 64)

Step :

Cut off the cord, leaving the end of 15 cm. Pull the end out. Take a needle and make 1 stitch as it is shown on the picture pic. 65-66. Hide the end between stitches on the wrong side (pic.67), cut off the cord.

Variant 2 :

When finish to join, go to the top side of the square part and work with sc all around the perimeter of the bag (pic. 51-54). Work in a spiral. Crochet 3 rounds sc BLO. When working BLO, also crochet in the 3rd back loop of each stitch to make your work tighter (pic. 57). Put markers in the places for handles (pic. 69). In this pattern, the holes for the handles are equal to the width of three stitches. Work with sc (BLO) to the first marker. Make ch3, skip 3 stitches on the base of the bag and work sc. Then work with sc to the next marker. Make 3 holes for handles in the same way.

Variant 3 :

Crochet 6 rounds sc BLO (pic. 76). Finish to crochet on the side as shown on pic. 64-67. Sew the leather handles to the bag (pic.77).

Info :

Magic Ring step-by-step illustrated on page 14 for reference.

Assembly Instructions

  • Steam and press the square panels and side strip gently according to the cord recommendations before assembly for a neater join.
  • Place a square panel with the front facing you; insert your hook into the chain edge of the square (pic.36-37) and into the stitch of the rectangular side panel, then join both parts with slip stitches across (109 sl st).
  • After joining one side, turn to the wrong side, work 9 sc across the edge of the square (pic.44-45), then join the second square to finish the perimeter with slip stitch (110 sl st) beginning at the point shown in pic.47.
  • Once the panels are joined, work sc all around the top edge (pic.51-54) then work in a spiral for the base: crochet 6 rounds sc BLO (also working into the 3rd back loop to pull the base tighter) then mark handle placements and work ch60 openings for handles as instructed.
  • Crochet 3 rounds sc BLO on the folded base edge and finish with 4 slip stitches at the end; close and hide cord ends inside between stitches on the wrong side and trim.
  • Position and attach handles evenly using markers (4 markers). Sew leather handles or attach buttoned handles as desired (pic.75).

Important Notes

  • πŸ’‘Use stitch markers to mark corners and the start of rounds for consistent shaping and accurate increases.
  • πŸ’‘Leave about 15 cm when cutting the cord to allow closing the round and hiding the tail on the wrong side.
  • πŸ’‘When working the side rows, crochet the last (10th) single crochet slightly on the side so the seam matches the square edge and the join is neat.
  • πŸ’‘Work back-loop-only (BLO) rounds for the base to tighten the fabric and create a stronger, more structured bottom for the bag.

You did it β€” a beautifully handmade Granny Square Bag that looks polished and professional. This pattern brings together simple stitches and smart finishing techniques to make a sturdy everyday tote. Try different cord colors or swap in leather handles for a classy, personalized finish. 🧢✨

You ask,

we answer.

FAQs

What size will the finished piece be?

The sample bag measures approximately 15" (38 cm) high and 14" (36 cm) wide when using 3 mm cord and a 5 mm hook; your size will vary with tension and cord thickness.

Can I use different yarn weights for this pattern?

Yes, you can use different yarn or cord weights, but the final size will change accordingly; thicker cord makes a larger, sturdier bag and will require more yarn.

Do I need prior crochet experience for this pattern?

This pattern is intermediate: basic knowledge of magic ring, double crochet, single crochet, working in rounds and rows, and slip stitch joins is recommended.

How long does this project typically take to complete?

Most crocheters complete this bag in 5-7 hours, depending on experience, finishing steps and whether you add hand-sewn handles.

How many stitches should the base side rows have?

The side rows are 10 stitches wide after the first chain and shaping: Row 1 makes 10 sc, and rows 3-109 are worked as 10 sc with the last 10th sc crocheted slightly on the side for the seam.