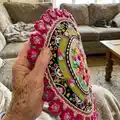
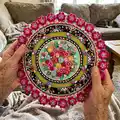
Make a stunning floral crochet rug that brings brightness and texture to any room. This pattern guides you through the large central base panel, surface-crochet borders, and layered decorative flowers and leaves so you can create a show-stopping piece. With clear diagrams and step-by-step rounds, you'll turn yarn into a vibrant, handmade statement for your home.
Progress Tracker
0% Complete
— Central base panel :
Foundation :
ch 3, ss 1 to join.
Round 1 :
ch 1, sc 6 in ring, ss 1 to join (6).
Round 2 :
ch 1, sc 2 in each stitch around. Ss 1 to join round (12).
Round 3 :
ch 1, *sc 2 in first st around, sc 1 in next st*. Repeat from * to * to end of round. Ss 1 to join round (18).
Round 4 :
ch 1, *sc 2 in first st around, sc 1 in each of the next 2 st*. Repeat from * to * to end of round. Ss 1 to join round (24).
Round 5 :
ch 1, *sc 2 in first st around, sc 1 in each of the next 3 st*. Repeat from * to * to end of round. Ss 1 to join round (30).
Round 6 :
ch 1, *sc 2 in first st around, sc 1 in each of the next 4 st*. Repeat from * to * to end of round. Ss 1 to join round (36).
Round 7 :
ch 1, *sc 2 in first st around, sc 1 in each of the next 5 st*. Repeat from * to * to end of round. Ss 1 to join round (42).
Round 8 :
ch 1, *sc 2 in first st around, sc 1 in each of the next 6 st*. Repeat from * to * to end of round. Ss 1 to join round (48).
Round 9 :
ch 1, *sc 2 in first st around, sc 1 in each of the next 7 st*. Repeat from * to * to end of round. Ss 1 to join round (54).
Round 10 :
ch 1, *sc 2 in first st around, sc 1 in each of the next 8 st*. Repeat from * to * to end of round. Ss 1 to join round (60).
Round 11 :
ch 1, *sc 2 in first st around, sc 1 in each of the next 9 st*. Repeat from * to * to end of round. Ss 1 to join round (66).
Round 12 :
ch 1, *sc 2 in first st around, sc 1 in each of the next 10 st*. Repeat from * to * to end of round. Ss 1 to join round (72).
Round 13 :
ch 1, *sc 2 in first st around, sc 1 in each of the next 11 st*. Repeat from * to * to end of round. Ss 1 to join round (78).
Round 14 :
ch 1, *sc 2 in first st around, sc 1 in each of the next 12 st*. Repeat from * to * to end of round. Ss 1 to join round (84).
Round 15 :
ch 1, *sc 2 in first st around, sc 1 in each of the next 13 st*. Repeat from * to * to end of round. Ss 1 to join round (90).
Round 16 :
ch 1, *sc 2 in first st around, sc 1 in each of the next 14 st*. Repeat from * to * to end of round. Ss 1 to join round (96).
Round 17 :
ch 1, *sc 2 in first st around, sc 1 in each of the next 15 st*. Repeat from * to * to end of round. Ss 1 to join round (102).
Info :
!! Caution: starting as of the next round i.e. round 18, the beginning of the rounds is shifted in order to round the shape off a bit. Cut yarn in current position and work in ends. Count 8 stitches along from the beginning of the last round worked and join in same color yarn.
Round 18 :
ch 1, *sc 2 in first st around, sc 1 in each of the next 16 st*. Repeat from * to * to end of round. Ss 1 to join round (108).
Round 19 :
ch 1, *sc 2 in first st around, sc 1 in each of the next 17 st*. Repeat from * to * to end of round. Ss 1 to join round (114).
Round 20 :
ch 1, *sc 2 in first st around, sc 1 in each of the next 18 st*. Repeat from * to * to end of round. Ss 1 to join round (120).
Round 21 :
ch 1, *sc 2 in first st around, sc 1 in each of the next 19 st*. Repeat from * to * to end of round. Ss 1 to join round (126).
Round 22 :
ch 1, *sc 2 in first st around, sc 1 in each of the next 20 st*. Repeat from * to * to end of round. Ss 1 to join round (132).
Round 23 :
ch 1, *sc 2 in first st around, sc 1 in each of the next 21 st*. Repeat from * to * to end of round. Ss 1 to join round (138).
Round 24 :
ch 1, *sc 2 in first st around, sc 1 in each of the next 22 st*. Repeat from * to * to end of round. Ss 1 to join round (144).
Round 25 :
(!! caution, there are no increases in this round !!) ch 1, then sc 1 in each stitch around. Ss 1 to join round (144).
Info :
Count 8 stitches along from the beginning of the last round worked and join in new color 1256 The Hague (orange):
Round 26 :
ch 1, *sc 2 in first st around, sc 1 in each of the next 23 st*. Repeat from * to * to end of round. Ss 1 to join round (150).
Round 27 :
ch 1, *sc 2 in first st around, sc 1 in each of the next 24 st*. Repeat from * to * to end of round. Ss 1 to join round (156).
Round 28 :
ch 1, *sc 2 in first st around, sc 1 in each of the next 25 st*. Repeat from * to * to end of round. Ss 1 to join round (162).
Info :
!! Caution: starting as of the next round, i.e. round 29, the beginning of the rounds is shifted. Cut yarn in current position and work in ends. Count 10 stitches along from the beginning of last round worked and join in new color 1823 Coevorden (yellow-green):
Round 29 :
ch 1, *sc 2 in first st around, sc 1 in each of the next 26 st*. Repeat from * to * to end of round. Ss 1 to join round (168).
Round 30 :
ch 1, *sc 2 in first st around, sc 1 in each of the next 27 st*. Repeat from * to * to end of round. Ss 1 to join round (174).
Round 31 :
ch 1, *sc 2 in first st around, sc 1 in each of the next 28 st*. Repeat from * to * to end of round. Ss 1 to join round (180).
Round 32 :
ch 1, *sc 2 in first st around, sc 1 in each of the next 29 st*. Repeat from * to * to end of round. Ss 1 to join round (186).
Round 33 :
ch 1, *sc 2 in first st around, sc 1 in each of the next 30 st*. Repeat from * to * to end of round. Ss 1 to join round (192).
Info :
Central base panel up to row 33.
Info :
!! Caution: starting as of the next round, i.e. round 34, the beginning of the rounds is shifted. Cut yarn in current position and work in ends. Count 11 stitches along from the beginning of last round worked and join in new color 1002 Ede (black):
Round 34 :
ch 1, *sc 2 in first st around, sc 1 in each of the next 31 st*. Repeat from * to * to end of round. Ss 1 to join round (198).
Round 35 :
ch 1, *sc 2 in first st around, sc 1 in each of the next 32 st*. Repeat from * to * to end of round. Ss 1 to join round (204).
Round 36 :
ch 1, *sc 2 in first st around, sc 1 in each of the next 33 st*. Repeat from * to * to end of round. Ss 1 to join round (210).
Round 37 :
ch 1, *sc 2 in first st around, sc 1 in each of the next 34 st*. Repeat from * to * to end of round. Ss 1 to join round (216).
Round 38 :
ch 1, *sc 2 in first st around, sc 1 in each of the next 35 st*. Repeat from * to * to end of round. Ss 1 to join round (222).
Info :
Caution: starting as of the next round, i.e. round 39, the beginning of the rounds is shifted. Cut yarn in current position and work in ends. Count 10 stitches along from the beginning of the last round worked and continue crocheting with the same color (black):
Round 39 :
ch 1, *sc 2 in first st around, sc 1 in each of the next 36 st*. Repeat from * to * to end of round. Ss 1 to join round (228).
Round 40 :
ch 1, *sc 2 in first st around, sc 1 in each of the next 37 st*. Repeat from * to * to end of round. Ss 1 to join round (234).
Round 41 :
ch 1, *sc 2 in first st around, sc 1 in each of the next 38 st*. Repeat from * to * to end of round. Ss 1 to join round (240).
Round 42 :
ch 1, *sc 2 in first st around, sc 1 in each of the next 39 st*. Repeat from * to * to end of round. Ss 1 to join round (246).
Round 43 :
ch 1, *sc 2 in first st around, sc 1 in each of the next 40 st*. Repeat from * to * to end of round. Ss 1 to join round (252).
Info :
Central base panel up to row 43.
Info :
Cut yarn and work in ends. The following round is a scalloped edging. Change yarn color to 1256 The Hague (orange) and continue crocheting with 3 strands of yarn put together:
Round 44 :
Join in yarn with a ss, ch2 and dc1 in 1st st, dc 1, ch 2 and ss 1 in next stitch. *Skip 2 stitches, ss1, ch2, dc1 in next st, dc1, ch2, ss1, in following st*. Repeat from * to * to end of round, cut yarn, work in ends.
Info :
Change yarn color to 1026 Lelystad (peach) and continue crocheting with 3 strands of yarn put together:
Round 45 :
join in yarn and work a finishing round of sc, done around the scallops of previous round. To do so, sc 5 around each scallop and ss 1 in between each scallop to end of round.
Info :
Detail of rows 44 and 45.
— Surface-crochet borders :
Info :
Once you've completed the base panel, proceed adding surface-crochet borders done along the color changes of the panel itself. These decorative borders are worked directly along the top of the panel in surface single crochet stitches with the yarn held running above the right side surface of the rug. All the rug's surface crochet borders are done with 2 (two) strands of yarn put together and using a size L/11 (8 mm) crochet hook.
Item Name (P1) :
the 1st surface crochet border is in Colour Crafter 1026 Lelystad (peach), with surface single crochet stitches done along the color change between the mint-green and orange sections.
Item Name (P2) :
the 2nd surface crochet border is in Colour Crafter 1002 Ede (black), with surface single crochet stitches done along the color change between the mint-green and orange sections, i.e. right alongside the 1st surface crochet border in peach. Here it is also necessary to join in the pom-pom yarn. To do so, place the Rico Creative 'Pompon' yarn color 019 baby pink along the crochet surface and catch up the thread between the pom-poms directly while working the surface crochet stitches (i.e. every 2 surface single crochet stitches), leaving the pom-poms to pop out.
Item Name (P3) :
the 3rd surface crochet border is in Colour Crafter 1002 Ede (black), with surface single crochet stitches done along the color change between the orange and yellow-green sections.
Item Name (P4) :
the 4th surface crochet border is in Colour Crafter 1725 Ameland (dark-green), with surface single crochet stitches done along the color change between the orange and yellow-green sections, i.e. right alongside the 3rd surface crochet border in dark green.
Item Name (P5) :
the 5th surface crochet border is in Colour Crafter 1725 Ameland (dark-green), in surface single crochet stitches done along the color change between the yellow-green and black sections.
Item Name (P6) :
the 6th surface crochet border is in Colour Crafter 1026 Lelystad (peach), with surface single crochet stitches done along the color change between the black and the orange scalloped edging.
Item Name (P7) :
the 7th surface crochet border is in Colour Crafter 1725 Ameland (dark-green), with surface single crochet stitches done along the color change between the black section and the orange scalloped edging, i.e. right alongside the 6th surface crochet border in peach.
— Large flower :
Info :
(crocheted in two versions, one using two strands of yarn and the other using a single strand of yarn) The large flowers crocheted using two strands of yarn put together and crochet hook size K/10 (7 mm), are all arranged and attached around the rug's outer edge. Crochet a total of 28 flowers, using Colour Crafter 1435 Apeldoorn (bright fuchsia) and 1241 Den Bosch (medium pink) - the heart of the large flower is done in Colour Crafter 1034 Urk (light-blue), this too with two strands of yarn put together. When crocheted using a thinner yarn (i.e. a single strand of yarn and an E/4 (3,5 mm) crochet hook), this pattern can also be used to make a smaller version of the large flower, to decorate the rug's central base panel. Crochet a total of 5 flowers, using a single strand of Colour Crafter 1241 Den Bosch (medium pink) and 1435 Apeldoorn (bright fuchsia) - the heart of the smaller version of the large flower is also done in single strand, using Colour Crafter 1263 Leerdam (yellow).
Foundation :
ch 3, ss 1 to join.
Rnd 1 :
ch 1, sc 7 in ring, ss 1 to join.
Rnd 2 :
ch 2 (counts as 1st dc), dc 1 in first ch, dc 2 in every st around, ss 1 to join (=16 dcs, photo 1).
Rnd 3 :
ch 3, skip 1 st, ss 1 in next st, repeat to end of rnd (=8 loops).
Rnd 4 :
[ss 1, ch 1, dc 1, tc 1, dc 1, sc 1] in each ch-3 loop of rnd 3, ss 1 in each ss of rnd 3 so that the petals curve nicely. Repeat to end of rnd; for the last ss insert hook into the rear bump of the ss in row 3, ready to crochet a rnd of new petals right behind the rnd just completed.
Rnd 5 :
work 8 ch-4 loops on rear, closing each loop with ss 1 done in the rear bumps of each ss in rnd 3 (= 8 loops, diagram 2).
Rnd 6 :
[ss 1, ch 1, dc 1, tc 2, dc 1, sc 1] in each ch-4 loop of rnd 5, ss 1 in each ss of rnd 5 and repeat to end of rnd (= 8 petals). This completes the two rnds of petals.
Info :
With Colour Crafter 1435 Apeldoorn (bright fuchsia) double strand [or Colour Crafter 1241 Den Bosch (medium) single strand for the smaller version].
Rnd 7 :
holding yarn above the crochet surface, insert hook in the gaps between the sts forming rnds 1 and 2 at center of flower, pull up a loop and ch 1 to join in yarn, surface single crochet all around and ss 1 to close rnd (= 8 surface single crochet sts).
Rnd 8 :
ch 3, insert hook in next st and ss 1, work five ch-3 loops on rnd 7, closing each loop with a ss placed at irregular intervals so that they are not equally spaced (= 5 loops).
Rnd 9 :
in each ch-3 loop, repeat the petal sequence as done in rnd 4, to end of rnd.
— Heart of the large flower :
Info :
The heart of the large flower is done using Colour Crafter 1034 Urk (light-blue), hook size H/8 (5 mm) and two strands of yarn put together [or Colour Crafter 1263 Leerdam (yellow), hook size E/4 (3.5 mm) single strand]. They are crocheted separately and then sewn onto the flower.
Foundation :
ch 3, ss 1 to join.
Round 1 :
ch 2, dc 7 in ring, ss 1 to join. You'll notice a small dome forming which you can also opt to stuff with fiber fill before placing it onto the center of the flower. Sew the heart to the center section of the flower with small, neat stitches.
— Double leaves placed between the large flowers :
Info :
The double leaves placed between the large flowers all around the edge of the rug are crocheted using a hook size 3.5 mm / E 4 and a single strand of Colour Crafter 1316 Almelo (mint-green).
To make one double leaf (foundation) :
Ch 9 to make the foundation chain, turn.
Step :
Working in top loop only, sc 1 in 3rd ch from hook, dc 1 in next st, dc 1 and tc 1 in next st, tc 1 and dc 1 in next st, dc 1 in next st, sc 1 in next st, sc 3 in 1st ch of foundation ch (to form point of leaf).
Step :
Now work back along the opposite side of the foundation chain to make the other half of the leaf: sc 1 in next st, dc 1 in next st, dc 1 and tc 1 in next st, tc 1 and dc 1 in next st, dc 1 in next st, sc 1 in next st, ss 1 in last st. This completes one single leaf.
Info :
To make the double leaves, do not cut yarn and once you have ss 1 in last st to complete the first leaf, chain 12, where the first 3 chains are meant to be the stem in the middle joining the two leaves. Proceed making the second leaf on the remaining 9 chains the same way as the first leaf.
— Rosebuds :
Info :
The rosebuds for the rug's yellow-green section and for the central, mint-green section are crocheted using a hook size E/4 (3.5 mm) and a single strand of yarn. Crochet a total of 8 rosebuds in each color variation which you will then divide into bunches of three (one per color) and attach them all around the yellow-green section of the rug as illustrated.
Groups :
the 1st group of 8 rosebuds are crocheted using Colour Crafter 1026 Lelystad (peach) and Colour Crafter 1824 Enschede (sage-green); the 2nd group ... using Colour Crafter 1257 Hilversum (bright pink) and Colour Crafter 1316 Almelo (mint-green); the 3rd group ... using Colour Crafter 1080 Venlo (antique-pink) and Colour Crafter 1824 Enschede (sage-green).
Info :
The rest of the rosebuds are for the central mint-green section of the rug: crochet 8 rosebuds in Colour Crafter 1130 Sittard (baby pink) and Colour Crafter 1824 Enschede (sage-green); crochet 8 rosebuds in Colour Crafter 1256 The Hague (orange) and Colour Crafter 1316 Almelo (mint-green).
With the green yarn :
ch 29. Row 1: insert hook into 2nd ch from hook, sc 28 to end of chain. Row 2: ch 2 and dc 1 in 1st st; dc 1, ch 2, ss 1 in next st. Then *ss 1, ch 2, dc 1 in next st, and dc 1, ch 2, ss 1, in following st*. Repeat from * to * till you have four green leaves, cut green yarn and change color. Now proceed repeating from * to * in color chosen for petals till you reach the end of the row (10 petals). Starting from the petals at the end of the row, roll the strip up to form a rosebud surrounded by the leaves. Using a yarn needle, stitch the rosebud firmly together along the base.
— XL Rosebuds :
Info :
The XL rosebuds are crocheted using a hook size E/4 (3.5 mm) and a single strand of yarn. They are all for the central, mint-green section of the rug. Crochet a total of 5 pieces in each of the following color combinations making a total of 10 XL rosebuds: make 5 XL rosebuds with Colour Crafter 1246 Maastricht (red) and 1435 Apeldoorn (bright pink); make 5 XL rosebuds with Colour Crafter 1130 Sittard (baby pink) and 1241 Den Bosch (medium pink).
With color 1 :
ch 29. Row 1: insert hook into 3rd chain from hook, sc 27 to end of row. Row 2: ch 2, dc 1, tc 1 in same st; tc 1, dc 1, ch 2 and ss 1 in next st, then continue along the row with *ss 1, ch 2, dc 1, tc 1 in next st, and tc 1, dc 1, ch 2, ss 1 in following st*. Repeat from * to * till you have five petals in color 1, cut yarn and change to color 2. Now proceed repeating from * to * till you reach the end of the row (8 petals in color 2). To form the rosebud, roll the strip up on itself starting from the color 2 section of the row. Using a tapestry needle firmly stitch the XL rosebud together along the base.
— Leaves :
Info :
The leaves are all arranged among the flowers in the central, mint-green section of the rug. They are crocheted using a hook size E/4 (3.5 mm) and a single strand of yarn.
Make 8 leaves :
using Colour Crafter 1820 Goes (grey-blue).
Make 8 leaves :
using Colour Crafter 1824 Enschede (sage-green).
Make 5 leaves :
using Colour Crafter 2016 Charleroi (leaf-green).
Make 5 leaves :
using Colour Crafter 1081 Gouda (light-yellow).
To make one leaf :
ch 9 for foundation. In top loop only: sc 1 in 3rd ch from hook, then in each ch across: dc 1, dc 1 and tc 1, tc 1 and dc 1, dc 1, sc 1, sc 3 in last chain (to form point of leaf). Continue in bottom loop on opposite side of chain: sc 1, dc 1, dc 1 and tc 1, tc 1 and dc 1, dc 1, sc 1, ss 1 in last st. This completes one single leaf.
— XL Leaves :
Info :
The XL Leaves are all arranged around the flowers in the central, mint-green section of the rug. They are crocheted using a hook size E/4 (3.5 mm) and a single strand of yarn. Crochet a total of 5 pieces in each of the following color combinations, thus making a total of 10 XL leaves: 5 XL leaves in Colour Crafter 1725 Ameland (dark-green) with surface crochet vein in Colour Crafter 1823 Coevorden (yellow-green); 5 XL leaves in Colour Crafter 2016 Charleroi (leaf-green) with surface crochet vein in Colour Crafter 1820 Goes (grey-blue).
To make one XL leaf :
ch 19 for foundation. In top loop only: sc 1 in 3rd ch from hook, then in each ch across: sc 1, dc 3, tc 6, dc 3, sc 2, then sc 3 in 1st ch of foundation ch (to form point of leaf). Now work back along the opposite side of the foundation chain (in opposite loop) to make the other half of the leaf: sc 2, dc 3, tc 6, dc 3, sc 2, then ss 1 in last st. To form the central vein, point hook in center of foundation chain using color specified above and work a row of surface slip stitch right along the middle of the leaf.
This joyful rug pattern celebrates colour, texture and handwork in a bold floral design. Whether you make the full-size version or a smaller decorative panel, each element layers into a beautiful finished piece. Add your favourite colours for a totally personalised garden of joy. 🧶🌸✨