About This Granny Patchwork Lap Robe Pattern
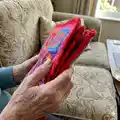
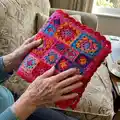
This pattern makes a colorful 44" x 52" Granny Patchwork Lap Robe composed of mixed-size granny squares and striped blocks. Youll work classic granny rounds, small modular units, and simple strip panels for a patchwork layout. The design is ideal for using many colors and yarn scraps to make a lively, textured throw.

Includes detailed instructions for 2-, 3-, 6- and 12-round granny squares and striped panels. Follow the assembling diagram to join squares and work a three-round border to finish.
Why You'll Love This Granny Patchwork Lap Robe Pattern
I absolutely love this pattern because it lets you play with color and texture while using simple crochet building blocks. I enjoy how the mix of small and large granny squares creates a dynamic patchwork look that is different every time. I like that it is forgiving — you can swap colors and units as you go to suit your stash. Making this lap robe feels like a relaxing, creative project with a beautiful, practical result.
Switch Things Up
I love using this pattern to experiment with color — try grouping similar hues for a tonal throw or go wild with high-contrast brights for a boho look.
I sometimes substitute a larger or smaller hook to change the finished size; using a larger hook and bulky yarn makes a chunky, cozy lap rug.
I often make the striped panels wider or narrower to vary the patchwork rhythm and use up long yarn tails efficiently.
I recommend changing the color each rnd for a scrappy, mosaic effect; alternatively keep rounds the same color for a more unified square.
I like to add an extra solid rnd around selected squares before assembly to give them more presence in the layout.
I sometimes join squares as I go by slip-stitching pairs to reduce sewing at the end; this works well if you keep a consistent edge tension.
I enjoy adding a contrasting final border color to frame the whole lap robe and draw the eye to the patchwork center.
I often use textured yarn for one or two squares to add interest — just check that the texture doesnt throw off your join alignment.
I sometimes embroider small motifs or attach crocheted flowers to a few squares to personalize the blanket for gifts.
I recommend blocking larger assembled sections before working the final border to ensure straight edges and accurate dimensions.
Common Mistakes & How to Fix Them
✗ Skipping the joining chain when starting rounds can make corners collapse; always ch the specified number and join to the top of the starting ch before cutting yarn.
✗ Not changing color cleanly can leave loose ends and uneven edges; fasten off and cut yarn after each round and weave in ends for neat joins.
✗ Sewing squares without pinning first can result in misaligned seams; lay out the diagram, pin pieces in place, then whipstitch or mattress-stitch squares together for accurate alignment.
✗ Working with inconsistent tension causes irregular square sizes; aim for consistent gauge, especially by checking that after round 3 your granny measures about 4 inches.
✗ Forgetting to count 3-dc groups between corners leads to shape errors; follow the pattern rule adding one 3-dc group between corners on each successive round to maintain square shape.