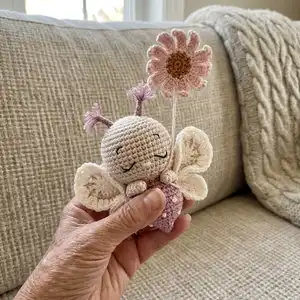
Make Elvina, a delicate handmade butterfly with puff-stitch wings and a daisy accessory. This pattern guides you step-by-step through head, body, wings, arms, antennas and finishing details. With clear photos and techniques included, you will create a tiny, charming amigurumi perfect for gifting or display. Enjoy a relaxing crochet project that produces a sweet little companion.
Progress Tracker
0% Complete
Info :
Crocheted with a 2.5 mm-hook and cotton yarn (50 g, 115 m), Elvina will be approximately 11 cm tall (13 cm with the antennas).
Info :
Unless otherwise specified, crochet in spiral rounds and insert the stitch marker into the first stitch of each round.
Infos :
Invisible decrease: To make an invisible decrease, insert the hook in the front loop of the first stitch (photo a). Then insert the hook in the front loop of the next stitch (photo b). Yarn over and draw through the first 2 loops on the hook. There are now two loops left on the hook (photo c). Yarn over and draw through both loops on the hook. Your invisible decrease is complete (photo d). Color change: Crochet the last stitch before a color change like this: insert the hook in the next stitch, yarn over with the current color, and draw through the stitch (photo a). There are now two loops of the current color on the hook. Take your new color, yarn over and draw it through both loops on the hook (photo b and c). There is now one loop with the new color on the hook (photo d). Work the next stitches as usual using the new color. Puff stitch: a Puff stitch is made of 3 incomplete dc in the same stitch which are joined together. Make the first unfinished dc: yarn over, insert the hook into the stitch (photo a) and pull up a loop (photo b). Hold the hook up to extend the loop to the same height as a dc (photo c): 3 loops are left on the hook; repeat these steps 2 more times in the same stitch to make 3 unfinished dc: 7 loops are left on the hook (photo d); then, wrap the yarn around the hook (photo e) and pull the yarn through all the loops (photo f).
— Head and Body :
Round 3 :
(1 sc, 1 inc) x6 (18)
Round 4 :
(1 sc, 1 inc, 1 sc) x6 (24)
Round 5 :
(3 sc, 1 inc) x6 (30)
Round 6 :
(2 sc, 1 inc, 2 sc) x6 (36)
Round 7 :
(5 sc, 1 inc) x6 (42)
Round 8-16 :
42 sc (9 rds) (42)
Round 17 :
(5 sc, 1 dec) x6 (36)
Round 18 :
(1 sc, 1 dec, 1 sc) x9 (27)
Round 19 :
(1 sc, 1 dec) x9 (18)
Info :
Stuff the head and continue with the body in violet.
Round 20 :
(flo) (1 sc, 1 inc, 1 sc) x6 (24)
Round 21 :
(3 sc, 1 inc) x6 (30)
Round 22 :
(2 sc, 1 inc, 2 sc) x6 (36)
Round 23-26 :
36 sc (4 rds) (36)
Round 27 :
(2 sc, 1 dec, 2 sc) x6 (30)
Round 28 :
(3 sc, 1 dec) x6 (24)
Info :
Start stuffing and continue as you crochet.
Round 29 :
(2 sc, 1 dec, 2 sc) x4 (20)
Round 30 :
(3 sc, 1 dec) x4 (16)
Round 31 :
(1 sc, 1 dec, 1 sc) x4 (12)
Round 32 :
(1 sc, 1 dec) x4 (8)
Round 33 :
(2 sc, 1 dec) x2 (6)
Info :
Fasten off, leave a 20 cm-long tail and weave it with a needle through the front loops of the next 6 stitches. Pull the yarn tail to close and weave in the end.
— Antenna (X2) :
Info :
Make 6 ch. Starting in the 3rd ch from the hook, make 4 sl st. Fasten off, leaving a 20 cm-long tail for sewing.
Info :
In violet: cut 3 strands of yarn (about 7 cm each) and fold them in 2 (photo a). Insert the hook under the 2 ch stitches skipped at the end of the foundation chain (from the back toward the front) (photo b), pull all 3 strands halfway through to create a loop (photo c). Pull all 6 yarn ends through the loop and tighten (photo d). Cut the yarn ends to a length of about 15 mm and separate the yarn plies to make them fluffy (photo d).
— Arm (X2) :
Round 2-6 :
6 sc (5 rds) (6)
Info :
End with a sl st and fasten off, leaving a 30 cm-long tail.
Info :
Fold the arm and close it by sewing the two edges together. Do not cut the yarn, as it will be needed to sew the arm to the body.
— Large half-wing (X2) :
Info :
The wings are crocheted with Puff stitches (see explanations pages 3-4). They are made of 3 incomplete dc in the same stitch which are joined together.
Info :
Start with the color cream. Make a chain of 8 ch.
Row 1 :
Starting in the 2nd ch from the hook: 2 sc, 2 hdc, 2 dc, then in the last ch: [(1 dc, 1 ch) x5, 1 dc], on the other side of the foundation chain: 2 dc, 2 hdc, 2 sc. Cut the yarn and weave in the end.
Row 2 :
In ivory: Join the yarn by 1 sc in the 1st stitch of row 1 (see technique page 4). Continue with: 6 sc, then in each of the 5 ch-spaces (see definition page 4): (2 ch, 1 sc). Then: 7 sc. Cut the yarn and weave in the end.
Row 3 :
In cream: Join the yarn by 1 sc in the 1st stitch of row 2 (see technique page 4). Continue with: 1 sc, 3 hdc, 1 Puff, 1 ch, 1 Puff, 2 ch, then in each of the next 5 ch-spaces: [(1 Puff, 2 ch) x2 ]. Skip the next stitch (photo a) and make: 1 Puff, 1 ch, 1 Puff, 3 hdc, 2 sc.
Info :
Fasten off, leaving a 30 cm-long tail. Weave in all the other remaining ends (photo b). With the 30 cm-long tail, sew the 1st and the last stitches of row 3 together to form a drop (photo c).
— Small half-wing (X2) :
Info :
Make a chain of 6 ch.
Row 1 :
Starting in the 2nd ch from the hook: 4 sc, in the last ch: (2 ch, 1 sc, 2 ch, 1 sc, 2 ch), on the other side of the foundation chain: 4 sc. Cut the yarn and weave in the end.
Row 2 :
Join the yarn by 1 sc in the 1st stitch of row 1 (see technique page 4). Continue with: 1 sc, 1 hdc, 1 dc, then in each of the next 2 ch-spaces: [(1 Puff, 2 ch) x2 ], in the 3rd ch-space: (1 Puff, 2 ch, 1 Puff, 1 ch). Continue with: 1 dc, 1 hdc, 2 sc.
Info :
Fasten off, leaving a 30 cm-long tail. Weave in all the other remaining ends. With the 30 cm-long tail, sew the 1st and the last stitches of row 2 together to form a drop (photo b).
Info :
Sew the large and the small half-wings together following the steps below (Attention: for the second butterfly wing, take care to sew the large and the small half-wings inversely in order to obtain 2 symmetrical butterfly wings): With the long tail of the small half-wing, sew the two tips as well as the folded edges of the 2 half-wings together (photos a-b). Bring the thread between the 2 half-wings and sew the two adjacent edges together by passing the needle back and forth under the stitches of the 2 edges on a width of 4 stitches (picture c).
— Assembly :
Item Name (P1) :
With a long cream thread, embroider the little nose by passing the thread between rds 14 and 15 about 3 times over 2 stitches (see sketch).
Item Name (P2) :
With black embroidery yarn, embroider the eyes (on rd 14) and the eyebrows (on rd 10) as shown in the sketch.
Item Name (P3) :
Sew the antennas on rd 4 on each side of the head.
Item Name (P4) :
With a long cream thread, embroider small dots on the body with French knots. To do so, bring up the yarn to the selected hole and insert the needle under the nearest stitch strand (photo a). Wind the yarn twice around the needle (photo b). Then while holding the 2 loops in place, gently pull the needle (photo c) and tighten slightly to form a small knot (photo d). Insert the needle in the same hole as the one you started with and pull it out to the location of the next dot to embroider (photo d).
Item Name (P5) :
Sew the arms on each side between head and body by tilting them forward.
Item Name (P6) :
Sew the wings behind the arms, on each side of the body of the little butterfly.
— Daisy :
Round 1 :
5 sc in mr. Close the rd with 1 sl st and 2 ch. (5)
Round 2 :
2 dc in each stitch of rd 1. Close the rd with 1 sl st in pastel pink. (10)
Round 3 :
Make 8 ch. Starting in the 3rd ch from the hook: 4 dc, 1 hdc, 1 sc. Starting in the 1st stitch of rd 2 (in which the sl st was made to close rd 2), work: (1 sl st, 8 ch, starting in the 3rd ch from the hook: 4 dc, 1 hdc, 1 sc) x10
Info :
End with 1 sl st, fasten off and weave in the end.
Thank you for choosing this delicate Elvina pattern — I hope it brings a little joy to your day and to whoever receives this handmade friend. 🧶
This tiny butterfly is full of charm and thoughtful details, from the puff-stitch wings to the embroidered freckles on the body. ✨
Have fun stitching and making it truly yours — happy crocheting! 🧵