🧶 Beautiful ✨ Detailed 💝 Adorable

Giraffe Bookmark Amigurumi Pattern

Giraffe Bookmark Amigurumi Pattern
4.9★ Rating
2-4 Hours Time Needed
2.7K Made This
✂️

Intermediate Level

Ideal for those with basic crochet experience, featuring slightly more advanced stitches and techniques to expand your skills.

⏱️

Bite-Sized Project

Finishes in 2-4 hours—perfect for an afternoon of creative relaxation.

🎁

Tiny Treasure

Small, sweet, and gift-worthy creations that fit perfectly in the palm of your hand with detailed charm.

About This Giraffe Bookmark Amigurumi Pattern

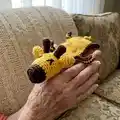
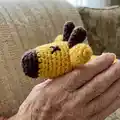
This pattern makes a cute giraffe bookmark worked mainly in rounds with color changes and simple shaping. You will crochet the head, continue into the elongated body with curled feet and attach small ears and horns for character. The design uses common amigurumi techniques and finishes with embroidered facial features and painted spots.

Giraffe Bookmark Amigurumi Pattern crochet pattern - detailed view of completed project

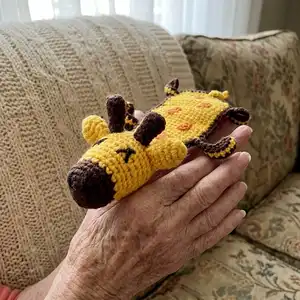
Perfect as a handmade gift or a quick project to practice shaping and color changes. The finished bookmark measures approximately 20 cm tall using the recommended yarn and hook.

Why You'll Love This Giraffe Bookmark Amigurumi Pattern

I absolutely love this pattern because it transforms simple stitches into a playful, functional toy-bookmark combination. I enjoy the tiny details like the curled legs and embroidered face that give the giraffe so much personality. Making it is quick but satisfying, and it makes a lovely handmade gift that looks professional despite being small. The pattern is versatile and invites creative color choices and small customizations.

Giraffe Bookmark Amigurumi Pattern step 1 - construction progress Giraffe Bookmark Amigurumi Pattern step 2 - assembly progress Giraffe Bookmark Amigurumi Pattern step 3 - details and accessories Giraffe Bookmark Amigurumi Pattern step 4 - final assembly and finishing

Switch Things Up

I love how easily this pattern adapts to different color schemes; try soft pastels for a baby-friendly version or bright colors for a playful look.

I sometimes change the yarn weight and use a 3.5mm hook to create a larger, cuddlier bookmark for older kids.

I like to embroider different facial expressions to give each giraffe a unique personality, from smiling to sleepy.

For a festive variation I add tiny felt accessories like a bow or scarf glued or sewn near the neck.

I often replace the brown spots with little buttons or felt cutouts for extra texture and interest.

If I want a sturdier bookmark I insert a thin strip of cardboard or flexible plastic between body rows before closing the edges.

I sometimes make a set in graduated sizes by changing yarn weight and hook size, creating a matching family of bookmarks.

I enjoy adding a loop or tassel at the tail for hanging as an ornament rather than using it as a bookmark.

To make a keychain version I add a metal keyring to the head or tail and reduce the body length by a few rows.

I recommend experimenting with different stuffing amounts; less stuffing gives a flatter bookmark while more creates a plumper toy-like feel.

Common Mistakes & How to Fix Them

✗ Skipping the color change cleanly can create visible jogs in the rounds; carry the yarn neatly or fasten off and rejoin to keep color transitions tidy. ✗ Not stuffing the head before closing will prevent correct shaping and create lumps; stuff gradually to maintain a smooth oval profile while shaping. ✗ Failing to count stitches after increases or decreases leads to uneven shaping; count stitches after each round especially during shaping sections. ✗ Sewing ears or horns in the wrong position can unbalance the face; pin pieces in place and check symmetry before stitching securely. ✗ Not working the curled feet chain rows tightly can cause them to unravel; tighten tension on the chain row and secure ends when finishing.

Giraffe Bookmark Amigurumi Pattern

Create a charming giraffe bookmark perfect for gifting or keeping your place in a favorite book. This small amigurumi-style bookmark is worked in simple rounds with color changes and fun curled feet to give it personality. You will enjoy a compact project that combines basic shaping and playful finishing details to make a delightful tiny treasure.

Intermediate 2-4 Hours

Materials Needed for Giraffe Bookmark Amigurumi Pattern

— Main Fabric

  • 01
    YarnArt Jeans (main yellow) - small amount (pattern does not specify grams)
  • 02
    YarnArt Jeans (brown) - small amount for muzzle, horns, and edging
  • 03
    Accent brown for spots (small scraps)
  • 04
    Silicone filling ball (small) for shaping the head

— Tools Required

  • 01
    Crochet hook 2.5mm
  • 02
    Silicone filling ball (small)
  • 03
    Yarn needle for sewing and embroidery
  • 04
    Scissors

Progress Tracker

0% Complete

Info :

Materiały: Włóczka: YarnArt Jeans. Szydełko 2,5. Wypełnienie: kulka silikonowa. Wysokość: 20 cm.

Info :

Objaśnienia: MG – magiczne koło. ch - oczko. sc – półsłupek. dc – słupek. inc – 2 (pół)słupki w jedno oczko (rozszerzanie). dec – 2 (pół)słupki przerabiane razem (zwężanie). blo – półsłupki w tylną część oczka poprzedniego rzędu.

— Mordka :

Round 1 :

6sc w MG (6)

Round 2 :

(inc) – powtórz 6 razy (12)

Round 3 :

(1sc, inc) - powtórz 6 razy (18)

Round 4-5 :

18sc (18) (2 rzędy)

Info :

Zmieniamy kolor na żółty

Round 6-8 :

18sc (18) (2 rzędy)

Round 9 :

(2sc, inc) - powtórz 6 razy (24)

Round 10-16 :

24sc (24) (7 rzędów)

Round 17 :

(2sc, dec) - powtórz 6 razy (18) wypełnić

Round 18 :

(1sc, dec) - powtórz 6 razy (12)

Round 19 :

Składamy głowę na pół, łączymy oba brzegi: 1ch, 6sc (7)

Round 20 :

1ch, inc, 5sc, inc (9)

Round 21 :

1ch, 9sc (9)

Round 22 :

1ch, inc, 7sc, inc (11)

Round 23 :

1ch, 11sc (11)

Round 24 :

1ch, inc, 9sc, inc (13)

Round 25 :

1ch, 13sc (13)

Round 26 :

1ch, inc, 11sc, inc (15)

— Body :

Round 27 :

1ch, 15sc (15)

Round 28 :

1ch, 15sc (15)

Info :

Tutaj robimy zakręcone nóżki ;)

Round 29-30 :

15ch, odwracamy, 14sc wzdłuż łańcuszka, 15sc wzdłuż tułowia

Round 31-50 :

1ch, 15sc (15) (20 rzędów)

Info :

Tutaj robimy zakręcone nóżki ;)

Round 51-52 :

15ch, odwracamy, 14sc wzdłuż łańcuszka, 15sc wzdłuż tułowia

Round 53-54 :

1ch, 15sc (15) (2 rzędy)

Round 55 :

1ch, dec, 11sc, dec (13)

Round 56 :

1ch, dec, 9sc, dec (11)

Round 57 :

1ch, dec, 7sc, dec (9)

Round 58 :

1ch, dec, 5sc, dec (7)

Round 59 :

1ch, dec, 3sc, dec (5)

Info :

Tułów razem z nogami obrabiamy półsłupkami brązową nitką.

— Uszy (x2) :

Round 1 :

4sc w MG (4)

Round 2 :

(inc) – powtórz 4 razy (8)

Round 3-6 :

8sc (8) (4 rzędy)

— Rogi (x2) :

Round 1 :

6sc w MG (6)

Round 2 :

(inc) – powtórz 6 razy (12)

Round 3 :

(1sc, inc) - powtórz 6 razy (18)

Round 4-5 :

18sc

Round 6 :

(1sc, dec) - powtórz 6 razy (12)

Round 7 :

(2sc, dec) - powtórz 3 razy (9)

Info :

Krzyżykami wyszywamy oczy i nos - czarną nitką. Na tułowiu malujemy brązową kredką łatki.

Assembly Instructions

  • Składamy głowę na pół i łączymy oba brzegi: wykonaj 1ch, 6sc (7) a następnie zszyj brzegi, zabezpieczając łączenie.
  • Przyszyj uszy po obu stronach głowy na wysokości odpowiednio rozmieszczonych punktów tak, aby były symetryczne.
  • Przymocuj rogi (x2) na górze głowy przed lub po umieszczeniu uszu, przeszywając je kilkoma mocnymi szwami.
  • Wyhaftuj oczy i nos krzyżykami czarną nitką w miejscach wskazanych na zdjęciu, aby uzyskać wyraz twarzy.
  • Tułów wraz z nogami obrobiony jest półsłupkami brązową nitką; przypnij łańcuszki zakręconych nóżek i zabezpiecz końce.

Important Notes

  • 💡Wypełnij głowę stopniowo, aby zachować gładkie kształty i uniknąć grudek w silikonowym wypełnieniu.
  • 💡Przypinaj uszy i rogi przed przyszyciem, aby kontrolować ich położenie i symetrię.
  • 💡Maluj łatki na tułowiu delikatnie kredką, aby móc poprawić kształt i kolor zanim zostanie utrwalony.

This adorable giraffe bookmark is a delightful tiny project that brightens any book and makes a perfect handmade gift. The compact design combines simple shaping with sweet details for a charming finish. Give one as a special present or keep it for yourself while you enjoy your next read! 🧶📚

You ask,

we answer.

FAQs

What size will the finished piece be?

The finished bookmark measures approximately 20 cm tall when using YarnArt Jeans and a 2.5 mm hook, as indicated in the pattern.

Can I change the yarn or hook size?

Yes, you can use different yarn weights or a different hook, but this will change the final size and texture. Thicker yarn and a larger hook will make a chunkier bookmark, while thinner yarn will make a smaller one.

Do I need stuffing for this pattern?

Yes, a small silicone filling ball is recommended for shaping the head; stuff lightly to maintain smooth shaping without overfilling.

How do I finish the facial features?

Embroider the eyes and nose using black thread with small cross-stitches, as indicated in the pattern, and draw spots on the body with a brown colored pencil.