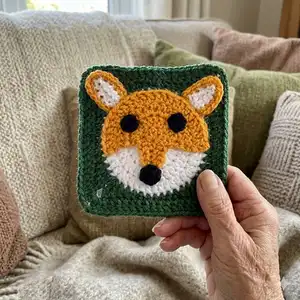
Make a charming fox granny square perfect for blankets, cushions, or applique projects. This easy-to-follow pattern guides you through a circular base, the fox face, ears, nose and simple assembly. Youll enjoy the clear photos and step-by-step rounds as you bring this little fox to life. Ideal for using scrap yarn and creating a coordinated set.
Progress Tracker
0% Complete
— Notes :
Info :
The ( ) at the end of each round/row states the total number of stitches that should be completed for that round/row.
Info :
When working through the rounds/rows, work through the entire stitch (back loop and front loop); unless stated otherwise.
Info :
The chains at the beginning of the round/row do not count as a stitch unless stated otherwise.
Info :
You can use any yarn to make this square. For example, if you use a larger hook and a suitable yarn, the square will be bigger.
Info :
Measurements: The square is 11 cm x 11 cm.
— Square :
Round 1 :
Using the white yarn: MR, ch2, 12dc inside MR (12)
Info :
Tighten the MR by pulling on the tail and then sl st in the 1st dc (skip the ch2).
Round 2 :
ch2, *dc inc* all around (24)
Round 3 :
ch2, *dc, dc inc* all around (36)
Round 4 :
ch2, *2dc, dc inc* all around (48)
Info :
Invisible stitch: After you are done with Round 4, cut the yarn, leave a long tail, and pull it all the way through. With your needle, go into the 2nd dc from the back to the front through both loops, and then go through the center of the last dc towards the back. Pull the tail tight enough to create a stitch on top of the 1st dc and then weave in the excess yarn to secure it.
Info :
Color Change: at the end of Round 4, you will need to do a color change. Method 1: change color at the last dc of Round 4. Method 2: after Round 4 finish off with an invisible stitch and then attach the new color.
Info :
Insert your hook into any stitch and attach the yarn by pulling it through.
Round 5 :
ch1, *3sc, 2hdc, 2dc, [2tc + ch2 + 2tc] in the same stitch, 2dc, 2hdc* all around (68)
Info :
Sl st in the 1st sc that you did at the beginning of Round 5.
Round 6 :
ch2, *dc* all around and [2dc + ch2 + 2dc] in the ch2 space (84)
— Face Area :
Round 1 :
Using the orange yarn: MR, ch3 (counts as a dc), 5dc in MR (6)
Info :
Pull on the tail of your yarn to tighten the MR.
Round 2 :
ch3 (counts as a dc), turn, dc in the same st, *dc inc* all around the remaining stitches (12)
Round 3 :
ch3 (counts as a dc), turn, dc inc, *dc, dc inc* all around the remaining stitches (18)
Round 4 :
ch3 (counts as a dc), turn, dc, dc inc, *2dc, dc inc* all around the remaining stitches (24)
Info :
At the end of the round, finish off and weave in any excess yarn. Cut the yarn, and finish off. Leave a long tail for stitching.
— Nose Area :
Round 1 :
Using the orange yarn: slip knot, ch7, skip the first 4 chains (count as a dc), hdc in the 5th ch away from the hook, sc, 4sc in 1 st (allowing you to turn and start crocheting on the back of the chains), sc, hdc, dc (10)
Info :
Cut the yarn, and finish off. Leave a long tail for stitching.
— Nose :
Round 1 :
Using the black yarn: MR, ch1, 8sc in the MR (8)
Info :
Tighten the MR, cut the yarn, and finish off. Leave a long tail for stitching.
— Eyes x2 :
Round 1 :
Using the black yarn: MR, ch1, 5sc in MR (5)
Info :
Close the MR, finish off, and leave a long tail for stitching.
— Ears x2 :
Round 1 :
Using the white yarn: slip knot, ch6 (last 3 count as a hdc) hdc in the 4th ch away from the hook, hdc, 4sc in one stitch, 3hdc across (10) , change color to orange at the last hdc.
Round 2 :
Using the orange yarn: 3sc across, 4inc, 3sc across (14)
Info :
Cut the yarn, and finish off. Leave a long tail for stitching.
— Assembly :
Info :
Place the face components on the square. Use the tails for stitching.
Info :
The ears are aligned to the corners of the square (the [2tc + ch2 + 2tc] space at the edge of Round 4).
Info :
The Face Area is aligned to the circular base and then the Nose Area is placed exactly next to it in which the tip (where the 4sc are) is directed downwards. Use the tails to stitch everything in place.
Info :
The Nose is stitched on top of the tip of the Nose area.
Info :
The eyes are stitched on top of the Face Area on Round 3.
This fox granny square is a playful and cozy addition to any handmade project, perfect for blankets, cushions, or appliques. Make a family of foxes in different colors or join many squares for a charming woodland blanket. Each square is quick to finish and looks delightful in sets 🧶🦊