🧢 Beautiful ✨ Detailed πŸ’ Adorable

Florence the Flamingo Amigurumi Pattern

Florence the Flamingo Amigurumi Pattern
4.0β˜… Rating
5-7 Hours Time Needed
3.2K Made This
βœ‚οΈ

Intermediate Level

Ideal for those with basic crochet experience, featuring slightly more advanced stitches and techniques to expand your skills.

⏱️

Weekend Treat

Takes 5-7 hours, making it an enjoyable project to finish over a couple of days.

🧸

Cute Companion

An adorable friend to cherish, handcrafted with love to bring comfort and joy for years to come.

About This Florence the Flamingo Amigurumi Pattern

This pattern creates a lovable flamingo amigurumi named Florence worked in continuous rounds with separate pieces for body, neck, head, wings and legs. You will use cotton aran weight yarn and a small hook to achieve a neat, tightly stitched finish. The pattern includes clear round-by-round counts, colour change instructions and helpful pictorial guides for assembly and closing seams.

Florence the Flamingo Amigurumi Pattern crochet pattern - detailed view of completed project

You will learn techniques like working in both sides of a foundation chain, front and back loop stitches, and making bobbles. Detailed finishing instructions ensure clean seams and a charming embroidered face.

Why You'll Love This Florence the Flamingo Amigurumi Pattern

I absolutely love this pattern because it transforms simple stitches into a character full of personality and charm. I enjoy the way the neck and head shaping give Florence a graceful pose and how the wings add a playful sculptural detail. The process of assembling and pinning the parts first always makes the final sewing so satisfying for me. I also like that the pattern allows for fun color swaps and small customisations to make each flamingo unique.

Florence the Flamingo Amigurumi Pattern step 1 - construction progress Florence the Flamingo Amigurumi Pattern step 2 - assembly progress Florence the Flamingo Amigurumi Pattern step 3 - details and accessories Florence the Flamingo Amigurumi Pattern step 4 - final assembly and finishing

Switch Things Up

I love how easily this pattern adapts to different colours and sizes; try soft pastels for a nursery-friendly flamingo or bold hot pink for a statement piece.

If you want a larger flamingo, use a bulkier yarn and a larger hook β€” the stitch counts will remain the same but the finished measurements will increase.

I often add embroidered eyelashes or tiny felt accessories like a bow or tiny hat to give each flamingo a unique personality.

For a poseable neck try inserting a bendable wire inside the neck before stuffing to gently shape and reposition the head.

Experiment with eye placement and embroidery style β€” a slightly higher or lower eye changes the expression dramatically.

I sometimes use a variegated yarn for the wings or add a contrasting edge to make them pop against the body.

Swap the cotton yarn for a soft acrylic if you want a plusher finish, but be aware the look and weight will change.

Make a matching set by crocheting multiple flamingos in graduated sizes for a whimsical display or child’s room decor.

I like to personalise mine by adding small charms or sewing initials inside the tail seam for gift giving.

Don’t be afraid to modify stitch repeats on the wings to create more scallops or a smoother edge β€” the pattern is forgiving and fun to customise.

Common Mistakes & How to Fix Them

βœ— Skipping stitch markers at the start of rounds can cause miscounted increases and decreases; place a marker at the first stitch of each round to keep track precisely. βœ— Forgetting to stuff gradually will create lumps and uneven shaping; stuff in small amounts while shaping so the piece keeps its smooth form. βœ— Changing colour incorrectly at the end of rounds can leave loose tails; change colour on the last single crochet of the previous round and pull through to secure the new colour. βœ— Not working into the correct loops for BLO/FLO shaping will alter openings and joins; carefully identify and work into the specified BLO or FLO locations as noted in the pattern.

Florence the Flamingo Amigurumi Pattern

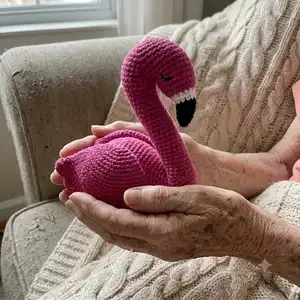
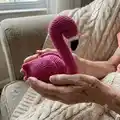
Make a delightful Florence the Flamingo with this complete crochet pattern designed for intermediate crocheters. You will create a sweet, poseable flamingo using simple amigurumi techniques, clear step-by-step rounds, and helpful assembly photos. The pattern includes full instructions for body, neck, head, beak, wings and legs plus finishing and embroidery tips. Perfect for a special handmade gift or a proud display piece for your home.

Intermediate 5-7 Hours

Materials Needed for Florence the Flamingo Amigurumi Pattern

β€” Main Fabric

  • 01
    10 ply cotton yarn (Aran - 4 Medium weight)
  • 02
    Bendigo Woollen Mills cotton 10 ply - 865 Hot Pink (approx 80 grams)
  • 03
    Bendigo Woollen Mills cotton 10 ply - 805 Pink Rose (approx 15 grams)
  • 04
    Bendigo Woollen Mills cotton 10 ply - 801 Snow White (approx 5 grams)
  • 05
    Bendigo Woollen Mills cotton 10 ply - 817 Noir (approx 3 grams)

β€” Tools Required

  • 01
    Crochet hook size 3.75mm
  • 02
    Toy stuffing (polyester fibrefill)
  • 03
    Tapestry needle for sewing
  • 04
    Scissors
  • 05
    Stitch markers
  • 06
    Black embroidery yarn for the eyes
  • 07
    Pins for assembly

Progress Tracker

0% Complete

β€” Body :

Info :

Crochet the flamingo body starting at the chest and working towards the tail. Use colour 865 hot pink

Round 1 :

sc 8 into a mr (8)

Round 2 :

inc x 8 (16)

Round 3 :

(sc 3, inc) x 4 (20)

Round 4 :

(sc 4, inc) x 4 (24)

Round 5 :

(sc 5, inc) x 4 (28)

Round 6 :

(sc 6, inc) x 4 (32)

Round 7 :

(sc 7, inc) x 4 (36)

Info :

We will now make a hole for the flamingo neck and continue to crochet the flamingo body

Round 8 :

chain 3, skip 12 stitches then sc 24 stitches to form the body. (The body stitch count is now 27 which includes the 24 stitches plus the chain 3). (27)

Round 9 :

inc, inc, inc (these are worked into the BLO chain stitches from the previous round). Then sc 24 (30)

Round 10 :

sc (30)

Round 11 :

(sc 4, inc) x 6 (36)

Round 12 :

(sc 5, inc) x 6 (42)

Round 13 :

sc (42)

Round 14 :

(sc 2, inc) x 3 then sc 33 (45)

Round 15 :

(sc 3, inc) x 3 then sc 33 (48)

Round 16 :

sc (48)

Round 17 :

(sc 4, inc) x 3 then sc 33 (51)

Round 18 :

sc (51)

Round 19 :

(sc 5, inc) x 3 then sc 33 (54)

Round 20-21 :

sc (54) (2 rounds = a total of 108 stitches)

Round 22 :

(sc 5, dec) x 3 then sc 33 (51)

Round 23-24 :

sc (51) (2 rounds = a total of 102 stitches)

Round 25 :

(sc 4, dec) x 3 then sc 33 (48)

Round 26 :

sc (48)

Round 27 :

(sc 3, dec) x 3 then sc 33 (45)

Round 28-29 :

sc (45) (2 rounds = a total of 90 stitches)

Round 30 :

(sc 2, dec) x 3 then sc 33 (42)

Round 31 :

sc (42)

Round 32 :

(sc 5, dec) x 6 (36)

Round 33 :

(sc 4, dec) x 6 (30)

Round 34 :

(sc 1, dec) x 3 then sc 21 (27)

Round 35 :

sc (27)

Info :

Stuff the body of the Flamingo

Round 36 :

(dec x 4) then sc 19 (23)

Round 37 :

sc (23)

Round 38 :

(dec x 3) then sc 17 (20)

Round 39 :

(dec x 2) then sc 16 (18)

Info :

Tie off and leave a long tail of yarn for sewing closed.

β€” Neck :

Info :

Crochet the flamingo neck starting at the back of the head. Use colour 865 hot pink

Round 1 :

sc 8 into a mr (8)

Round 2 :

inc x 8 (16)

Round 3 :

(sc 3, inc) x 4 (20)

Round 4 :

(sc 4, inc) x 4 (24)

Round 5 :

(sc 5, inc) x 4 (28)

Round 6 :

(sc 6, inc) x 4 (32)

Round 7 :

sc (32)

Round 8 :

(sc 7, inc) x 4 (36)

Info :

We will now make a hole for the flamingo head and continue to crochet the flamingo neck

Round 9 :

Chain 2, skip 18 stitches and then sc 18 to form the neck. (The total stitch count for the neck is now 20 which includes the 18 stitches plus the chain 2) (20)

Round 10 :

sc 2 into BLO (these are worked into the chain stitches from the previous round). Then sc 18 (20)

Round 11 :

(sc 8, dec) x 2 (18)

Round 12 :

(sc 4, dec) x 3 (15)

Round 13-34 :

sc (15) (22 rounds = a total of 330 stitches)

Info :

Tie off and leave a long tail for sewing.

β€” Head and Beak :

Info :

The flamingo head and beak will be made by attaching your yarn at the top of the neck and working in continuous rounds towards the beak. Use colour 865 hot pink

Round 1 :

make a slip knot and perform a standing sc in the stitch immediately after the chain 2 join (see photo for pictorial guide of the starting point). Now Sc 19. (The last two sc are worked into the FLO of the chain stitches) (20)

Round 2 :

sc (20) (the first sc will go into the standing sc from the previous round)

Round 3 :

inc, sc 16, then (inc x 3) (24)

Round 4-5 :

sc (24) (2 rounds = a total of 48 stitches)

Round 6 :

(sc 2, dec) x 6 (18)

Round 7 :

(dec, sc 4) x 3 (15) Change colour to 801 snow

Round 8 :

sc into BLO (15)

Round 9 :

(dec, sc 3) x 3 (12) change colour to 817 Noir

Round 10 :

sc into BLO (12)

Round 11 :

sc (12)

Round 12 :

inc, inc, (sc 1, dec) x 3, inc (12)

Round 13 :

sc (12)

Round 14 :

(dec, sc 2) x 3 (9)

Round 15 :

(dec, sc 1) x 3 (6)

Info :

Tie off and leave a long tail for sewing.

β€” Wings :

Info :

The wings will be made in a continuous round. The circle is folded flat and closed with single crochet. Do not tie off. Each wing is made with a different edge stitch. Use colour 865 hot pink

Round 1 :

sc 6 into a mr (6)

Round 2 :

inc x 6 (12)

Round 3 :

(sc 1, inc) x 6 (18)

Round 4 :

(sc 2, inc) x 6 (24)

Round 5 :

(sc 3, inc) x 6 (30)

Round 6 :

sc (30)

Round 7 :

(sc 4, inc) x 6 (36)

Round 8 :

sc (36)

Round 9 :

(sc 5, inc) x 6 (42)

Round 10-11 :

sc (42) (2 rounds = a total of 84 stitches)

Round 12 :

(sc 6, inc) x 6 (48)

Round 13 :

sc (48)

Round 14 :

(sc 7, inc) x 6 (54)

Round 15 :

(sc 8, inc) x 6 (60)

Round 16 :

fold flat, chain 1 and sc 30 to close. Go through both loops of both sides. Do not tie off. (30)

Info :

Wing 1: Complete rounds 1-16. Do not tie off. Follow to page 14 for instructions on how to complete the final row of stitches. Wing 2: Complete rounds 1-16. Do not tie off. Follow to page 14 for instructions on how to complete the final row of stitches. These are different to wing 1.

Item Name (Wing One) :

chain 1, turn sc 14 then (sc, 2dc, 2dc, sc) x 4. Tie off and leave a long tail for sewing

Item Name (Wing Two) :

chain 1, turn (sc, 2dc, 2dc, sc) x 4 then sc 14. Tie off and leave a long tail for sewing

β€” Legs :

Info :

The legs will be made starting at the foot. Use colour 805 pink rose

Round 1 :

chain 5 (5)

Round 2 :

sc into the second chain from the hook, sc 2, 3sc into the last stitch. (Then working on the opposite side of the chain) sc 2, inc (10)

Info :

Working on both sides of a foundation chain: Technique 1: work into the BLO, 3sc into the end stitch, then work into the skipped FLO stitches. Technique 2: work into the back hump/back bar, 3sc into the end stitch, then work back up the chain into both loops. Reminder: 3sc = put 3 single crochet into one single stitch

Round 3 :

inc, sc 2, (inc x 3), sc 2, (inc x 2) (16)

Round 4 :

sc (16)

Round 5 :

dec, sc 2, (dec x 3), sc 2, (dec x 2) (10)

Round 6 :

(sc 3, dec) x 2 (8)

Round 7-18 :

sc (8) (12 rounds = a total of 96 stitches)

Round 19 :

sc, bobble in the following stitch (see bobble guide) then sc 6 (8)

Round 20-29 :

sc (8) (10 rounds = a total of 80 stitches)

Info :

Change colour to 865 hot pink

Round 30 :

sc (8)

Round 31 :

(sc 1, inc) x 4 (12)

Round 32 :

sc (12)

Info :

Tie off and leave a long tail for sewing. Do not stuff the legs.

β€” Assembly & Finishing :

Info :

Finish stuffing the body. Fold the edges towards each other in half and line up the stitches. Take a tapestry needle and work a mattress stitch to close the tail. Pin all parts in place before sewing for correct positioning.

Item Name (Sewing Body Closed) :

Tie off and leave a tail for sewing. Finish stuffing the body. Fold in half, line up the stitches, pin closed and use a mattress stitch to close. Hide your yarn tail.

Item Name (Stitching The Flamingo Together) :

Pin the neck to the body. Make sure you stuff the join firmly with fibrefill before closing to ensure the neck sits upright. Use a mattress stitch to close the neck. Pin the legs in the middle of the body with a gap of 1cm. Pin the wings either side of the body, place the edge stitch right side out and sew the front edges of the wings as indicated by photos. Pin the beak against the neck and stitch it against the middle of the neck. Use yarn tails and a tapestry needle to sew all parts together, then hide your yarn tails.

Item Name (Face Embroidery) :

Sew the eyes to the face with black embroidery yarn. Using a pin, mark where you want to stitch. Position the eyes half way down the flamingo's face. Stitch a line at the side of the face. With your needle come back through the centre of the eye (but one row below). Go up and over the line to secure it down into a curve. Hide any yarn tails.

Assembly Instructions

  • Pin the neck to the body and stuff the join firmly with fibrefill before closing; use a mattress stitch to close the neck and secure it so the neck sits upright.
  • Pin the legs into the middle of the body with a gap of approximately 1cm between them, then sew through the foundation edges using a tapestry needle and strong stitches to secure.
  • Place each wing on either side of the body with the edge stitch right side out; stitch the front edges of the wings to the body as shown in the photos for a neat finish.
  • Pin the beak against the neck and stitch it to the middle of the neck, following the shape so it sits naturally on the face.
  • Weave in and hide all yarn tails after sewing; use pins to check positioning before final stitching and adjust for symmetry.

Important Notes

  • πŸ’‘Use stitch markers to keep track of your rounds, especially when creating the neck and body openings.
  • πŸ’‘Stuff firmly but in small amounts for even shaping and to avoid lumps; finish stuffing before closing seams.
  • πŸ’‘Pin all parts in place prior to sewing to confirm placement and symmetry before final stitching.
  • πŸ’‘Change colours on the last single crochet prior to the new colour change round to get a neat transition.
  • πŸ’‘For young children stitch the eyes on using black yarn and a needle rather than safety eyes, as safety eyes are a choking hazard.

This charming Florence the Flamingo pattern brings a handmade smile to any room and makes a perfect gift for loved ones. The pattern includes every round, colour change and finishing tip so you can create a polished amigurumi with confidence. Try different shades or sizes to collect a flock of flamingos! 🧢🧡

You ask,

we answer.

FAQs

What size will the finished piece be?

The finished amigurumi measures approximately 21 cm tall when sitting and about 33 cm long with the legs stretched out, using the recommended yarn and hook size.

Can I use different yarn weights for this pattern?

Yes, you can use different yarn weights but this will change the final size and proportions; adjust your hook size accordingly and expect different stitch counts and tension.

Do I need prior crochet experience for this pattern?

This pattern is rated intermediate and uses techniques like working in BLO/FLO, working on both sides of a foundation chain and bobbles, so basic amigurumi experience is recommended.

How long does this project typically take to complete?

Most crocheters complete this project in 5-7 hours, though time may vary based on experience level, customization and assembly complexity.