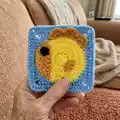
About This Fish Granny Square Pattern
This pattern creates a cheerful fish motif worked into a square — great for blankets, appliques, or playful home accents. You will crochet a circular base, change colors, and make small fins, a face, and an eye to stitch on. Clear photos and step-by-step rounds guide you through shaping and finishing.
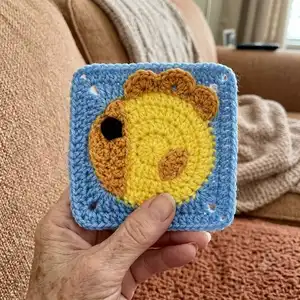
Designed for crocheters who know the basics and want to practice increases and color changes. The finished square measures about 11 cm x 11 cm with the recommended materials.
Why You'll Love This Fish Granny Square Pattern
I absolutely love this pattern because it combines classic round crochet with a fun applique-style assembly that brings the fish to life. I enjoy how the color change creates a crisp edge between the circular body and the square border. The small fins and face let me add personality through placement and embroidery. It is satisfying to see a simple circle transform into a whimsical motif you can use in many projects.
Switch Things Up
I love customizing this square by changing the colors—try soft pastels for a nursery-friendly look or bright brights for a playful blanket.
I often swap yarn weight and hook size to create larger statement squares or mini motifs for keychains.
I like to experiment with the placement of the fins and face; moving them slightly gives the fish different expressions and poses.
I sometimes add embroidery or French knots for extra facial detail instead of a separate crocheted eye to save time.
Try making a full set of sea creatures by using the same circular base and changing applique shapes for crabs, turtles, or starfish.
I occasionally use a textured or boucle yarn for the square border to give a more rustic, tactile finish that contrasts with the smooth fish body.
If you want a more secure applique, I stitch the pieces down with a matching thread and then tack them again with invisible stitches for durability.
I recommend blocking the finished square lightly to square up the edges before adding the border rounds, which helps with consistent joining in blankets.
To make themed sets, choose color palettes like sunset tones or cool blues and make several squares that coordinate when joined into a blanket or wall hanging.
I sometimes add a small hanging loop into a corner for an ornament version—just crochet an extra chain and secure it into the corner before finishing the border.
Common Mistakes & How to Fix Them
✗ Skipping the stitch count at the end of each round leads to uneven shaping; always check the number in parentheses after each round and recount if your work looks off.
✗ Not tightening the magic ring will produce a hole in the center of the circle; pull the tail firmly and close the MR before joining or finishing off to get a neat center.
✗ Changing color incorrectly at the last dc of Round 4 can leave a visible knot; follow Method 1 or Method 2 for a clean color change and weave tails in securely.
✗ Forgetting to use the invisible stitch for a tidy finish causes a bulky seam; follow the invisible stitch directions carefully and weave in the excess yarn to hide the join.