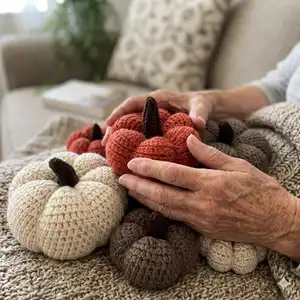
Make a cozy collection of crochet pumpkins with this clear intermediate pattern. You will create several sizes with a textured, segmented look using linked double crochet stitches. The pattern includes full round-by-round instructions, stem templates, and step photos so you can follow along easily. Perfect for autumn decor, gifts, or a seasonal craft project to brighten your home.
Progress Tracker
0% Complete
— Special Stitches :
Infos :
starting linked double crochet in Back Loop (starting l-dc in BL) ch 2, insert H in second ch from H and pull up a loop (photos 7-8), insert H in BL of next st and pull up a loop (3 loops on H, photos 8-9), (YOH and pull through 2 loops) x 2 (photos 10-11). linked double crochet in Back Loop (l-dc in BL) insert H behind the horizontal part of the st just made (photo 11-12, the horizontal part is formed by the middle loop of the 3 loops on the H from the previous step) and pull up a loop (photo 13), insert H in BL of indicated st and pull up a loop (photo 14), (YOH and pull through 2 loops) x 2 (photo 15). 2 single crochet together (2sc-tog) insert H into indicated st and pull up a loop, insert H into next st and pull up a loop (3 loops on H), YOH and pull through all 3 loops. 2 single crochet together in Back Loop with invisible decrease method (2sc-tog in BL) insert H into BL of first st (photos 24-25), insert H into BL of next st (insert your H in the same way, from front to back, photo 26), YOH and pull through both back loops (2 loops on H, photo 27), YOH and pull through both loops (photo 28). 3 single crochet together in Back Loop with invisible decrease method (3sc-tog in BL) insert H into BL of st, insert H into BL of next st (insert your H in the same way, from front to back) AND in the BL of the next st, YOH and pull through a 3 back loops (2 loops on H), YOH and pull through both loops (photos 38-41). single crochet in Back Loop (sc in BL) Insert your H from the top between the two top loops of the st and let your H come out at the back (you've now inserted your H under the back loop only), complete a normal single crochet. slip stitch in Back Loop (sl st in BL) Insert your H from the top between the two top loops of the st and let your H come out at the back (you've now inserted your H under the back loop only), complete a normal slip stitch.
— Tips and Extra Information :
Infos :
Crochet the pumpkin in continuous rounds, marking the first stitch of each round with a stitch marker to track your progress. A smaller hook size than the recommended hook size is used to create a denser fabric, so that your stuffing doesn't show. The slip stitches are always made in the previous row slip stitches, and is made under both loops. Extra information in the pattern is printed in italics, to provide additional clarity when needed. Photo's are placed at the end of this document so that you have the option to print only the written instructions and consult the photo's on your tablet or computer. This pattern is written in US terminology.
— Finished Sizes :
Info :
A: Height 4 cm / 1.6 inches Width 9 cm / 3.6 inches. B: Height 4.5 cm / 1.8 inches Width 10 cm / 4 inches. C: Height 5.5 cm / 2.2 inches Width 10.5 cm / 4.2 inches. D: Height 6 cm / 2.4 inches Width 13.5 cm / 5.3 inches. E: Height 7.5 cm / 3 inches Width 15.5 cm / 6.1 inches. F: Height 11.5 cm / 4.5 inches Width 18.5 cm / 7.3 inches. The stem will add 3cm/1.2 inches or 6cm/2.4 inches.
— Small Pumpkin A :
Info :
This pumpkin has the appearance of horizontal stripes and is the smallest of the pumpkins.
Round 1 :
in second ch from H, make 6 sc, (don't end the round, simply begin next round sts) [6 sts]
Round 2 :
*sl st in next st (photos 1-3), sc in same st* (photo 4), mark first sl st with a SM, rep from * to * another 5 times (photo 5), [12 sts]
Round 3 :
*sl st in next st (from here on, all sl sts will always be in the sl st of the prev round and is made under both loops, photo 6, all other sts in the BL), starting-l-dc in BL of next st (photos 7-11), 2 l-dc in BL of same st* (photos 11-16), rep from * to * another 5 times (photo 17), [24 sts]
Round 4 :
*sl st in next st, starting-l-dc in BL of next st (photos 18-19), l-dc in BL of same st (photo 20), (2 l-dc in BL of next st) x 2 (photo 21)*, rep from * to * another 5 times (photo 22), [42 sts]
Round 5-9 :
(sl st in next st, starting-l-dc in BL of next st, l-dc in BL of each of next 5 sts, photo 23) x 6, [42 sts]
Round 10 :
*sl st in next st, (2sc-tog in BL of next 2 sts (photo 24) with invisible decrease method, photos 24-28) x 3 (photos 29-35)*, rep from * to * another 5 times (photo 36), [24 sts]
Round 11 :
sl st in next st 1 row below (photo 37), sc in BL of each of next 3 sts, [24 sts]
Round 12 :
(sl st, 3sc-tog in BL of next 3 sts with invisible decrease method, photos 38-41) x 6, [12 sts]
Info :
stuff the pumpkin before the next round, make sure to stuff it firmly, photo 42
Round 13 :
sl st in next st 1 row below, sc in BL of next st, [12 sts]
Round 14 :
(2sc-tog over next 2 sts) x 6 (these are normal 2sc-tog under both loops of the sc and sl st), [6 sts], sl st into next st, leave a long tail and cut the yarn, fasten off.
— Small Pumpkin B :
Info :
Pumpkin B has the appearance of bumps and looks a little bigger than Pumpkin A, however, it is the exact same pattern as for Pumpkin A, it is simply turned inside out! Repeat the pattern for Pumpkin A, but before you stuff it, turn it inside out, then complete the instructions as for Pumpkin A.
— Small Pumpkin C :
Info :
This pumpkin is slightly bigger than the smallest pumpkin. It is the same pattern as for Pumpkin A, but with two extra rows after Row 9, making it slightly higher.
Round 1 :
in second ch from H, make 6 sc, (don't end the round, simply begin next round sts) [6 sts]
Round 2 :
*sl st in next st (photos 1-3), sc in same st* (photo 4), mark first sl st with a SM, rep from * to * another 5 times (photo 5), [12 sts]
Round 3 :
*sl st in next st (from here on, all sl sts will always be in the sl st of the prev round and is made under both loops, photo 6, all other sts in the BL), starting-l-dc in BL of next st (photos 7-11), 2 l-dc in BL of same st* (photos 11-16), rep from * to * another 5 times (photo 17), [24 sts]
Round 4 :
*sl st in next st, starting-l-dc in BL of next st (photos 18-19), l-dc in BL of same st (photo 20), (2 l-dc in BL of next st) x 2 (photo 21)*, rep from * to * another 5 times (photo 22), [42 sts]
Round 5-11 :
(sl st in next st, starting-l-dc in BL of next st, l-dc in BL of each of next 5 sts, photo 23) x 6, [42 sts]
Round 12 :
*sl st in next st, (2sc-tog in BL of next 2 sts (photo 24) with invisible decrease method, photos 24-28) x 3 (photos 29-35)*, rep from * to * another 5 times (photo 36), [24 sts]
Round 13 :
sl st in next st 1 row below (photo 37), sc in BL of each of next 3 sts, [24 sts]
Round 14 :
(sl st, 3sc-tog in BL of next 3 sts with invisible decrease method, photos 38-41) x 6, [12 sts]
Info :
stuff the pumpkin before the next round, make sure to stuff it firmly, photo 42
Round 15 :
sl st in next st 1 row below, sc in BL of next st, [12 sts]
Round 16 :
(2sc-tog over next 2 sts) x 6 (these are normal 2sc-tog under both loops of the sc and sl st), [6 sts], sl st into next st, leave a long tail and cut the yarn, fasten off.
— Large Pumpkin D :
Round 1 :
in second ch from H, make 6 sc, (don't end the round, simply begin next round sts) [6 sts]
Round 2 :
*sl st in next st (photos 1-3), sc in same st* (photo 4), mark first sl st with a SM, rep from * to * another 5 times (photo 5), [12 sts]
Round 3 :
*sl st in next st (from here on, all sl sts will always be in the sl st of the prev round and is made under both loops, photo 6, all other sts in the BL), starting-l-dc in BL of next st (photos 7-11), 2 l-dc in BL of same st* (photos 11-16), rep from * to * another 5 times (photo 17), [24 sts]
Round 4 :
*sl st in next st, starting-l-dc in BL of next st (photos 18-19), l-dc in BL of same st (photo 20), (2 l-dc in BL of next st) x 2 (photo 21)*, rep from * to * another 5 times (photo 22), [42 sts]
Round 5 :
*sl st in next st, starting-l-dc in BL of next st, l-dc in BL of same st, l-dc in BL of each of next 4 sts, 2 l-dc in BL of next st*, rep from * to * another 5 times, [54 sts]
Round 6 :
*sl st in next st, starting-l-dc in BL of next st, l-dc in BL of same st, l-dc in BL of each of next 6 sts, 2 l-dc in BL of next st*, rep from * to * another 5 times, [66 sts]
Round 7-13 :
(sl st in next st, starting-l-dc in BL of next st, l-dc in BL of each of next 9 sts) x 6, [66 sts]
Round 14 :
see photos 24-27 of small pumpkin, *sl st in next st, 2sc-tog in BL of next 2 sts with invisible decrease method, sc in BL of each of next 6 sts, 2sc-tog in BL of next 2 sts with invisible decrease method*, rep from * to * another 5 times, [54 sts]
Round 15 :
sl st in next st 1 row below (photo 37), sc in BL of each of next 8 sts, [54 sts]
Round 16 :
*sl st in next st, 2sc-tog in BL of next 2 sts with invisible decrease method, sc in BL of each of next 4 sts, 2sc-tog in BL of next 2 sts with invisible decrease method*, rep from * to * another 5 times, [42 sts]
Round 17 :
sl st in next st 1 row below, sc in BL of each of next 6 sts, [42 sts]
Round 18 :
*sl st in next st, (2sc-tog in BL of next 2 sts with invisible decrease method) x 3*, rep from * to * another 5 times, [24 sts]
Round 19 :
sl st in next st 1 row below, sc in BL of each of next 3 sts, [24 sts]
Info :
stuff the pumpkin before the next round, make sure to stuff it firmly
Round 20 :
(sl st, 3sc-tog in BL of next 3 sts with invisible decrease method, photos 38-41) x 6, [12 sts]
Round 21 :
(sl st in next st 1 row below, sc in BL of next st) x 6, [12 sts]
Round 22 :
(2sc-tog in next 2 sts) x 6, [6 sts] these are normal 2sc-tog under both loops of the sc and sl st, sl st into next st, leave a long tail and cut the yarn, fasten off.
— Large Pumpkin E :
Info :
Pumpkin E has the appearance of bumps and looks a little bigger than Pumpkin D, however, it is the exact same pattern as for Pumpkin D, it is simply turned inside out. Repeat the pattern for Pumpkin D, but before you stuff it, turn it inside out, then complete the instructions as for Pumpkin D.
— Large Pumpkin F :
Info :
Pumpkin F follows the same pattern as Pumpkin D but includes extra rows to increase its height. When stuffed firmly, the width will also expand, creating the illusion of a larger pumpkin.
Round 1 :
in second ch from H, make 6 sc, (don't end the round, simply begin next round sts) [6 sts]
Round 2 :
*sl st in next st (photos 1-3), sc in same st* (photo 4), mark first sl st with a SM, rep from * to * another 5 times (photo 5), [12 sts]
Round 3 :
*sl st in next st (from here on, all sl sts will always be in the sl st of the prev round and is made under both loops, photo 6, all other sts in the BL), starting-l-dc in BL of next st (photos 7-11), 2 l-dc in BL of same st* (photos 11-16), rep from * to * another 5 times (photo 17), [24 sts]
Round 4 :
*sl st in next st, starting-l-dc in BL of next st (photos 18-19), l-dc in BL of same st (photo 20), (2 l-dc in BL of next st) x 2 (photo 21)*, rep from * to * another 5 times (photo 22), [42 sts]
Round 5 :
*sl st in next st, starting-l-dc in BL of next st, l-dc in BL of same st, l-dc in BL of each of next 4 sts, 2 l-dc in BL of next st*, rep from * to * another 5 times, [54 sts]
Round 6 :
*sl st in next st, starting-l-dc in BL of next st, l-dc in BL of same st, l-dc in BL of each of next 6 sts, 2 l-dc in BL of next st*, rep from * to * another 5 times, [66 sts]
Round 7-19 :
(sl st in next st, starting-l-dc in BL of next st, l-dc in BL of each of next 9 sts) x 6, [66 sts]
Round 20 :
see photos 24-27 of small pumpkin, *sl st in next st, 2sc-tog in BL of next 2 sts with invisible decrease method, sc in BL of each of next 6 sts, 2sc-tog in BL of next 2 sts with invisible decrease method*, rep from * to * another 5 times, [54 sts]
Round 21 :
sl st in next st 1 row below (photo 37), sc in BL of each of next 8 sts, [54 sts]
Round 22 :
*sl st in next st, 2sc-tog in BL of next 2 sts with invisible decrease method, sc in BL of each of next 4 sts, 2sc-tog in BL of next 2 sts with invisible decrease method*, rep from * to * another 5 times, [42 sts]
Round 23 :
sl st in next st 1 row below, sc in BL of each of next 6 sts, [42 sts]
Round 24 :
*sl st in next st, (2sc-tog in BL of next 2 sts with invisible decrease method) x 3*, rep from * to * another 5 times, [24 sts]
Round 25 :
sl st in next st 1 row below, sc in BL of each of next 3 sts, [24 sts]
Info :
stuff the pumpkin before the next round, make sure to stuff it firmly
Round 26 :
(sl st, 3sc-tog in BL of next 3 sts with invisible decrease method, photos 38-41) x 6, [12 sts]
Round 27 :
(sl st in next st 1 row below, sc in BL of next st) x 6, [12 sts]
Round 28 :
(2sc-tog in next 2 sts) x 6, [6 sts] these are normal 2sc-tog under both loops of the sc and sl st, sl st into next st, leave a long tail and cut the yarn, fasten off.
— Small Stem :
Info :
Use this stem for the smaller pumpkins A, B and C
Round 1 :
With a 4mm H, ch 10
Row 1 :
sc in 2nd ch from H and in next 5 ch, sl st in last 3 ch [9 sts]
Row 2 :
ch 1, sl st in BL of next 3 sts, sc in BL of next 6 sts,
Row 3 :
ch 1, sc in BL of next 6 sts, sl st in BL of next 3 sts
Rows 4-7 :
rep Rows 2-3 another 2 times, fasten off, leaving a long tail.
— Large Stem :
Info :
Use this stem for the larger pumpkins D, E and F
Round 1 :
With a 4mm H, ch 13
Row 1 :
sc in 2nd ch from H and in next 6 ch, sl st in last 5 ch [12 sts]
Row 2 :
ch 1, sl st in BL of next 5 sts, sc in BL of next 7 sts,
Row 3 :
ch 1, sc in BL of next 7 sts, sl st in BL of next 5 sts
Rows 4-9 :
rep Rows 2-3 another 2 times, fasten off, leaving a long tail.
Rows 10 :
rep Row 2, fasten off, leaving a long tail.
— Finishing the Pumpkin :
Info :
Preparing the stem Fold the stem lengthwise so that the top and bottom meet. The slip stitches should touch each other and the single crochets next to each other. Thread the long tail left when finishing off, through a darning needle. Now seam the top and bottom together, but insert your needle through the back loop only of the top row, so that you continue the ridge pattern made by the back loop stitches. Once you have stitched the top and bottom together, insert your needle through the middle of the stem to come out at the slip stitch end and sew the top closed, pulling it tight. Weave in yarn ends.
Info :
Preparing the pumpkin Thread the long tail left when finishing off, through a darning needle. Insert the needle from the top of the pumpkin through the stuffing to come out at the bottom, inserted the needle from the bottom again to come out at the top and pull the bottom and top closer to each other. Do this a few more times, leaving the yarn and needle at the top to fasten the stem (this will influence the height of your pumpkin, the closer you bring the top and bottom together, the shorter the pumpkin will be).
Info :
Attaching the stem to the pumpkin I find it easier to attach the stem by inserting the needle all the way to the bottom and back up through the stem, but you can also just do the stitching around the top if you prefer. It also looks neater if you use the same colour yarn as the pumpkin to attach the stem.
This pumpkin collection pattern gives you everything you need to crochet cozy fall decor with texture and charm. 🍁 The linked double crochet creates a dense, segmented pumpkin that hides stuffing and looks great grouped in different sizes. Whether you make one or a dozen, these pumpkins bring autumn warmth to any room. 🧶🎃