🧢 Beautiful ✨ Detailed πŸ’ Adorable

First Aid Kit Zippered Pouch Pattern

First Aid Kit Zippered Pouch Pattern
4.4β˜… Rating
5-7 Hours Time Needed
3.8K Made This
βœ‚οΈ

Intermediate Level

Ideal for those with basic crochet experience, featuring slightly more advanced stitches and techniques to expand your skills.

⏱️

Weekend Treat

Takes 5-7 hours, making it an enjoyable project to finish over a couple of days.

✨

Stylish Touch

An elegant detail to elevate any look, combining traditional techniques with contemporary design sensibilities.

About This First Aid Kit Zippered Pouch Pattern

This pattern creates a zippered first aid pouch with a granny-square plus emblem on the front. The pouch is worked from a rectangular bottom into rounds for a neat, boxy finish. It includes instructions for making a zipper tab, five small granny squares, and a simple method to attach the zipper and emblem. You can easily customize the pouch size and yarn choices to suit your needs.

First Aid Kit Zippered Pouch Pattern crochet pattern - detailed view of completed project

Perfect for travel, gifting, or organizing supplies, the pattern is adaptable and beginner-friendly with a few intermediate finishing steps. Follow the finishing notes to shorten and attach the zipper securely.

Why You'll Love This First Aid Kit Zippered Pouch Pattern

I absolutely love this pattern because it turns a practical item into a handmade statement with a sweet granny-square emblem. I enjoy how customizable the size and color choices are, letting me make pouches for different uses and recipients. The construction is satisfying β€” worked flat for the base and then joined to crochet in the round for a clean edge. Finishing with a zipper and a tiny tab always feels a little bit like tailoring, and I love seeing the finished pouch hold useful items.

First Aid Kit Zippered Pouch Pattern step 1 - construction progress First Aid Kit Zippered Pouch Pattern step 2 - assembly progress First Aid Kit Zippered Pouch Pattern step 3 - details and accessories First Aid Kit Zippered Pouch Pattern step 4 - final assembly and finishing

Switch Things Up

I love how easy it is to change the look of this pouch by swapping yarn colors β€” try a neutral MC with bright CC granny squares for contrast.

If you want a mini version, use fingering weight yarn and a smaller hook for the granny squares so the + symbol still fits on the front.

I sometimes make a chunky, cozy version by using bulky yarn and a larger hook for a soft, squishy pouch perfect for bedside supplies.

Try adding a fabric lining for extra durability and a neat interior finish; cut lining to size and hand-sew it in after attaching the zipper.

You can personalize the emblem by embroidering a small initial on the center granny square or adding a button embellishment for a unique touch.

For a wristlet version, crochet a short strap and attach to one side near the zipper tab so you can carry it easily while traveling.

Change the zipper color to match or contrast with your yarn choice β€” a metallic zipper adds a modern, polished look.

I like to make sets of pouches in different sizes using the same colorway to create coordinated travel kits for toiletries, meds, and first aid.

Try decorative edge stitches on the top round before adding the zipper for a lacy or picot finish if you prefer a more decorative style.

Don’t be afraid to experiment with textured stitches for the body of the pouch if you want more visual interest, but check your gauge and zipper fitting first.

Common Mistakes & How to Fix Them

βœ— Forgetting that turning chains in the rectangular bottom do not count as a stitch; always treat turning chains as non-stitch and work into the indicated stitches to maintain correct stitch counts. βœ— Not using a locking stitch marker to mark the beginning of rounds; place a locking marker at the first stitch of each round to avoid losing your place when working in the round. βœ— Purchasing the zipper too early and choosing the wrong length; make the pouch first then measure the opening and buy a zipper that matches, or shorten a longer zipper as described in the finishing section. βœ— Sewing the zipper teeth too close to the crocheted fabric which causes snagging; place the tape inside and ensure teeth are far enough away, then stitch from the right side just below the "v" edges. βœ— Failing to block granny squares before assembly which causes misaligned pieces; block each granny square to about 1.5" first so the + emblem lays flat and matches edges when sewn together.

First Aid Kit Zippered Pouch Pattern

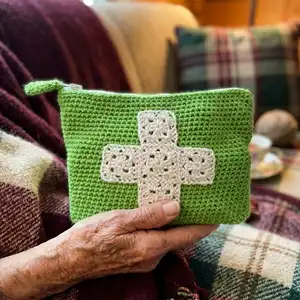
Make a handy, customizable first aid kit pouch you can take anywhere. This zippered crochet pouch features a charming granny-square plus emblem on the front and can be adjusted to any size to suit your needs. You'll love the no-frills construction, simple shaping, and clear finishing instructions for adding a zipper and tab. Perfect for travel, gifting, or organizing your supplies with style.

Intermediate 5-7 Hours

Materials Needed for First Aid Kit Zippered Pouch Pattern

β€” Main Fabric

  • 01
    Approximately 160 yds [146m] acrylic, cotton, or wool worsted weight yarn for pouch (main color)
  • 02
    Approximately 60 yds [55m] acrylic, cotton, or wool sport or light worsted weight yarn for granny square emblem (contrasting color)
  • 03
    Red Heart Super Saver (worsted weight, CYCA #4, 100% acrylic; 364 yards [333 m] 7 oz [198 grams]: Spring Green #0672 (MC), Partial skein (sample shown)
  • 04
    Patons Grace (light weight, CYCA #3, 100% mercerized cotton; 136 yards [125 m] 1.75 oz [50 grams]: Natural #62008 (CC), Partial skein (sample shown)

β€” Tools Required

  • 01
    US G [4.0mm] crochet hook or size needed to obtain gauge for pouch
  • 02
    US D [3.25mm] crochet hook or size needed to obtain gauge for granny square '+' symbol only
  • 03
    Yarn Needle
  • 04
    Removable stitch markers
  • 05
    Non-separating Zipper (sample shown measures 9"; purchase size after making pouch or shorten as described)
  • 06
    Sewing needle and thread (for attaching zipper)

Progress Tracker

0% Complete

β€” Rectangular bottom :

Info :

With MC and larger hook, ch 31.

Note for altering size :

Chain more sts for a wider pouch, fewer for a smaller pouch. Add 4 sts for each inch of added width. Subtract 4 sts for each inch of subtracted width.

Row 1 :

Beginning with the 2nd ch from hook and working into the bottom of the chain, 1 SC into each st. 30 SC.

Rows 2-10 :

Ch 1 (turning ch does not count as a st), turn, 1 SC in each st across. Do not turn after working the last row. Do not fasten off.

Note for altering size :

Work more rows here for a larger front-to-back measurement. Work fewer rows here for a smaller front-to-back measurement. To add or subtract one inch, add or subtract 5 rows.

β€” Sides :

Set-Up Rnd :

Ch 1 (does not count as a stitch), rotate work 90 degrees, to stitch along row-ends. Use a stitch marker to divide the side edge (along row-ends) into two equal sections. 5 SC into each of the two sections along row-ends to next corner, place stitch marker in first st to keep track of first st of round, rotate work 90 degrees to stitch along opposite edge of foundation chain, placing one SC into each of the 30 sts across edge, rotate work 90 degrees to stitch along row ends (use stitch marker to divide edge in half as before), 5 SC into each of the two sections along row-ends, rotate work 90 degrees and work 1 SC into each st across ending at marked stitch, do not join, but continue to work in the round. 80 SC around.

Note if altering size :

If more stitches were added to Rectangular Bottom, be sure to work into each stitch along long edges. If more rows were added, work extra stitches along row-ends (there should be one stitch in each row along row-ends). This will alter the stitch count.

Rnds 1-28 :

SC into each stitch around.

Info :

On last round fasten off at side edge of bag with a sl st (fold bag flat along top opening to find side edge). Work more stitches after last round if needed, to end at side edge.

Note for altering size :

Work more or fewer rounds here to change the height of the pouch.

β€” Zipper tab :

Info :

With larger hook and MC, ch 13.

Row 1 :

Beginning with the 2nd ch from hook and working into the bottom of the chain, 1 sl st in next st, SC in each of next 10 sts, 1 sl st in last st. 2 sl st, 10 SC.

Row 2 :

Ch 1 (turning ch does not count as a st), turn, 1 sl st in next st, 1 SC in each of next 10 sts, 1 sl st in last st.

Info :

Fasten off leaving long tail for sewing.

β€” Emblem :

Granny square (make 5) :

Set-up Rnd: With CC and smaller hook, ch 4, sl st in first ch to join into a ring.

Rnd 1 :

Ch 3 (counts as the first DC of rnd), 2 DC in center of ring, [ch 2, 3 DC in ring] 3 times, HDC into top of the ch-3 at beginning of rnd, this HDC counts as the last ch-2 sp of rnd as well as a join.

Rnd 2 :

Ch 3 (counts as first DC of rnd), 2 DC in same sp, *skip next 3 DC, [3 DC, ch 2, 3 DC] in next ch-2 sp, repeat from * twice more, skip next 3 DC, 3 DC into first ch-2 sp, HDC into top of ch-3 to join (HDC counts as a ch-2 sp as well as the join).

Rnd 3 :

Ch 3 (counts as first DC of rnd), 2 DC in same ch-2 sp, *skip next 3 DC, 3 DC into sp before next set of 3 DC sts, skip next 3 DC, [3 DC, ch 2, 3 DC] in next ch-2 sp, repeat from * twice more, skip next 3 DC, 3 DC into sp before next set of 3 DC sts, skip next 3 DC, [3 DC, ch 2] into first ch-2 sp, sl st into top of ch-3 to join.

Info :

Fasten off leaving long tail for sewing

β€” Finishing :

Info :

Block all pieces.

β€” Zipper :

Info :

Check measurement of zipper against the measurement of opening. If zipper is longer than opening, it can be shortened from the bottom by stitching around the zipper teeth several times with a needle and thread and trimming away the excess below the stitching line. Pin zipper into opening in top of pouch. Place zipper tape to inside of crocheted fabric and make sure teeth are far enough away from crocheted fabric so that it will not get snagged by zipper teeth. Using sewing needle and thread, stitch zipper in place from the RS, just below the "v"s along the top edge of opening with a back stitch.

Info :

Feed one end of zipper tab through the opening in zipper pull. Using yarn needle and yarn tails, stitch short ends of zipper tab together. Position the narrow section of zipper tab within the hole in zipper pull, then stitch tab in place just above opening in zipper pull to keep it in place. Weave in all ends of MC.

β€” Emblem: Making the "+" sign :

Info :

Weave in all beginning yarn tails of granny squares, but leave ending tails loose for sewing. Position all granny squares in formation on table and whip stitch edges together to make the + symbol. Pin the + symbol to the front of the bag. Use yarn needle and yarn tails to sew symbol in place, using a back stitch around all edges.

Assembly Instructions

  • Position the five blocked granny squares in the + formation on a flat surface and whip stitch the square edges together to form the emblem.
  • Pin the completed + emblem to the front of the pouch in the desired location and sew it in place using a yarn needle and a back stitch around all edges.
  • Measure the top opening of the pouch and pin the zipper in place with the zipper tape to the inside of the crocheted fabric, keeping teeth away from the fabric, then sew in place from the RS just below the 'v' edges using a back stitch.
  • If the zipper is longer than the opening, shorten the zipper from the bottom by stitching around the teeth several times with thread and trimming the excess below the stitching line before attaching.
  • Feed one end of the crocheted zipper tab through the zipper pull, stitch the short ends of the tab together, position the narrow section into the zipper pull hole, then secure the tab in place above the opening and weave in all ends of MC.

Important Notes

  • πŸ’‘Turning chains in the rectangular bottom do not count as a stitch; always treat turning chains as non-stitches when counting rows and stitches.
  • πŸ’‘Use a locking stitch marker to note the beginning of the round so you don't lose your place when working in the round.
  • πŸ’‘Purchase the zipper after making the pouch to ensure correct length, or shorten a longer zipper using the trimming method described.
  • πŸ’‘Block granny squares to the approximate measurement (about 1.5") before assembling the + emblem so pieces align neatly.

This First Aid Kit Zippered Pouch pattern makes a useful and stylish travel pouch that you can customize in color, size, and yarn. The granny-square + emblem adds a handmade, thoughtful touch for gifting or personal use. Finish the pouch with a zipper tab and a neatly sewn zipper for a polished result. πŸ§Άβœ‚οΈ

You ask,

we answer.

FAQs

What size will the finished piece be?

The sample shown measures approximately 9" wide (along top edge folded flat) x 2" front-to-back near the bottom and about 5.75" tall, but the size is easily customizable by changing chains and rows.

Can I use different yarn weights for this pattern?

Yes, you can change yarn weight but it will alter the final size and gauge; adjust hook size accordingly and consider using thinner yarn for the granny squares if making a smaller pouch.

Do I need prior crochet experience for this pattern?

This pattern is rated intermediate and assumes basic knowledge of SC, DC, HDC, chaining, working in turned rows and in the round, and basic finishing techniques like sewing and blocking.

How long does this project typically take to complete?

Most crocheters complete this project in 5-7 hours, depending on experience and how much time is spent on blocking and finishing the zipper.