🧢 Beautiful ✨ Detailed πŸ’ Adorable

Bucket Hat Pattern

Bucket Hat Pattern
3.9β˜… Rating
5-7 Hours Time Needed
3.0K Made This
βœ‚οΈ

Intermediate Level

Ideal for those with basic crochet experience, featuring slightly more advanced stitches and techniques to expand your skills.

⏱️

Weekend Treat

Takes 5-7 hours, making it an enjoyable project to finish over a couple of days.

🧣

Snug Essential

Everyday comfort with practical charm, designed for both functionality and style through changing seasons.

About This Bucket Hat Pattern

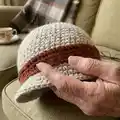
This pattern creates a classic bucket hat worked in the round using two strands of worsted weight yarn held together for body and brim. It includes clear increase rounds to shape the crown, a front-post round to form a defined brim, and a simple, removable hat band. Three sizes are provided so you can make a comfortable fit for head circumferences.

Bucket Hat Pattern crochet pattern - detailed view of completed project

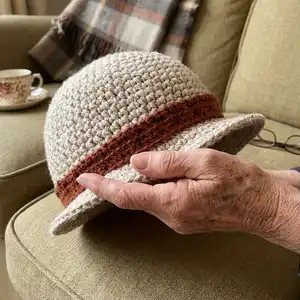
Worked in spiral with no joins, the hat builds from a 6-sc center and expands with increase rounds for a smooth dome. The band is crocheted separately with one strand and can be slipped on or sewn in place for a polished finish.

Why You'll Love This Bucket Hat Pattern

I absolutely love this pattern because it turns simple stitches into a structured, fashionable hat you can actually wear every day. I enjoy the way holding two strands gives great body and texture without complicated stitches. The brim pops out nicely thanks to the single round of front post single crochets, and the separate band makes it easy to change the look whenever I want. Making this hat feels fast and satisfying β€” each increase round visibly changes the shape and makes the project feel rewarding at every step.

Bucket Hat Pattern step 1 - construction progress Bucket Hat Pattern step 2 - assembly progress Bucket Hat Pattern step 3 - details and accessories Bucket Hat Pattern step 4 - final assembly and finishing

Switch Things Up

I love changing the color of the band to create a new look; try bright contrast colors for a bold style or neutrals for a classic finish.

I often switch yarn weights and hook sizes to make minis or oversized versions β€” using thinner yarn and a smaller hook creates a dainty hat, while bulky yarn makes a chunky statement piece.

I sometimes substitute a cotton or linen-blend worsted yarn for a cooler summer hat that breathes better on warm days.

To make the brim stiffer, I add a light interfacing or fabric ribbon inside the brim, or block the brim with a light spray starch to hold the shape.

I also experiment with different brim widths by adding or skipping increase rounds in the brim shaping section to make a floppy or narrow brim.

For a dressier hat, I sew on a ribbon or tiny crocheted flowers to the band; for a casual look I leave the band removable and swap it for different colors.

I sometimes embroider small motifs onto the band before joining it to add personalized details like initials or small icons.

To adjust sizing easily, I add or remove an increase round near the crown and re-check the fit against a head measurement as I work.

If you want a reversible band, I make a double-thick band by working two panels and sewing them together so both sides are finished.

I encourage trying metallic or novelty yarn for the band only to add a subtle shimmer without changing the hat body texture.

Finally, consider lining the hat with lightweight fabric for extra structure and comfort if you plan to wear it frequently or want a more finished interior.

Common Mistakes & How to Fix Them

βœ— Starting with only one strand instead of two gives a floppy hat; hold two strands together throughout for correct gauge and structure. βœ— Failing to use a stitch marker causes rounds to drift and miscounts; place a marker after the first 6 sc and move it up each round. βœ— Not trying the band chain around the hat before joining leads to the wrong circumference; always test the ch length and adjust before slip stitching. βœ— Overstuffing or pulling stitches too tight during increases will distort the crown; keep even, moderate tension and check shape regularly. βœ— Skipping the front post single crochet round will make the brim limp instead of standing out; work the fpsc round exactly as written for a crisp brim.

Bucket Hat Pattern

Make a stylish, handmade bucket hat with this clear crochet pattern. Youll work with two strands of worsted weight yarn held together to create a sturdy, textured hat with a turned brim and removable band. The pattern includes three sizes and a simple band tutorial so you can customize the look. Perfect for crafting a wearable accessory that dresses up any outfit.

Intermediate 5-7 Hours

Materials Needed for Bucket Hat Pattern

β€” Main Fabric

  • 01
    Worsted weight yarn (#4) - Color A (main) - 4 oz
  • 02
    Worsted weight yarn (#4) - Color B (band/contrast) - 4 oz
  • 03
    Use two strands held together throughout the hat body and brim (held together as one working yarn)
  • 04
    Optional: one strand of worsted weight yarn for the hat band (same weight, single strand)

β€” Tools Required

  • 01
    Crochet hook size J / 6.00mm
  • 02
    Stitch marker
  • 03
    Scissors
  • 04
    Yarn needle / tapestry needle for weaving and sewing
  • 05
    Measuring tape

Progress Tracker

0% Complete

β€” Hat :

Infos :

Materials: 4oz each of two colors of worsted weight yarn, size J or 6.00mm crochet hook. Gauge: 3 sts + 4 rows = 1 inch with two strands held together. Sizes: small-18", medium- 20", large-22". Abbreviations: ch - chain. sc - single crochet. fpsc - front post single crochet (single crochet around the post of the single crochets in the previous round, not the top). Rnd - round.

Info :

Notes: This hat is made in the round with no joins (spiral) with both strands of yarn held together throughout. To start you can use the magic ring or if you'd like you can just chain 2 and crochet the first 6 single crochets in the second chain from hook. There is one round of front post single crochets to start the brim, this gives it a brim that instantly stands out and doesn't gradually increase. Each increase round adds 2 inches to this hat, for in between sizes (19", 21", 23" etc) you can add a round and only increase by 3 stitches skipping every other increase stitch.

Info :

Starting with both strands of yarn held together and magic loop: Single crochet 6 inside ring. Place a marker after this last sc and move it up with every round.

Round 1 :

2 sc in each sc around.

Round 2 :

(sc 1, 2 sc in next sc) around.

Round 3 :

(sc 2, 2 sc in next sc) around.

Round 4 :

(sc 3, 2 sc in next sc) around.

Round 5 :

(sc 4, 2 sc in next sc) around.

Round 6 :

(sc 5, 2 sc in next sc) around.

Round 7 :

(sc 6, 2 sc in next sc) around.

Round 8 :

(sc 7, 2 sc in next sc) around. For small sizes end increase here and skip down to Rnd 11.

Round 9 :

(sc 8, 2 sc in next sc) around. For medium size end increase here and skip down to Rnd 11.

Round 10 :

(sc 9, 2 sc in next sc) around.

Round 11-24 :

sc around.

Round 12 :

(fpsc 10, 2 fpsc in next st) around.

Round 13 :

(sc 11, 2 sc in next st) around.

Round 14 :

sc 6, 2 sc in next st, (sc 12, 2 sc in next st) 5 times, sc to end.

Round 15 :

sc 3, 2 sc in next st, (sc 13, 2 sc in next st) 5 times, sc to end.

Round 16 :

(sc 14, 2 sc in next st) around.

Round 17 :

sc 7, 2 sc in next st, (sc 15, 2 sc in next st) 5 times, sc to end. Break yarn, hide end.

β€” Hat Band :

Info :

For the hat band - With one strand of your choice color of worsted weight yarn and size j or 6.00mm crochet hook -

Round 1 :

ch 66, join with a slip stitch to the first chain. (Try this chain out around your hat to make sure it fits before joining, if it's to long pull out some chains, if it's to short add some. The number of chains is not important here, fit is!)

Round 2 :

ch 1, sc in each ch around, join with a slip stitch to the first SINGLE CROCHET, skipping the ch 1.

Round 3 :

ch 1, sc around, join in the same way.

Round 4 :

Reverse single crochet around.

Round 5 :

You can cut the yarn and rejoin it to the bottom of the band on the chain round or you can slip stitch down the inside of the band and turn it around so that the bottom is the top and continue. Reverse single crochet around along the bottom of the band. Cut and hide yarn. Slip this band down around the hat and you can use a strand of the same color of yarn and sew it in place or just let it be there and make a bunch of different colors of bands and change them to match whatever accessories your wearing that day. : D

Assembly Instructions

  • Place a stitch marker after the initial 6 single crochets and move it up at the end of each round so you keep correct stitch placement while working in spiral.
  • After completing the hat, slip the completed hat band down around the crown where desired and either sew the band in place with a yarn needle or leave it removable for interchangeable colors.
  • When sewing the band in place use matching yarn and small whipstitches through the band and the hat at a few evenly spaced points so it lays flat and stays secure.
  • If you prefer the band to sit with the reverse single crochet edge out, slip stitch down the inside before flipping the band and finishing the outside edge with reverse single crochet and then attach it to the hat.
  • Break and hide yarn ends after finishing the brim increases and after completing the band; weave ends into fabric to secure and neaten the hat.

Important Notes

  • πŸ’‘Work the hat in spiral with no joins and hold two strands of yarn together throughout for correct gauge and brim structure.
  • πŸ’‘Place a stitch marker after the first 6 single crochets and move it up each round to track the start of the round accurately.
  • πŸ’‘Try the chain length for the band around your hat before joining; adjust chains for correct fit before slip stitching.
  • πŸ’‘The single round of front post single crochet creates a defined brim; do not skip it if you want the brim to stand out.

This Bucket Hat pattern makes a wearable, fashionable hat with sturdy texture and a neat brim you can be proud of. Change the band color to match your outfit and make a whole collection of hats. Perfect for gifting or styling for every season. 🧢✨

You ask,

we answer.

FAQs

What size will the finished piece be?

The pattern includes three sizes: small (18"), medium (20"), and large (22") when using the recommended yarn and hook.

Can I use different yarn weights for this pattern?

Yes, but changing yarn weight will affect the final size and drape; use an appropriate hook size and check gauge if substituting.

Do I need prior crochet experience for this pattern?

This pattern is rated intermediate; basic knowledge of single crochet, increases, and front post single crochet is recommended.

How long does this project typically take to complete?

Most crocheters complete this project in 5-7 hours, though time may vary based on experience and pace.