🧢 Beautiful ✨ Detailed πŸ’ Adorable

Felted Bowl Trio Pattern

Felted Bowl Trio Pattern
4.3β˜… Rating
5-7 Hours Time Needed
2.6K Made This
βœ‚οΈ

Beginner Friendly Level

Perfect for those just starting their crochet journey, with clear instructions and simple techniques

⏱️

Weekend Treat

Takes 5-7 hours, making it an enjoyable project to finish over a couple of days.

🏑

Cozy Accent

A warm touch for your space that transforms ordinary corners into inviting nooks filled with handmade charm.

About This Felted Bowl Trio Pattern

This pattern teaches you to crochet three nesting bowls that are felted for durability and texture. You will work each bowl from the center-bottom outward and finish them in the washing machine. A pen-style felting tool is used to add personalized embroidery or decorations.

Felted Bowl Trio Pattern crochet pattern - detailed view of completed project

Includes complete round-by-round instructions for Large, Medium, and Small bowls. Ideal for practicing felting and creating a coordinated set of storage bowls.

Why You'll Love This Felted Bowl Trio Pattern

I absolutely love this pattern because it combines simple single crochet shaping with the satisfying transformation of felting. The bowls are quick to make and forgiving β€” the felting process blends stitches and evens out tension beautifully. I also enjoy adding little needle-felted details with a pen-style tool to personalize each bowl. Making a trio feels rewarding because the nested set looks great together and makes lovely handmade gifts.

Felted Bowl Trio Pattern step 1 - construction progress Felted Bowl Trio Pattern step 2 - assembly progress Felted Bowl Trio Pattern step 3 - details and accessories Felted Bowl Trio Pattern step 4 - final assembly and finishing

Switch Things Up

I love customizing these bowls by swapping colors β€” try tonal shades for a subtle set or high-contrast colors for bold accents.

You can change yarn weight and hook size to make larger or smaller bowls, but be sure to choose 100% wool for successful felting.

Try alternate stitch patterns in the body before felting for surface textureβ€”post-stitch or front-loop-only rounds add interest.

I often add needle-felted letters or simple motifs with a pen-style felting tool to personalize bowls for gifts.

Make a single oversized bowl for a statement piece by continuing increases longer before working even rounds.

Combine two colors in stripes by alternating rounds for a layered felted effect after washing.

Embroider with contrasting wool yarn after felting if you prefer raised, crisp details rather than needle-felted ones.

If you want a stiffer bowl, felt more aggressively in the washing machine and add shaping on a bowl form while damp.

Consider adding a fabric or leather base after felting for extra protection and a mixed-media look.

I sometimes make sets in seasonal palettes and group them as hostess gifts β€” small personalization makes each set feel special.

Common Mistakes & How to Fix Them

βœ— Not using a stitch marker to mark the beginning of rounds can make counting difficult; place and move a marker at the first stitch of each round to stay on track. βœ— Pulling your yarn too tight while crocheting causes a stiff fabric that felts unevenly; maintain a relaxed, consistent tension for best felting results. βœ— Skipping the step to pull on the beginning yarn tail to close the adjustable ring leaves a hole in the base; always pull the tail to close the ring before continuing. βœ— Overstuffing or under-shaping bowls during felting will distort the final form; shape with your hands gradually during and after felting for the desired curve. βœ— Failing to weave in ends before felting can leave loose tails that catch during washing; weave in or securely tuck tails to prevent unraveling during felting.

Felted Bowl Trio Pattern

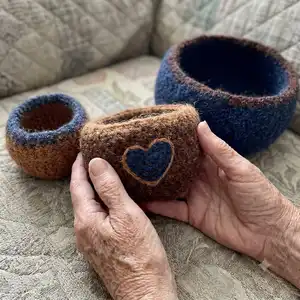
Create a set of three nesting felted bowls to organize your space and show off your love of yarn. These bowls are crocheted in the round, felted in the washer, and easily personalized with a pen-style felting tool. The pattern includes full instructions for large, medium, and small bowls so you can make a matching set to gift or keep.

Beginner Friendly 5-7 Hours

Materials Needed for Felted Bowl Trio Pattern

β€” Main Fabric

  • 01
    Non-superwash worsted weight yarn (#4), 100% wool
  • 02
    Color A (blue) - approximately 115 yards
  • 03
    Color B (dark brown) - approximately 85 yards
  • 04
    Color C (light golden brown) - approximately 50 yards

β€” Tools Required

  • 01
    Crochet hook size L (8.0 mm) or size needed to obtain gauge
  • 02
    Locking stitch markers
  • 03
    Tapestry needle (yarn needle) for weaving ends
  • 04
    Pen-style felting tool (needle felting pen)
  • 05
    Washing machine for felting and agitation
  • 06
    Scissors

Progress Tracker

0% Complete

β€” Large Bowl :

Round 1 :

Using A, make an adjustable ring, 6 sc in ring, pull on beg yarn tail to close hole – 6 sts, do not join, but work in the rnd. Use stitch marker to keep track of beg of rnds.

Round 2 :

2 sc in each st around – 12 sts.

Round 3 :

[Sc in next st, 2 sc in next st] 6 times – 18 sts.

Round 4 :

[2 sc in next st, sc in next 2 sts] 6 times – 24 sts.

Round 5 :

[1 sc in next 2 sts, 2 sc in next st, sc in next st] 6 times – 30 sts.

Round 6 :

[1 sc in next 4 sts, 2 sc in next st] 6 times – 36 sts.

Round 7 :

[1 sc in next 2 sts, 2 sc in next st, sc in next 3 sts] 6 times – 42 sts.

Round 8 :

[1 sc in next 5 sts, 2 sc in next st, sc in next st] 6 times – 48 sts.

Round 9 :

[1 sc in next 1 sts, 2 sc in next st, sc in next 5 sts] 6 times – 54 sts.

Round 10 :

Sc around.

Round 11 :

[1 sc in next 3 sts, 2 sc in next st, sc in next 5 sts] 6 times – 60 sts.

Round 12 :

Sc around.

Round 13 :

[1 sc in next 9 sts, 2 sc in next st] 6 times – 66 sts.

Round 14-21 :

Sc around. Use contrasting st marker to mark post of first st of Rnd 14. This will help keep track of how many rnds have been worked even.

Round 22 :

[1 sc in next 9 sts, sc2tog] 6 times – 60 sts.

Round 23 :

[1 sc in next 3 sts, sc2tog, sc in next 5 sts] 6 times, sl st in first st of rnd – 54 sts.

Round 24 :

Yo with B and pull up loop, pull on A yarn tail until last A loop disappears, ch 1 (does not count as a stitch), sc around, sl st in first sc to fasten off.

Info :

Weave in ends.

β€” Medium Bowl :

Info :

Using B, work Rnds 1 – 6 of Large Bowl directions.

Round 7 :

Sc around.

Round 8 :

[1 sc in next 2 sts, 2 sc in next st, sc in next 3 sts] 6 times – 42 sts.

Round 9 :

Sc around.

Round 10 :

[1 sc in next 5 sts, 2 sc in next st, sc in next st] 6 times – 48 sts.

Round 11-15 :

Sc around. Use contrasting st marker to mark post of first st of Rnd 11. This will help keep track of how many rnds have been worked even.

Round 16 :

[1 sc in next 6 sts, sc2tog] 6 times – 42 sts.

Round 17 :

[1 sc in next 3 sts, sc2tog, sc in next 2 sts] 6 times, sl st in first st of rnd – 36 sts.

Round 18 :

Yo with C and pull up loop, pull on B yarn tail until last B loop disappears, ch 1 (does not count as a stitch), sc around, sl st in first sc to fasten off.

Info :

Weave in ends.

β€” Small Bowl :

Info :

Using C, work Rnds 1 – 3 of Large Bowl directions.

Round 4 :

Sc around.

Round 5 :

[2 sc in next st, sc in next 2 sts] 6 times – 24 sts.

Round 6 :

Sc around.

Round 7 :

[1 sc in next 2 sts, 2 sc in next st, sc in next st] 6 times – 30 sts.

Round 8-10 :

Sc around. Use contrasting st marker to mark post of first st of Rnd 8. This will help keep track of how many rnds have been worked even.

Round 11 :

[1 sc in next 4 sts, sc2tog] 6 times-24 sts.

Round 12 :

Yo with A and pull up loop, pull on C yarn tail until last C loop disappears, ch 1 (does not count as a stitch), sc around, sl st in first sc to fasten off.

Info :

Weave in ends.

β€” Finishing :

Info :

Felt bowls in washing machine. Shape with hands and air dry after felting is complete. Add strands of yarn to bowls with needle felting tool to decorate.

Assembly Instructions

  • Weave in all loose ends before felting so tails do not catch or tangle during the wash.
  • Felt bowls in the washing machine using warm water and agitation, then shape them with your hands while damp to create the final bowl curve.
  • After felting and drying, use a pen-style or needle felting tool to attach strands or embroidered details to the outside of the bowl for personalization.
  • Use a contrasting stitch marker as instructed to keep track of rounds while working, which ensures consistent bowl height and even shaping.

Important Notes

  • πŸ’‘Some white or off-white wool yarns will not felt well, so test a swatch before committing to a whole bowl.
  • πŸ’‘Bowl is worked in the round from the center-bottom outward, with decreases at the top edge to keep the bowl from stretching out of shape.
  • πŸ’‘Because the bowls will be felted, obtaining an exact gauge is not necessary for this project, but you can check the first 5 rounds to approximate size.

These nesting felted bowls are a delightful and practical project that brings handmade charm to any space. Make a matching set for gifts or mix colors for a playful look. Personalize with needle felting for extra love and detail. 🧢✨

You ask,

we answer.

FAQs

What size will the finished piece be?

Bowls measure about 11 (18, 26) inches in circumference before felting and 9 (12.75, 17) inches after felting, depending on size.

Can I use different yarn weights for this pattern?

You can change yarn weight, but because these bowls rely on felting, use 100% wool that felts well; different weights will change final size and felting behavior.

Do I need prior crochet experience for this pattern?

This pattern is rated beginner friendly and uses basic single crochet, increases, and decreases; familiarity with working in the round and a stitch marker is helpful.

How do I felt the bowls and finish them?

Felt the bowls in the washing machine with warm water and agitation, shape them with your hands while damp, air dry, then add decorations with a pen-style needle felting tool.