🧢 Beautiful ✨ Detailed πŸ’ Adorable

Feather Locklear the Chick Amigurumi Pattern

Feather Locklear the Chick Amigurumi Pattern
3.9β˜… Rating
5-7 Hours Time Needed
4.0K Made This
βœ‚οΈ

Intermediate Level

Ideal for those with basic crochet experience, featuring slightly more advanced stitches and techniques to expand your skills.

⏱️

Weekend Treat

Takes 5-7 hours, making it an enjoyable project to finish over a couple of days.

🧸

Cute Companion

An adorable friend to cherish, handcrafted with love to bring comfort and joy for years to come.

About This Feather Locklear the Chick Amigurumi Pattern

This pattern teaches you how to crochet Feather Locklear, a charming chick made from worsted weight yarn. You will crochet from the top of the head down to the body and assemble wings, feet, tail and beak. The pattern includes clear round-by-round instructions and helpful assembly photos to guide you.

Feather Locklear the Chick Amigurumi Pattern crochet pattern - detailed view of completed project

Designed for intermediate crocheters, the pattern includes placement notes for safety eyes and options for fluffy or chenille versions. Both step-by-step instructions and finishing tips are provided for a polished result.

Why You'll Love This Feather Locklear the Chick Amigurumi Pattern

I absolutely love this pattern because it captures a playful, expressive personality in a small amigurumi. I enjoyed designing the eye placement and subtle facial details that really bring the chick to life. I also love the flexibility β€” you can make a fluffy, chenille or standard version using the same instructions. Sharing this pattern feels like handing someone a warm, handmade friend to enjoy and gift.

Feather Locklear the Chick Amigurumi Pattern step 1 - construction progress Feather Locklear the Chick Amigurumi Pattern step 2 - assembly progress Feather Locklear the Chick Amigurumi Pattern step 3 - details and accessories Feather Locklear the Chick Amigurumi Pattern step 4 - final assembly and finishing

Switch Things Up

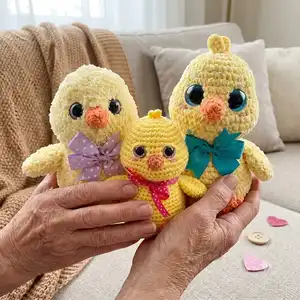
I love experimenting with color to make different personalitiesβ€”try pastel yellows and peach accents for a softer look.

For a fluffy chick, use chenille or loop yarn doubled on an F hook and larger safety eyes to create a cuddlier version.

Make a tiny keychain by using sport or DK weight yarn and a smaller hook and adjust eye sizes to match the scale.

Use different eye styles: safety eyes, embroidered eyes, or buttons for an expressive finish depending on the recipient.

I often add small accessories like bows, tiny hats, or a crocheted scarf to make the chick gift-ready and unique.

Try contrast beak and feet colors β€” a coral beak and darker orange feet change the look quickly and attractively.

If you want a posable chick, consider adding a short length of wire inside the wings or legs before sewing them closed.

I like to embroider subtle blush marks or freckle-dots with pink yarn to add extra charm to the face.

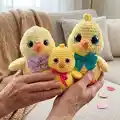
Make a family set by scaling yarn/hook combinations: a chenille parent and a standard baby make an adorable set.

Don't be afraid to mix yarn texturesβ€”pair a smooth worsted body with fuzzy trims for tactile interest and character.

Common Mistakes & How to Fix Them

βœ— Skipping the stitch marker when working in continuous rounds can cause lost counts and mis-shapen pieces; place and move a marker at the beginning of each round to keep track. βœ— Overstuffing early distorts shaping and makes it hard to reposition eyes and washers; stuff gradually and add stuffing as you finish shaping the body. βœ— Placing safety eyes without checking stitch counts can leave them unevenly spaced; mark the eye positions and count stitches carefully before attaching. βœ— Not removing stuffing to place eye washers causes lumpy finishes and misaligned washers; remove most stuffing, place washers behind eyes, then re-stuff and close evenly.

Feather Locklear the Chick Amigurumi Pattern

Make a sweet hand-crocheted chick with this complete pattern. You will work from the top of the head down to the body to create an adorable stuffed chick with detailed assembly instructions. The pattern includes full round-by-round instructions for head, body, wings, feet, tail, beak and optional hair plus helpful photos. Perfect for gifting or adding to your amigurumi collection.

Intermediate 5-7 Hours

Materials Needed for Feather Locklear the Chick Amigurumi Pattern

β€” Main Fabric

  • 01
    Worsted Weight yarn (#4), approximately 50g main color (Color A: Yellow)
  • 02
    Accent color: Color B Orange, approximately 20g
  • 03
    Exact yellow used: Red Heart With Love Daffodil (as example)
  • 04
    Exact orange used: I love this yarn Carrot (as example)
  • 05
    Fluffy chick option: Little Bunny Yellow and Parfait Mango (double-stranded with F hook), eye size 23 mm
  • 06
    Chenille chick option: Parfait Yellow, Parfait Mango, Flecks yarn loops and thread Sunshine (double-stranded), eye size 28 mm

β€” Tools Required

  • 01
    Crochet hook size 3.25mm (D)
  • 02
    F hook for alternate fluffy/chenille versions (as referenced on pg.12)
  • 03
    Safety eyes: 18 mm (standard sample)
  • 04
    Optional safety eye sizes: 23 mm (fluffy), 28 mm (chenille)
  • 05
    Scissors
  • 06
    Yarn needle for sewing and embroidery
  • 07
    Stitch markers
  • 08
    Polyester fiberfill stuffing
  • 09
    Pins for assembly (optional)

Progress Tracker

0% Complete

β€” Head and Body :

Info :

Crocheted from top of head to bottom. With Color A.

Round 1 :

Make 12 sc into a magic ring= 12

Round 2 :

Increase in each st around= 24

Round 3 :

(3 sc, inc) x 6= 30

Round 4 :

sc in each st around

Round 5 :

(4 sc, inc) x 6= 36

Rounds 6-8 :

sc in each st around

Info :

Mark the 6th and 7th inc with a st marker on round 9 for placement of eyes

Round 9 :

inc x 6, 6 sc, inc x 6, 18 sc= 48

Rounds 10-12 :

sc in each st around

Round 13 :

dec x 6, 6 sc, dec x 6, 18 sc= 36

Round 14 :

sc in each st around

Round 15 :

(dec, 4 sc) x 6= 30

Info :

Place eyes between rounds 8 and 9, leaving 9 holes between them. With the eyes facing you, the left eye will be placed before the stitch marker between rounds 8 and 9. The right eye will be placed after the stitch marker. If you want the sunken eye look, do not place the backs of the eyes on until round 29.

Round 16 :

(dec, 3 sc) x 6= 24

Round 17 :

sc in each st around

Info :

Now for the eyes. Stuff the head well. Cut a long piece of yarn and remove the eyes. Place the needle in the hole where the first eye was and insert the needle into a hole next to the eye hole. Go back and forth between each eye hole repeating the process from the first eye. Pull slightly on the yarn after going through each hole. Do this about 3 times on each side until you reach the look you want. Follow the pictures on pg. 5 for help. There is also a youtube video I have for extra help on this process. https://www.youtube.com/watch?v=9XoBnTY6k70&t=55s

β€” Head and Body Continued :

Info :

To place the backs of the eyes you will need to remove most of the stuffing to place the washers on the eyes, then re stuff it.

Round 18 :

(inc, 3 sc) x 6= 30

Round 19 :

(inc, 4 sc) x 6= 36

Round 20 :

sc in each st around

Info :

Stuff the body as you work

Round 21 :

(inc, 11 sc) x 3= 39

Round 22 :

sc in each st around

Round 23 :

(inc, 12 sc) x 3= 42

Round 24 :

sc in each st around

Round 25 :

(6 sc, inc) x 6= 48

Round 26 :

(7 sc, inc) x 6= 54

Rounds 27-29 :

sc in each st around

Round 30 :

(7 sc, dec) x 6= 48

Round 31 :

(6 sc, dec) x 6= 42

Round 32 :

(5 sc, dec) x 6= 36

Round 33 :

(4 sc, dec) x 6= 30

Round 34 :

(3 sc, dec) x 6= 24

Round 35 :

(2 sc, dec) x 6= 18

Round 36 :

(sc, dec) x 6= 12

Round 37 :

dec x 6 = 6

Info :

F/O and sew the hole closed

β€” Beak :

Round 1 :

With Color B: Make 6 sc into a magic ring= 6

Round 2 :

(sc, inc) x 3= 9

Info :

F/O and leave a long tail for sewing

β€” Wings (Make 2) :

Round 1 :

With Color A: Make 6 sc into a magic ring= 6

Round 2 :

(sc, inc) x 3= 9

Round 3 :

(2 sc, inc) x 3= 12

Round 4 :

sc in each st around

Info :

Do not stuff the wings

Round 5 :

(sc, inc) x 6= 18

Round 6 :

sc in each st around

Round 7 :

(sc, dec) x 6= 12

Round 8 :

(2 sc, dec) x 3= 9

Round 9 :

(sc, dec) x 3= 6

Info :

Fold the wings in half and sc the opening closed. F/O and leave a long tail for sewing

β€” Tail :

Round 1 :

With Color A: Make 6 sc into a magic ring= 6

Round 2 :

(sc, inc) x 3= 9

Round 3 :

Inc x 3, 6 sc= 12

Info :

F/O and leave a long tail for sewing

β€” Feet (Make 2) :

Round 1 :

With Color B: Make 6 sc into a magic ring= 6

Round 2 :

Increase in each st around= 12

Round 3 :

(sc, inc) x 6= 18

Round 4 :

(ch 3, sl st in 2nd ch from hook, sl st in next ch, sl st in next 2 sts on circle) x 3

Info :

F/O and leave a long tail for sewing

β€” Hair on Head (optional) :

Info :

With Color A: Attach yarn in the magic ring with a sl st. (Ch 4, sl st in 2nd ch from hook and across) x 2. F/O and weave in the tail end.

β€” Assembly :

Face :

1. Take a long strand of white yarn and thread your needle. Insert the needle into a hole in between the eyes. Bring the needle to the lower corner of the eye. Wrap the needle around the outside of the eye. Insert the needle into a hole on the top of the eye. Pull a little tightly to create a highlight for the eye. Repeat for the 2nd eye.

Face :

2. Optional: Take a long strand of yellow yarn and insert the needle into a hole on the head. Bring the needle up to a corner on the eye. Wrap the needle in front of the eye. Make an eyelid. Repeat one more time. Repeat on the 2nd eye. Weave in the tail end.

Face :

3. Optional: Cut a strand of pink yarn or thread. Embroider 2 cheeks.

Beak :

Pin the beak onto the front of the face in between the eyes. I did not stuff my beak. Sew the beak in place.

Wings :

1. Pin the wings onto the side of the body approximately between rounds 18 and 19. 2. Sew the wings onto the body.

Feet :

1. Pin the feet onto the front of the body. 2. Sew the feet onto the body.

Tail :

1. Pin the tail onto the back of the body. 2. Sew the tail onto the body.

Info :

You have your finished chick! If you have any questions or concerns please email sweetoddityart@gmail.com or etsy convo me. I will get back to you asap. Please share your finished chick with me as often as you want.

Assembly Instructions

  • Attach safety eyes between rounds 8 and 9 leaving nine stitches between them; if you want a sunken eye look, do not attach the washer backs until round 29 and remove most stuffing to place washers.
  • Sew the beak centered between the eyes on the front of the face; pin in place first to check placement and sew with a long tail left for finishing.
  • Pin wings to the sides of the body approximately between rounds 18 and 19 and sew them securely using a yarn needle and matching yarn.
  • Pin feet to the front of the body and sew them in place ensuring even spacing for stability and symmetry.
  • Pin tail to the back of the body and sew closed; weave in ends and shape tail as desired.
  • Embroider highlights, eyelids, and cheeks: use white yarn for eye highlights, yellow for eyelids, and pink thread/yarn for cheeks as optional finish details.

Important Notes

  • πŸ’‘Do not join rounds unless stated; work in a continuous spiral and use a stitch marker to mark the beginning of each round.
  • πŸ’‘Use stitch markers to keep track of increases and the exact placement for eyes and other features for consistent shaping.
  • πŸ’‘Stuff firmly but evenly as you work; remove stuffing when adding washers behind safety eyes then re-stuff before closing.

This cuddly chick pattern is perfect for making a cheerful handmade friend to gift or keep. 🐣 Follow the detailed steps and photos to get beautiful results with every piece. 🧢 Happy crocheting and share your creationβ€”I love seeing finished chicks! 🧡

You ask,

we answer.

FAQs

What size will the finished piece be?

The finished chick measures approximately 6 inches from bottom to top of head when using worsted weight (#4) yarn and a 3.25 mm (D) hook.

Can I use different yarn weights for this pattern?

Yes, you can use different yarn weights but this will change the final size and eye placement. If using bulkier yarn for a fluffier version, the pattern suggests trying an F hook or adjusting eye placement accordingly.

Do I need prior crochet experience for this pattern?

This pattern is rated intermediate, so basic knowledge of single crochet, increases and decreases, and working in continuous rounds is recommended.

How long does this project typically take to complete?

Most crocheters complete this project in 5-7 hours, depending on experience and whether you make the standard, fluffy or chenille versions.