🧶 Beautiful ✨ Detailed 💝 Adorable

EZ Diamond Lattice Blanket Pattern

EZ Diamond Lattice Blanket Pattern
4.0★ Rating
12-15 Hours Time Needed
3.1K Made This
✂️

Advanced Level

Designed for experienced crocheters, these patterns involve intricate designs and complex techniques to challenge and inspire.

⏱️

Multi-Day Project

A rewarding 12+ hour journey—perfect for dedicated crafters who love detailed work.

🤗

Soft Hug

Gentle, plush, and full of warmth, creating a sense of comfort and coziness wherever they find a home.

About This EZ Diamond Lattice Blanket Pattern

This pattern creates a richly textured diamond lattice blanket using Bernat Alize Blanket-EZ yarn and a special loop-cross technique. The result is a plush, squishy blanket with intricate, raised diamond motifs that look complex but are made with repetitive, rhythmic steps. The pattern works in a 10-row sequence (with a bind-off) and is repeated across the width until the blanket reaches the desired length.
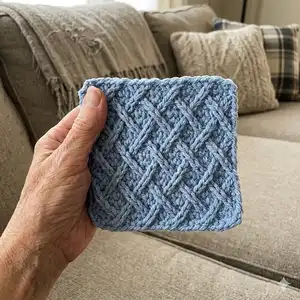
EZ Diamond Lattice Blanket Pattern crochet pattern - detailed view of completed project

Worked in a series of foundation loops and crossing loop sequences, this blanket has a no-hook, looped look that feels luxurious. The finished size is approximately 56" x 60" and uses 7 balls of Bernat Alize Blanket-EZ.

Why You'll Love This EZ Diamond Lattice Blanket Pattern

I absolutely love this pattern because the diamond lattice texture looks far more complicated than it actually is, giving anyone a chance to create a stunning heirloom piece. I enjoy the meditative rhythm of working the loop crossings row after row; it becomes a relaxing and satisfying process. The oversized loops give the blanket a plush, cozy feel that is perfect for snuggling on chilly evenings. I also love how customizable the pattern is — changing colors or loop lengths makes each blanket feel unique and special.

EZ Diamond Lattice Blanket Pattern step 1 - construction progress EZ Diamond Lattice Blanket Pattern step 2 - assembly progress EZ Diamond Lattice Blanket Pattern step 3 - details and accessories EZ Diamond Lattice Blanket Pattern step 4 - final assembly and finishing

Switch Things Up

I love customizing this pattern by playing with color — try stripes by changing color every 10 rows for a bold statement.

I also experiment with smaller or larger versions by changing yarn weight and hook/loop tension; bulky yarn makes a very squishy throw while thinner yarn makes a more delicate lattice.

I sometimes add a simple single-color border after binding off to frame the lattice and give a polished edge to the blanket.

For a playful touch, I add tassels or fringe to the short ends; they can be matched or contrasted with the main color for variety.

I recommend trying two-toned loop sections where every second repeat uses a contrast color to create an inset diamond effect.

To make a baby blanket, I use lighter yarn and fewer foundation loops; I also shorten the length so it becomes a cozy lap-sized piece.

I often experiment with alternating loop lengths to create a looser or tighter texture in the diamond motifs for unique tactile effects.

Consider adding sewn-on appliques or tiny crochet motifs to the corners or center of diamonds to personalize the design for gifts.

If I want a reversible look, I keep loop sizes consistent and add a matching border on both sides to balance the appearance.

I sometimes pair this blanket with matching pillow covers using the same lattice repeat to create a coordinated home decor set.

Common Mistakes & How to Fix Them

✗ Not keeping the right side of the project facing you at all times; always ensure the right side is facing to maintain consistent loop orientation and pattern alignment. ✗ Turning your work when the instructions say 'Do not turn' causes the lattice to shift; follow the instruction exactly and work each row from the specified direction without turning. ✗ Failing to count the foundation loops will make the pattern off-center; count 68 loops for the foundation row and re-count before beginning Row 1 to ensure accuracy. ✗ Pulling loops inconsistently creates uneven diamonds and tension issues; maintain even tension and consistent loop sizes throughout the blanket.
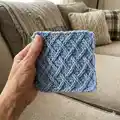
EZ Diamond Lattice Blanket Pattern

Create a cozy, textured throw with the EZ Diamond Lattice Blanket pattern using Bernat Alize Blanket-EZ. This design uses an innovative loop-and-cross technique to build a stunning lattice of diamonds that adds luxurious texture to any living space. You will enjoy the soothing, repetitive rhythm of the pattern as the blanket grows row by row. Perfect for gifting or styling your own home with a handmade statement piece.

Advanced 12-15 Hours

Materials Needed for EZ Diamond Lattice Blanket Pattern

— Main Fabric

  • 01
    Bernat Alize Blanket-EZ (6.4 oz/180 g; 18 yds/16 m) Country Blue (37018) - 7 balls

— Tools Required

  • 01
    Scissors
  • 02
    Yarn/tapestry needle for weaving in ends
  • 03
    Measuring tape

Progress Tracker

0% Complete

— Measurements :

Info :

Approximately 56" [142 cm] wide x 60" [152.5 cm] long.

— Materials :

Info :

Bernat® Alize® Blanket-EZ™ (6.4 oz/180 g; 18 yds/16 m) Country Blue (37018) 7 balls.

— Instructions :

Infos :

Notes: Right side of project is facing at all times. 'Working yarn' is held behind stitches throughout work.

Info :

Count 68 loops for foundation row.

Round 1 :

1st row: Working from right to left, pull the 69th loop (from 'working yarn') up through 68th loop (last loop of foundation row) from behind to create a knit stitch. Pull next loop from working yarn up through next loop of foundation row. *Cross second loop of foundation row in front of first loop of foundation row (to the right). Pull next loop from working yarn up from behind next loop. Pull next loop from working yarn up from behind next loop. (Pull next loop from working yarn up from behind next loop) over next 4 stitches. Cross next stitch in front of 2nd stitch (to the left). Pull next loop from working yarn up from behind 2nd stitch. Pull next loop from working yarn up from behind 1st stitch. Rep from * to end of row. Do not turn. 68 stitches in row.

Round 2 :

2nd row: Working from left to right, pull next loop from working yarn up from behind through last stitch worked on previous row. *Cross 2nd stitch over next stitch (to the left). Pull next loop from working yarn up from behind 2nd stitch. Pull next loop from working yarn up from behind 1st stitch. (Pull next loop from working yarn up from behind next loop) twice. Cross next stitch in front of next stitch (to the right). Pull next loop from working yarn up from behind next loop. Pull next loop from working yarn up from behind next loop. Rep from * to end of row. Do not turn.

Round 3 :

3rd row: Working from right to left, cross 2nd stitch of previous row over 1st stitch (to the right). Pull loop from working yarn up from behind 2nd stitch. Pull next loop from working yarn up from behind 1st stitch. *(Pull next loop from working yarn up from behind next loop) over next 4 stitches. Cross next stitch in front of 2nd stitch (to the right). Pull next loop from working yarn up from behind 2nd stitch. Pull next loop from working yarn up from behind 1st stitch. Rep from * to last 6 stitches. *(Pull next loop from working yarn up from behind next loop) over next 4 stitches. Cross next stitch in front of 2nd stitch (to the left). Pull next loop from working yarn up from behind 2nd loop. Pull next loop from working yarn up from behind 1st loop. Do not turn.

Round 4 :

4th row: Working from left to right, pull next loop from working yarn up from behind through last stitch worked on previous row. *Cross next stitch in front of 2nd stitch (to the right). Pull next loop from working yarn up from behind 2nd stitch. Pull next loop from working yarn up from behind 1st stitch. (Pull next loop from working yarn up from behind next loop) over next 4 stitches. Cross next stitch in front of 2nd stitch (to the left). Pull next loop from working yarn up from behind 2nd stitch. Pull next loop from working yarn up from behind 1st stitch. Rep from * to end of row. Do not turn.

Round 5 :

5th row: Working from right to left, (pull next loop from working yarn up from behind last stitch worked on previous row) twice. *Cross next stitch in front of 2nd stitch (to the left). Pull next loop from working yarn up from behind 2nd stitch. Pull next loop from working yarn up from behind 1st stitch. Cross 2nd stitch in front of next stitch (to the right). Pull next loop from working yarn up from behind 2nd stitch. Pull next loop from working yarn up from behind 1st stitch. (Pull next loop from working yarn up from behind next loop) over next 4 stitches. Rep from * to last 5 stitches. Cross 2nd stitch in front of 1st stitch (to the left). Pull next loop from working yarn up from behind 2nd stitch. Pull next loop from working yarn up from behind last stitch worked on previous row three times. Do not turn.

Round 6 :

6th row: Working from left to right, (pull next loop from working yarn up from behind last stitch worked on previous row) twice. *Cross next stitch in front of 2nd stitch (to the right). Pull next loop from working yarn up from behind 2nd stitch. Pull next loop from working yarn up from behind 1st stitch. Pull next loop from working yarn up from behind next loop twice. Cross next stitch in front of next stitch (to left). Pull next loop from working yarn up from behind 2nd stitch. Pull next loop from working yarn up from behind 1st stitch. Rep from * to end of row. Do not turn.

Round 7 :

7th row: Working from right to left, (pull next loop from working yarn up from behind last stitch worked on previous row) twice. *Cross 2nd stitch in front of next stitch (to the right). Pull next loop from working yarn up from behind 2nd stitch. Pull next loop from working yarn up from behind 1st stitch. Cross next stitch in front of next stitch (to the left). Pull next loop from working yarn up from behind 2nd stitch. Pull next loop from working yarn up from behind 1st stitch. Rep from * to last stitch. Pull next loop from working yarn up from behind next loop. Do not turn.

Round 8 :

8th row: Working from left to right, pull next loop from working yarn up from behind through last stitch worked on previous row. *Cross 2nd stitch in front of next stitch (to the left). Pull next loop from working yarn up from behind 2nd stitch. Pull next loop from working yarn up from behind 1st stitch. (Pull next loop from working yarn up from behind next loop) twice. Cross next stitch in front of next stitch (to the right). Pull next loop from working yarn up from behind 2nd stitch. Pull next loop from working yarn up from behind 1st stitch. Rep from * to end of row. Do not turn.

Round 9 :

9th row: Working from right to left, cross 1st stitch over 2nd stitch (to the left). Pull next loop from working yarn up from behind 2nd loop. *Pull next loop from working yarn up from behind 1st loop. (Pull next loop from working yarn up from behind next loop) over next 4 stitches. Cross 2nd stitch in front of next stitch (to the right). Pull next loop from working yarn up from behind 2nd stitch. Pull next loop from working yarn up from behind 1st stitch. Rep from * to last stitch. Pull next loop from working yarn up from behind next loop. Do not turn.

Round 10 :

10th row: Working from left to right, pull next loop from working yarn up from behind last stitch worked on previous row. Cross next stitch in front of 2nd stitch (to the right). Pull next loop from working yarn up from behind 2nd stitch. Pull next loop from working yarn up from behind 1st stitch. *(Pull next loop from working yarn up from behind next loop) twice. Cross 2nd stitch in front of next stitch (to the left). Pull next loop from working yarn up from behind 2nd stitch. Pull next loop from working yarn up from behind 1st stitch. Rep from * to end of row. Do not turn.

Info :

Repeat 5th to 10th rows for pattern. Work in pattern until Blanket measures approximately 60" [152.5 cm], ending on a 5th row.

Bind off row :

Bind off row: Working in same direction as last row, pull 2nd stitch through 1st stitch. Pull 3rd stitch through 2nd stitch. Pull 4th stitch through 3rd stitch. Continue in this manner to end of row. Cut thread at base of loop (thread used to create the loop) to create a yarn 'tail'. Tie to secure and weave in end.

Assembly Instructions

  • Weave in all loose ends securely using a yarn/tapestry needle; hide tails within the blanket loops for a clean finish.
  • After binding off, tie the yarn tail securely and weave it well into the edge loops to prevent unraveling.
  • Block the blanket gently if desired by smoothing and shaping to the finished measurements; avoid overstretching the loop texture.
  • Trim any excess yarn tails and inspect the blanket edge to ensure loop crossings and diamonds are consistent across the width.

Important Notes

  • 💡Right side of project is facing at all times; maintain orientation to ensure the lattice reads correctly.
  • 💡'Working yarn' is held behind stitches throughout work; keep the yarn positioned consistently for even loops.
  • 💡Do not turn at the end of the pattern rows when instructed; many rows instruct 'Do not turn' to maintain the pattern flow.
  • 💡Count the foundation loops carefully (68 loops) before starting Row 1 to ensure the pattern fits the correct width.

This EZ Diamond Lattice Blanket makes a luxurious, textured throw that elevates any room with cozy sophistication. The tufted diamond pattern is both striking and soothing, perfect for curling up with a book or gifting to someone special. Enjoy creating a handmade heirloom that’s both beautiful and comforting. 🧶✨

You ask,

we answer.

FAQs

What size will the finished piece be?

The finished blanket measures approximately 56" [142 cm] wide x 60" [152.5 cm] long using the recommended yarn and the pattern as written.

Can I use different yarn weights for this pattern?

You can experiment with different yarn weights, but the final size and loop appearance will change; heavier yarn creates a chunkier blanket while lighter yarn gives a finer lattice—adjust quantity and tension accordingly.

Do I need prior crochet experience for this pattern?

This pattern is rated advanced (experienced), so familiarity with loop techniques, counting loops, and working with consistent tension is recommended for best results.

How long does this project typically take to complete?

Most crafters complete this blanket in about 12-15 hours, though time will vary by experience, speed, and whether you work continuously or in sessions.