🧢 Beautiful ✨ Detailed πŸ’ Adorable

Embla Set Pattern

Embla Set Pattern
4.9β˜… Rating
5-7 Hours Time Needed
3.5K Made This
βœ‚οΈ

Intermediate Level

Ideal for those with basic crochet experience, featuring slightly more advanced stitches and techniques to expand your skills.

⏱️

Weekend Treat

Takes 5-7 hours, making it an enjoyable project to finish over a couple of days.

🧣

Snug Essential

Everyday comfort with practical charm, designed for both functionality and style through changing seasons.

About This Embla Set Pattern

This pattern creates the Embla Set: a fair isle inspired hat and matching cowl worked in DK weight yarn. The hat features a knitted crown, charted colorwork body, a ribbed brim and optional ear flaps. The cowl has a fitted neck, charted yoke and a wide decorative hem, making a coordinated winter accessory set.

Embla Set Pattern crochet pattern - detailed view of completed project

Includes charts, full shaping instructions and multiple sizes for both hat and cowl. Techniques covered include stranded colorwork, increases, decreases and working in the round.

Why You'll Love This Embla Set Pattern

I absolutely love this pattern because the classic Nordic motifs feel timeless and special. I enjoy how the hat and cowl pair together for a cohesive winter look that is both practical and stylish. The charts make colorwork satisfying to knit, and the multiple sizes mean you can make something for friends and family. I also appreciate the optional ear flaps and pompom details that let you personalize each finished piece.

Embla Set Pattern step 1 - construction progress Embla Set Pattern step 2 - assembly progress Embla Set Pattern step 3 - details and accessories Embla Set Pattern step 4 - final assembly and finishing

Switch Things Up

I love how easy it is to customize the Embla set by changing colors; try swapping the palette for high-contrast brights or soft pastels to change the mood entirely.

If you want a chunkier version, I switch to a bulkier DK/aran blend and increase needle size two steps to make a squishier hat and cowl.

To make a mini keychain hat, use fingering yarn and smaller needles and shorten the chart repeat for a tiny adorable version.

I sometimes add simple embroidery over the finished colorwork for tiny highlights β€” use duplicate stitch with contrasting yarn for small stars or dots.

Swap the i-cord ear flap ties for braided ties or leather cord for a different finish and texture.

If you prefer a slouchier hat, simply continue the chart for extra length before working the brim and bind off when you reach your desired depth.

For a reversible look, you can experiment with stranded floats on the inside using a very loose tension, but be mindful of comfort against the skin.

I like to add a faux fur pompom for a luxurious touch, or a small knitted pompom for a coordinated handmade finish.

To make the cowl shorter or longer, adjust the number of rib repeats before starting the chart; measure on the wearer for perfect fit.

Finally, I sometimes knit a matching pair of mittens using the chart motifs from the yoke to create a full coordinated set that makes a beautiful gift.

Common Mistakes & How to Fix Them

βœ— Using needles that are too small during the early increases can create overly tight stitches and a distorted crown; use needles one to two sizes larger at the beginning if your tension is tight. βœ— Not placing the beginning of round marker (BOR) leads to misplaced ear flaps or pattern joins; place a marker and double-check BOR before picking up stitches for ear flaps. βœ— Failing to maintain even tension between colors causes puckering in stranded colorwork; carry floats snugly (not too tight) and catch long floats at regular intervals. βœ— Skipping gauge swatches for colorwork results in incorrect finished size; always knit a stranded colorwork gauge after blocking to match the 22 sts = 10 cm measurement. βœ— Forgetting to weave in ends and secure the top when tightening the crown can cause the hat to come undone; weave in all ends and tidy the top yarn tail securely after closing.

Embla Set Pattern

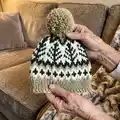
Make a cozy matching Embla hat and cowl set featuring classic Nordic colorwork. This pattern guides you through knitting a fitted hat with optional ear flaps and a wide decorative cowl, both worked in DK weight yarn. Youll enjoy clear charts, size options, and helpful tips for colorwork and finishing. Perfect for gifting or keeping warm through the colder months.

Intermediate 5-7 Hours

Materials Needed for Embla Set Pattern

β€” Main Fabric

  • 01
    DK weight yarn in 3 colors (Color A, Color B, Color C); skeins approx. 125 meters / 137 yards per 50 g
  • 02
    Hat yarn requirements: Color A: 1 skein for any size; Color B: 1 skein for any size; Color C: 1 skein for any size (general recommendation provided)
  • 03
    Cowl yarn requirements (Color A approx.): 45 (50) (55) 60 (70) 80 (90) 105 (120) 135 meters depending on size
  • 04
    Cowl yarn requirements (Color B approx.): 50 (60) (70) 80 (100) 125 (150) 175 (200) 225 meters depending on size
  • 05
    Cowl yarn requirements (Color C approx.): 40 (45) (50) 55 (60) 65 (70) 75 (80) 85 meters depending on size
  • 06
    Sample yarns listed: Rauma Mitu (Green sample), Sandnes Garn Merino (Blue sample) with color codes given in the pattern notes

β€” Tools Required

  • 01
    3.0 mm / US 2.5 circular needles, 40 cm / 16 inches (for brim and small work)
  • 02
    3.5 mm / US 4 circular needles, 40 cm / 16 inches (for crown/body of hat) and double-pointed needles (DPNs) of same size for small circumferences
  • 03
    4.0 mm / US 6 circular needles (for cowl neck and initial cast-on)
  • 04
    3.5 mm / US 4 circular needles for cowl yoke colorwork
  • 05
    Stitch markers (place marker at BOR and for pattern repeats)
  • 06
    Tapestry/yarn needle for weaving in ends
  • 07
    Scissors
  • 08
    Pompom or pompom maker (optional)
  • 09
    Blocking tools (steamer or wet blocking supplies) to block colorwork after finishing

Progress Tracker

0% Complete

β€” Crown of Hat :

Info :

With 3.5 mm / US 4 DPNs, cast on 7 (8) 9 (9) 10 (11) sts using Color B. The hat is knitted in the rnd, feel free to switch to circular ndls whenever there are enough sts on your ndls to stretch across a pair of circular ndls.

Set-up Rnd :

K to end.

Next Rnd :

[K1, m1R] to end. - the number of sts doubled

Info :

You should now have 14 (16) 18 (18) 20 (22) sts on your ndl.

Next Rnd :

K to end.

Next Rnd :

[K1, m1R] to end. - the number of sts doubled

Info :

You should now have 28 (32) 36 (36) 40 (44) sts on your ndl.

Next Rnd :

K to end.

β€” Body of Hat :

Info :

Begin working from Chart and inc as indicated.

Info :

From Row 16 of Chart and onwards you should have 84 (96) 108 (108) 120 (132) sts on your ndl.

Info :

Continue working from the chart until work measures 14 (16) 18 (19) 19 (20) cm / 5.5 (6.25) 7 (7.5) 7.5 (7.75) inches or your preferred length.

Next Rnd :

Using the prominent colour of the last rnd, k to end.

Info :

Example: If your previous rnd is Row 26 of chart, then the next rnd should be worked in Color B.

β€” Brim :

Info :

Switch to 3 mm / US 2.5 ndl.

Next Rnd :

[K2, p2] to end.

Info :

Repeat the previous rnd until the ribbing measures approx. 2.5 (3) 3 (3) 4 (4) cm / 1 (1.25) 1.25 (1.25) 1.5 (1.5) inches.

Info :

Bind off all sts in pattern.

Info :

If you want to make a double brim, continue knitting as instructed above, until the brim measures approx 6 (7) 7 (7) 9 (9) cm / 2.25 (2.75) 2.75 (2.75) 3.5 (3.5) inches before binding off all sts.

Info :

Tighten the top with the yarn tail from the cast-on. Weave in all ends.

Info :

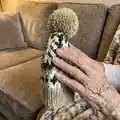
Feel free to attach a pompom!

Info :

If you're knitting one of the three smaller sizes and would like ear flaps for the hat, you'll find the instructions for this on the next page.

β€” Ear Flaps :

Info :

Size 6-12 months (2-4 years) 5-8 years only: With 3 mm / US 2.5 ndl pick up 24 (28) 32 sts on the inside of the brim, in the first rnd after you began the rib. Start at the beginning of the rnd.

Set up row :

K3 [P2, K2] repeat to last st. K1.

Row A :

Turn work. With yarn in back, slip 2 sts as if to knit. Work established pattern to end of row.

Info :

Repeat the row above until the ear flap measures the same length as the brim.

Row B (RS) :

Slip 2, ssk, k to last 4 sts, k2tog, k2. - 2 sts decreased

Info :

Repeat Row B for all RS and Row A for all WS until you're left with 6 sts on your ndl.

Next row :

k1, ssk, k2tog, k1.

Info :

You should have 4 sts on your ndl.

Info :

The last remaining 4 sts will be worked to create an i cord string.

Info :

Keep the RS of the cuff facing you at all times.

I cord row :

Slide the 4 sts to the other side of the ndl, k4.

Info :

Repeat the row above until the string measures approx 15-20 cm / 6-7.75 inches. Break yarn, and fasten so the string won't unravel.

Second ear flap :

Measure approx. 5.5 (6.5) 7.5 cm / 2.25 (2.5) 3 inches around the brim from the start of the first ear flap. This is the neck. Make sure the beginning of rnd of the hat is placed at the back.

Info :

Pick up 24 (28) 32 sts for the second ear flap, and make it the same way as the first.

Info :

Fasten all loose ends.

β€” Cowl: Neck :

Info :

With 4 mm / US 6 ndls, cast on (112) 120 (128) 136 (144) 152 (160) 168 (176) 184 sts using Color B. Join to knit in the rnd, PM at the BOR.

Set-up Rnd :

[K2tog twice, p2tog twice] to end. - half the number of sts dec'd

Info :

You should now have (56) 60 (64) 68 (72) 76 (80) 84 (88) 92 sts on your ndl.

Next Rnd :

[K2, p2] to end.

Info :

Repeat the previous rnd until work measures approx. (8) 10 (12) 14 (14) 16 (16) 16 (17) 17 cm / (3.25) 4 (4.75) 5.5 (5.5) 6.25 (6.25) 6.25 (6.75) 6.75 inches, or your preferred length.

β€” Cowl: Yoke :

Info :

Switch to 3.5 mm / US 4 ndl.

Next Rnd :

With Color B, k to end.

Info :

Begin working from Chart and inc as instructed. The chart is read from the bottom up, from right to left.

Info :

From Row 16 of Chart and onwards you should have (168) 180 (192) 204 (216) 228 (240) 252 (264) 276 sts on your ndl.

Info :

End working on Chart after Row (21) 24 (24) 30 (30) 36 (36) 36.

Info :

The work should now measure approx. (8.5) 10 (10) 12.5 (12.5) 15 (15) 15 (15) 15 cm / (3.25) 4 (4) 5 (5) 6 (6) 6 inches from the rib.

β€” Cowl: Hem :

Rnds 1-2 :

Using Color A, k to end.

Rnd 3 :

P to end.

Rnd 4 :

K to end.

Info :

Repeat Rnds 3-4 once.

Info :

Bind off all sts purlwise.

Info :

Weave in all ends and steam block to flatten out work.

Assembly Instructions

  • Tighten the top of the hat with the yarn tail from the cast-on, secure firmly and weave in the tail on the wrong side.
  • If using a pompom, attach it to the top center of the hat after tightening and securing the cast-on tail; sew through several times to anchor it.
  • For ear flaps, pick up stitches on the inside of the brim as instructed, make both flaps the same way and attach i-cord strings to the last 4 sts of each flap.
  • Weave in all loose ends and steam block or gently wet block the hat and cowl to even out colourwork and flatten the hem before wearing.

Important Notes

  • πŸ’‘The increases at the start of the hat may cause tight tension; consider using needles one to two sizes larger to make looser stitches if needed.
  • πŸ’‘Place a marker at the BOR (beginning of round) when joining to knit in the rnd and before picking up ear flap stitches so motifs and ear flaps align correctly.
  • πŸ’‘Read the colorwork chart from the bottom up and from right to left for each rnd; maintain even floats and catch long floats to avoid loose strands.
  • πŸ’‘Work a gauge swatch in stranded colorwork after blocking to ensure the finished size matches the given gauge of 22 sts = 10 cm.

This Embla set brings classic Nordic colorwork to your winter wardrobe with a cozy hat and matching cowl that coordinate perfectly. The pattern includes clear charts, optional ear flaps and sizes for the whole family. Make a set in your favorite palette and enjoy handmade warmth and style all season long. πŸ§Άβ„οΈ

You ask,

we answer.

FAQs

What size will the finished pieces be?

Sizes are given in the pattern for multiple age ranges; finished hat circumferences and cowl neck circumferences are listed in metric and inchesβ€”choose the size that matches the wearer's head/neck measurements.

Can I change yarn weight or needle size?

Yes, you can use different yarn weights, but this will affect the final size. If you change yarn weight, adjust needle size and make a gauge swatch in stranded colorwork to match the pattern gauge.

Do I need to know stranded colorwork?

This pattern is rated intermediate because it uses stranded colorwork charts; basic experience with carrying floats and reading charts is recommended for best results.

How long does this project typically take to complete?

Most knitters complete the hat and cowl set in about 5-7 hours overall, depending on experience, size and how comfortable you are with colorwork.