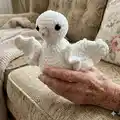
About This Dove Amigurumi Pattern
This pattern creates a small plush dove using soft plush and cotton yarns for texture and detail. You will crochet the head, body and tail in one continuous piece, then make wings and a tiny beak to attach. The instructions include every round and finishing directions so you can assemble a balanced, symmetrical toy.
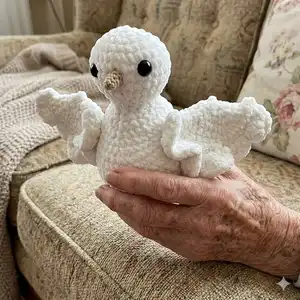
Perfect for gift-giving or as a décor piece, the dove is built with simple increases and decreases. The pattern explains shaping, folding and finishing to create a polished amigurumi bird.
Why You'll Love This Dove Amigurumi Pattern
I absolutely love this pattern because it turns simple stitches into a charming, expressive bird that feels soft and cuddly. I enjoy the way the shaping creates a rounded body and dainty tail without complicated techniques. The wings are fun to make and allow for little variations, which I love to experiment with. Most of all I love seeing the finished dove come together — it always makes a warm, handmade gift that people treasure.
Switch Things Up
I love how easily you can customize this dove by changing yarn and hook sizes; thicker yarn makes a chunky, cuddly dove while thinner yarn yields a delicate mini version.
I often swap the Yarn Art Jeans beak for a small felt beak for a cleaner finish—glue it securely and sew a few stitches to hold it in place.
You can add embroidery details like a stitched smile or tiny feather marks on the wings to personalize each bird.
For a poseable version, try inserting thin wire into the wings before sewing them closed so they can be positioned.
I sometimes change eye sizes — smaller safety eyes give a cuter, less cartoonish look while larger eyes make an expressive face.
Use pastel shades for a nursery-friendly dove or bright colors for a whimsical motif; each color choice changes the character of the bird.
If you want a weighted base so the dove sits steadier, add a small pouch of poly pellets inside the bottom during finishing.
Try making a tiny loop at the top of the head to hang the dove as an ornament, or attach a small ribbon collar for a gift-ready touch.
I recommend testing your tension on a small swatch before starting — consistent tension keeps wings and body sizes predictable.
Mix textures: a plush body and a cotton or linen beak add delightful contrast and visual interest to the finished amigurumi.
Common Mistakes & How to Fix Them
✗ Skipping stitch markers during continuous rounds leads to lost starting points; place a thin marker in the first stitch of each row to keep track of the beginning.
✗ Not stuffing as you go can make shaping difficult later; start stuffing gradually from the rounds indicated and add small amounts to achieve a smooth shape.
✗ Failing to fold and join body halves precisely results in uneven edges; fold carefully and count stitches when connecting front to back to ensure symmetry.
✗ Forgetting to leave long tails for sewing wings or beak will make attachment fiddly; fasten off with longer tails and weave them through when attaching parts.