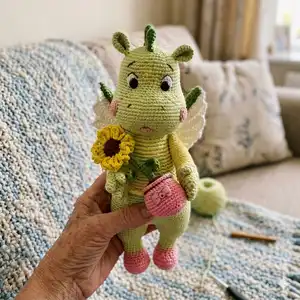
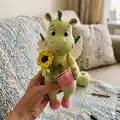
Make Gretta the Dragon — a charming, photo-filled amigurumi pattern that guides you step-by-step through shaping the head, body, arms, legs, crest and wings. This pattern uses clear instructions, helpful photos and finishing tips so you can create a cuddly, detailed dragon you will be proud of. Perfect as a handmade gift or a unique addition to your toy collection.
Progress Tracker
0% Complete
— Head :
Round 3 :
(1 sc, inc)*7 (21)
Round 4 :
(2 sc, inc)*7 (28)
Round 5 :
(3 sc, inc)*7 (35)
Round 6 :
(4 sc, inc)*7 (42)
Round 7 :
(5 sc, inc)*7 (49)
Round 8 :
(6 sc, inc)*7 (56)
Round 9 :
(7 sc, inc)*7 (63)
Round 10 :
(8 sc, inc)*7 (70)
Round 11 :
(9 sc, inc)*7 (77)
Round 22 :
(5 sc, dec)*6, 35 sc (71)
Round 23 :
(4 sc, dec)*6, 35 sc (65)
Round 24 :
(3 sc, dec)*6, 35 sc (59)
Round 32 :
(17 sc, dec)*2, 19 sc, dec (56)
Round 35 :
(6 sc, dec)*7 (49)
Round 36 :
(5 sc, dec)*7 (42)
Round 37 :
(4 sc, dec)*7 (35)
Round 38 :
(3 sc, dec)*7 (28)
Round 39 :
(2 sc, dec)*7 (21)
Round 40 :
(1 sc, dec)*7 (14)
Info :
Tighten the opening, cut and secure the thread.
— Ears :
Info :
Make 2 details. Crochet with light green yarn, do not stuff with filler. Do not forget to mark rounds.
Round 3 :
(1 sc, inc)*7 (21)
Info :
Fold in half and single crochet through both halves. Fold in half again and sew the ear from the bottom (see photo). Leave thread end for sewing.
— Cheeks :
Info :
Make 2 details. Crochet with pink yarn.
Info :
Leave thread end for sewing.
— Tongue :
Round 1 :
Make a chain of 4 ch, from 2nd ch from hook 3 sc in one ch, then on chain 1 sc, 3 sc in last ch, on second side of chain 1 sc, slst.
Info :
Leave thread end for sewing.
— Crest for Head (5 details) :
Info :
Crochet with dark green yarn, do not forget to mark rounds. Do not stuff with filler. Cut the thread on 4 triangles, do not cut the thread on 5th triangle and connect into one crest with slip stitches.
Round 2 :
inc, 2 sc, inc, 2 sc (8)
Round 3 :
inc, 3 sc, inc, 3 sc (10)
Round 4 :
inc, 4 sc, inc, 4 sc (12)
Round 5 :
inc, 5 sc, inc, 5 sc (14)
Round 6 :
inc, 6 sc, inc, 6 sc (16)
Info :
Fold the triangle in half and single crochet through both halves. Connect into one crest with slip stitches (see photo). Cut and secure threads, weave in the ends.
— Head Decoration :
Item 1 (P1) :
Sew on the ears between 7th and 8th rounds symmetrical to each other (count from the top of the head, see photo). You may place the ears on other rounds as you like best.
Item 2 (P1) :
Eyes and mouth tightening: place two pins for mouth (at a distance of 1 sc between them) between 10th and 11th rounds from the beginning of crocheting the head (see photo). Place two pins for each eye (at a distance of 1 sc between the pins) between 26th and 27th rounds from the beginning of crocheting the head at a distance of 10-11 sc between eyes (see photo). You may place eyes and mouth in other rounds as you like best. Insert needle at point A, bring it out at point B, again insert needle at point C, bring out at point D, insert at point E, bring out at point F. Repeat this stage one more time tightening the thread.
Item 3 (P1) :
Sew eyes into eye deepening and glue them with felt for strength. Make a little hole in the felt disc, backing a little from the center to the edge, insert eyes in felt discs (see photo).
Item 4 (P1) :
Sew tongue into mouth deepening. Place the cheeks symmetrically to each other on the sides of the head (see photo).
Item 5 (P1) :
Embroider eyelids and eyebrows with brown yarn (I split the thread into two parts to make it thinner).
Item 6 (P1) :
Embroider freckles with shiny thread.
Item 7 (P1) :
Embroider the nostrils under the eyes with brown thread (see photo).
Item 8 (P1) :
Sew on the crest in the middle of the head (I sew on both sides to keep it steady) (see photo).
Item 9 (P1) :
Embroider the scales on the forehead with shiny thread (see photo).
— Arms (2 details) :
Info :
Start crocheting with green yarn. Do not forget to mark rounds, stuff as you go.
Info :
Make fingers. 6 fingers: cut the thread on 4 fingers, do not cut thread on 2 fingers.
Item - Connect fingers into arm :
1 r: 4 sc on one finger (on which the thread was not cut)+4 sc on second finger + 4 sc on third finger, crochet the second semicircle the same (4 sc +4 sc +4 sc) (24)
Round 3 :
crochet the thumb: on first arm: 20 sc, crochet finger from the inside 4 sc (24) (see photo)
Info :
on second arm: crochet finger from the inside 4 sc, 20 sc (24) (see photo)
Round 4 :
on first arm: 20 sc, crochet on the outside of the finger 4 sc (24). on second arm: crochet on the outside of the finger 4 sc, 20 sc (24)
Round 6 :
(2 sc, dec)*6 (18)
Round 9-22 :
work in back loops only 18 sc
Round 23 :
in back loops only (1 sc, dec)*6 (12)
Round 24 :
in back loops only 12 sc
Round 25 :
in back loops only 6 dec (6)
Info :
Tighten the hole, secure and cut the thread. Attach yellow yarn to 9th round and crochet around the arm from 9th to 25th rounds with slst (see photo).
— Legs (2 details) :
Info :
Start crocheting with pink yarn. Stuff as you go. Do not forget to mark rounds. Make a chain of 7 ch.
Round 1 :
from 2nd ch from hook crochet 3 sc in one ch, then on chain 4 sc, 3 sc in last ch, on second side of chain 4 sc (14)
Round 2 :
(inc.)*3, 4 sc, (inc.)*3, 4 sc (20)
Round 3 :
(inc., 1 sc)*3, 4 sc, (inc., 1 sc)*3, 4 sc (26)
Round 4 :
(inc., 2 sc)*3, 4 sc, (inc., 2 sc)*3, 4 sc (32)
Round 5 :
(inc., 3 sc)*3, 4 sc, (inc., 3 sc)*3, 4 sc (38)
Round 6 :
in back loops only 38 sc
Info :
Attach pink yarn to 6th round and crochet around 38 slst.
Round 9 :
work 9 sc (shift the beginning of the round to the middle of the heel, place marker), then 11 sc, 8 dec., 11 sc (30)
Round 9 (alt) :
9 sc, 6 dec., 9 sc (24)
Info :
Attach light green yarn
Round 10 :
in back loops only 24 sc
Round 11 :
7 sc, 5 dec., 7 sc (19)
Round 12 :
17 sc, dec (18)
Info :
Attach pink yarn to 10th round and crochet around 24 slst.
Round 16 :
(2 sc, inc.)*6 (24)
Round 18 :
(3 sc, inc.)*6 (30)
Round 20 :
(4 sc, inc.)*6 (36)
Info :
On first leg, crochet 12 sc to the middle of the leg, secure and cut the thread. On second leg, crochet 31 sc, make 1 ch, do not cut the thread.
Round 22 :
Attach second leg to the first leg into the next stitch (i.e. in 13th stitch) and place marker. 36 sc on first leg, 1 sc on ch, 36 sc on second leg, 1 sc on ch (74)
Round 24 :
(36 sc, inc)*2 (76)
Round 25 :
(37 sc, inc)*2 (78)
Round 26 :
(12 sc, inc)*6 (84)
Round 32 :
(12 sc, dec)*6 (78)
Round 34 :
(11 sc, dec)*6 (72)
Round 36 :
(10 sc, dec)*6 (66)
Round 38 :
(9 sc, dec)*6 (60)
Round 40 :
(8 sc, dec)*6 (54)
Info :
Shift the beginning of round as desired and stuff the toy with filler, pay attention to hips to get rounded shape.
Round 41-52 :
in back loops only 54 sc
Round 53 :
in back loops only (7 sc, dec)*6 (48)
Round 54-56 :
in back loops only 48 sc
Round 57 :
in back loops only (6 sc, dec)*6 (42)
Round 58 :
(5 sc, dec)*6 (36)
Round 60 :
(4 sc, dec)*6 (30)
Round 61 :
(3 sc, dec)*6 (24)
Round 62 :
(2 sc, dec)*6 (18)
Round 63 :
(1 sc, dec)*6 (12)
Info :
Tighten the hole, cut and secure thread. Weave in the ends. Sew up the holes between the legs (if you have them formed when crocheting).
Info :
Attach yellow yarn to the back of the toy and crochet with sl.st around to the 57th round inclusive (see photo). Cut and secure thread.
— Shells :
Info :
Attach yellow yarn to 41st round and make shells: ch, skip 1 st, 5 DC, skip 1 st, sc, skip 1 st, 5 DC, skip 1 st, sc and so on to the end of round (see photo). Cut and secure the thread.
— Tail :
Info :
Start crocheting with dark green yarn, stuff as you go, do not forget to mark rounds.
Round 4 :
(1 sc, inc)*3, 3 sc (12)
Round 5 :
(2 sc, inc)*3, 3 sc (15)
Round 7 :
(3 sc, inc)*3, 3 sc (18)
Round 8 :
(2 sc, inc)*6 (24)
Round 9 :
3 sc, (inc, 1 sc)*9, 3 sc (33)
Round 13 :
(10 sc, inc)*3 (36)
Round 14 :
(5 sc, inc)*6 (42)
Round 15 :
make a fold: in front loops 7 sc, then work in both loops 28 sc, again in front loops 7 sc (42)
Round 18 :
make a fold: grab one stitch in current 18th round and one back loop in 15th round, work 7 sc in this way, then crochet 28 sc in both loops of current round, again grab one stitch in current 18th round and one back loop in 15th round, crochet 7 sc in this way in total (42)
Info :
Leave thread end for sewing.
— Crest for Tail (4 details) :
Info :
Start crocheting with dark green yarn, do not forget to mark rounds. Do not stuff with filler. Cut the thread on 3 triangles, leave the thread on 4th triangle.
1 piece :
1 r: 6 sc in a MR. 2 r: inc, 2 sc, inc, 2 sc (8). 3 r: inc, 3 sc, inc, 3 sc (10). 4 r: inc, 4 sc, inc, 4 sc (12). 5 r: inc, 5 sc, inc, 5 sc (14).
2 pcs :
1 r: 6 sc in a MR. 2 r: inc, 2 sc, inc, 2 sc (8). 3 r: inc, 3 sc, inc, 3 sc (10). 4 r: inc, 4 sc, inc, 4 sc (12).
1 piece (small) :
1 r: 6 sc in a MR. 2 r: inc, 2 sc, inc, 2 sc (8). 3 r: inc, 3 sc, inc, 3 sc (10).
Info :
Fold triangle in half and single crochet through both halves. Connect into one crest with slip stitches (see photo). Connect from smaller triangle to larger. Cut and secure thread, weave in the ends.
— Frame for Wings :
Info :
Start crocheting with dark green yarn, do not forget to mark rows.
Round 1 :
Make a chain of 6 ch, from 2nd ch from hook crochet 5 sc, 1 turning chain, turn. Further crochet in turning rows and make 1 t.ch in the end of each row.
Round 2-44 :
5 sc, 1 t.ch, turn. (43 rows)
Info :
Leave thread end for sewing. Bend the ends of the chenille wire (you can use a thin ordinary wire) and place it inside the part, sew it by the edges (see photo). Give a "checkmark" shape. Cut and secure the thread.
This Gretta the Dragon pattern is a delightful project full of personality and thoughtful shaping. With detailed rounds, photo examples, and finishing tips you can make a beautiful keepsake or a heartfelt gift. Follow the step-by-step instructions and enjoy every stitch as Gretta comes to life. 🧶✨