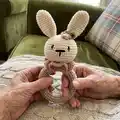
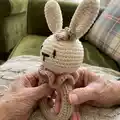
About This Bunny Baby Rattle with Teether Ring Amigurumi Pattern
This pattern creates a sweet bunny baby rattle with a wooden teether ring, designed for little hands and teething mouths. You will crochet the head, ears, a wrapped ring body, a decorative collar and a tiny flower to finish. The pattern includes clear step-by-step rounds, photos and a linked video tutorial to guide you through every stage.

Finished size is approximately 2 1/2" (6 cm) rattle diameter and about 5 1/2" (14 cm) high with the ring. The rattle uses a small 24 mm rattle ball secured inside the head for safe baby play.
Why You'll Love This Bunny Baby Rattle with Teether Ring Amigurumi Pattern
I absolutely love this pattern because it turns simple stitches into a lovable, functional baby toy with a sweet personality. I enjoy how quick it is to crochet yet still provides opportunities for small details like embroidery and a tiny flower. I take care to design it so the wooden ring and soft yarn combine for sensory contrast babies enjoy. I also love that the pattern is paired with video guidance so you can watch techniques if you prefer. Making these little rattles brings me joy and I hope you feel the same satisfaction finishing one.
Switch Things Up
I love how easy it is to customize this bunny to make it your own — change the colors to match a nursery or use variegated yarn for a fun effect.
To make a larger or smaller rattle, adjust your yarn weight and hook size: bulkier yarn with a larger hook makes a chunky version and thinner yarn with a smaller hook makes a mini keychain-sized rattle.
I often swap the wooden ring for a silicone teether ring if I want a softer teething surface; just check that the ring you choose is baby-safe and food-grade.
Try embroidering different facial expressions by moving the eye placement slightly or altering the nose length for a sleepy, happy or surprised look.
You can add tiny removable accessories like a crocheted bow or a small scarf secured with a few stitches so they can be replaced or swapped.
If you want a pacifier clip version, sew a short strap and attach a baby-safe clip to the ring, ensuring all stitches are extra secure and the clip is firmly attached.
I sometimes add a loop of ribbon at the top to hang the rattle as nursery decor — but avoid this for items given to unsupervised infants.
For a teething-focused toy, use textured stitches on the wrapped ring cover (e.g., front-post stitches) to give added tactile interest for little hands.
I recommend sewing a reinforcement thread through busy seams for extra durability if you expect heavy use or frequent washing.
Experiment with different flower or bow shapes — a small crocheted leaf or button (sewn tightly) can also change the look, but always prioritize baby-safe materials.
Common Mistakes & How to Fix Them
✗ Skipping stitch markers during rounds can make you lose your place and create uneven shaping; use a marker at the beginning of each round to keep track and maintain consistent stitch counts.
✗ Not stuffing the head evenly will create lumps or misshapen areas; stuff gradually, smoothing and shaping as you go to keep a round, even form.
✗ Inserting the rattle ball too late or without securing it can cause it to shift; insert the rattle ball when instructed and firmly secure the opening with stitches to hold it in place.
✗ Sewing parts loosely may cause pieces to detach during play; pin parts in place first and sew tightly with small secure stitches to ensure baby-safe assembly.
✗ Changing tension between pieces leads to mismatched fit around the ring; use consistent tension and check fit frequently when wrapping the wooden ring.