๐Ÿงถ Beautiful โœจ Detailed ๐Ÿ’ Adorable

Deer Crochet Amigurumi Pattern

Deer Crochet Amigurumi Pattern
4.8โ˜… Rating
5-7 Hours Time Needed
4.1K Made This
โœ‚๏ธ

Beginner Friendly Level

Perfect for those just starting their crochet journey, with clear instructions and simple techniques

โฑ๏ธ

Weekend Treat

Takes 5-7 hours, making it an enjoyable project to finish over a couple of days.

๐Ÿงธ

Cute Companion

An adorable friend to cherish, handcrafted with love to bring comfort and joy for years to come.

About This Deer Crochet Amigurumi Pattern

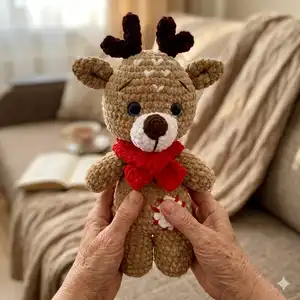
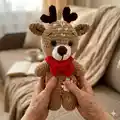
This pattern guides you through crocheting a plush deer amigurumi using plush and cotton yarns. It features detailed rounds for legs, body, head, arms, ears, antlers, muzzle, nose, tail and decorative patches. Clear photos and notes help you assemble and finish the toy with a scarf and belly patch.

Deer Crochet Amigurumi Pattern crochet pattern - detailed view of completed project

Designed for crocheters with basic skills, the pattern uses simple increases, decreases and sewing techniques. You can swap yarns and hook sizes to change finished size and texture.

Why You'll Love This Deer Crochet Amigurumi Pattern

I absolutely love this pattern because it turns soft, bulky plush yarn into a charming, huggable deer with simple stitches. I enjoy how quickly the piece grows when using plush yarn and how forgiving the texture is for beginners. The design includes sweet details like antlers, a muzzle and a tiny belly patch that bring personality to the toy. Sewing and assembly feel rewarding and the final result is a gift-ready plush companion.

Deer Crochet Amigurumi Pattern step 1 - construction progress Deer Crochet Amigurumi Pattern step 2 - assembly progress Deer Crochet Amigurumi Pattern step 3 - details and accessories Deer Crochet Amigurumi Pattern step 4 - final assembly and finishing

Switch Things Up

I love how easy it is to customize this deer; you can change yarn colors to create different personalities, like a white winter deer or a pastel nursery friend.

If you want a smaller version, use a thinner yarn and a smaller hook; a bulkier yarn with a larger hook will give you a chunky, huggable deer.

I often swap the antler color or use two strands of cotton for a sturdier antler that holds shape better than plush yarn.

Try adding clothes: a tiny crocheted sweater, hat, or a removable scarf can transform the look and make fun gift sets.

For safety-conscious projects, embroider the eyes instead of using safety eyes, or use sewn-on buttons for decorative pieces only.

I sometimes make the belly patch in contrasting yarn and sew on beads or embroidery to personalize each toy.

Experiment with facial expressions by moving the eye placement slightly or using different eyebrow stitches to convey surprise or sleepiness.

Make a family set by varying sizesโ€”create mini keychain versions using thinner yarn and a small hook for portable pals.

Try surface crochet details like spots or stripes on the back for more character, or embroider an initial on the scarf for a personalized gift.

I recommend testing different stuffing amounts to see how soft or firm you prefer your deer; a slightly firmer body helps it stand upright better.

You can attach a short loop on the head to hang the deer as an ornament, perfect for holiday decorating or gift toppers.

Adding a little bell inside the scarf or stitched to the scarfโ€™s knot gives a whimsical, playful touch to your finished deer.

Common Mistakes & How to Fix Them

โœ— Forgetting to insert safety eyes at the recommended rounds can misplace the eyes; insert or mark eye placement between rounds 11 and 12 with 7 stitches in between before closing the head. โœ— Not stuffing as you go causes lumps and a misshapen body; stuff legs and body gradually and firmly where indicated, especially before finishing rounds that close the piece. โœ— Cutting yarn too early between the two legs leaves you unable to join them smoothly; do not cut yarn after the first leg so you can join the second leg and continue to round 11. โœ— Skipping the single crochet joining stitch between legs can leave a hole; use the tail of the first leg to make 1 sl st inside the legs to prevent a gap. โœ— Working too loosely with plush yarn will make stuffing show through; crochet tight enough to prevent stuffing from sticking out and adjust tension when necessary. โœ— Using wrong eye size or placing eyes too close will alter the look; use 16 mm eyes and place them between rounds 11 and 12 separated by 7 stitches as instructed.

Deer Crochet Amigurumi Pattern

Make a cuddly deer amigurumi with this easy, photo-guided crochet pattern. You will work with plush yarn and simple single crochet techniques to create a charming toy with antlers, a scarf and a belly patch. The pattern includes step-by-step rounds for each piece plus assembly instructions so you can finish a polished, gift-ready deer.

Beginner Friendly 5-7 Hours

Materials Needed for Deer Crochet Amigurumi Pattern

โ€” Main Fabric

  • 01
    Plush yarn Dolce YarnArt 120m (131 yds)/100g in light brown - 1 ball (100g) for main body
  • 02
    Plush yarn Dolce YarnArt 120m (131 yds)/100g - small amount in dark brown for antlers
  • 03
    Plush yarn Dolce YarnArt 120m (131 yds)/100g - small amount in white for muzzle, patch and tail
  • 04
    Cotton yarn YarnArt Jeans 159m (174 yds)/50g or another cotton/acrylic medium yarn in dark brown for nose and eyebrows (small quantity)
  • 05
    Substitute plush yarn options: Himalaya Dolphin Baby 120m (131 yds)/100g; Baby Bee Adore 100g/84m; Velvet by Bernat 288m (315 yds)/300g; Ice Cream Deluxe by Lion Brand 142m (155 yds)/142g

โ€” Tools Required

  • 01
    Hook US size G/6 (4 mm)
  • 02
    Hook US size C/2 (3 mm)
  • 03
    Glitter safe eyes 16 mm (2 pieces) (can substitute with buttons or crochet eyes)
  • 04
    Fiber fill stuffing
  • 05
    Brown thread for assembling
  • 06
    Tapestry needle
  • 07
    Buttons (optional substitute for safety eyes)

Progress Tracker

0% Complete

โ€” Beginning :

Info :

Notes: start working from the body. All pieces are worked in a spiral continuously. This means that you do not end the rnd with a slip stitch and do not start a rnd with a chain.

Info :

I start working every piece from a magic ring but you can ch2 and work the necessary number of sc in the second st from the hook.

Info :

You should crochet tight enough to prevent stuffing from sticking out.

โ€” Legs & Body :

Round 1 :

6 sc in magic ring =6 sts

Round 2 :

sc 2 in each st around =12 sts

Round 3 :

(sc in next st, 2 sc in next st)*6 times =18 sts

Round 4-10 :

sc in each st around =18 sts

Info :

Fasten off, leave the tail about 10 cm and cut the yarn. One leg is done. Rep rnds 1-10 for the second leg. Do not cut yarn when the second leg is finished.

Round 11 :

18 sc around the 1st leg's sts, then make 18 sc around the 2nd leg's sts (this is how legs are attached to each other) =36 sts

Info :

Then with the tail of the first leg yarn you should do 1 sl st inside the legs to prevent hole between the legs.

Round 12-18 :

sc in each st around =36 sts

Info :

Now you need to stuff the legs. Otherwise it will be uncomfortably later.

Round 19 :

(sc in next 4 sts, sc dec)*6 times =30 sts

Round 20 :

sc in each st around =30 sts

Round 21 :

(sc in next 3 sts, sc dec)*6 times =24 sts

Round 22 :

sc in each st around =24 sts

Round 23 :

(sc in next 2 sts, sc dec)*6 times =18 sts

Info :

Now stuff the body and continue:

Round 24 :

(sc in next st, sc dec)*6 times =12 sts

Round 25 :

sc in each st around =12 sts

Info :

Fasten off.

โ€” Head :

Info :

With light brown yarn and hook 4mm make a magic ring.

Round 1 :

6 sc in magic ring =6 sts

Round 2 :

2 sc in each st around =12 sts

Round 3 :

(sc in next st, 2 sc in next st)*6 times =18 sts

Round 4 :

(sc in next 2 sts, 2 sc in next st)*6 times =24 sts

Round 5 :

(sc in next 3 sts, 2 sc in next st)*6 times =30 sts

Round 6 :

(sc in next 4 sts, 2 sc in next st)*6 times =36 sts

Round 7 :

(sc in next 5 sts, 2 sc in next st)*6 times =42 sts

Round 8 :

(sc in next 6 sts, 2 sc in next st)*6 times =48 sts

Round 9-15 :

sc in each st around =48 sts

Info :

Important!!!! If you use safe eyes (16 mm) insert them now between rounds 11 and 12 with 7 sts in between.

Round 16 :

(sc in next 6 sts, sc dec)*6 times =42 sts

Round 17 :

(sc in next 5 sts, sc dec)*6 times =36 sts

Round 18 :

(sc in next 4 sts, sc dec)*6 times =30 sts

Round 19 :

(sc in next 3 sts, sc dec)*6 times =24 sts

Round 20 :

(sc in next 2 sts, sc dec)*6 times =18 sts

Info :

Stuff the head.

Round 21 :

(sc in next st, sc dec)*6 times =12 sts

Round 22 :

sc dec*6 times =6 sts

Info :

Fasten off.

โ€” Arm (Make 2) :

Info :

With light brown yarn and hook 4mm make a magic ring.

Round 1 :

6 sc in magic ring =6 sts

Round 2 :

2 sc in each st around =12 sts

Round 3-8 :

sc in each st around =12 sts

Round 9 :

(sc in next 4 sts, sc dec)*2 times =10 sts

Info :

Stuff the arm, do not stuff it too tight.

Round 10 :

(sc in next 3 sts, sc dec)*2 times =8 sts

Round 11 :

(sc in next 2 sts, sc dec)*2 times =6 sts

Info :

Close the piece using sc, work 2 sc along the edge of the piece. Fasten off, cut yarn and weave in ends. One arm is done. Rep rnds 1-11 for the second arm.

โ€” Muzzle :

Info :

With white plush yarn and hook 4mm make a magic ring or ch2.

Round 1 :

6 sc in magic ring =6 sts

Round 2 :

sc 2 in each st around =12 sts

Round 3 :

(sc in next st, 2 sc in next st)*6 times =18 sts

Round 4 :

sc in each st around =18 sts

Info :

Fasten off.

โ€” Nose :

Info :

With dark brown cotton yarn and hook 3 mm make a magic ring or ch2.

Round 1 :

6 sc in magic ring =6 sts

Round 2 :

sc 2 in each st around =12 sts

Round 3 :

(sc in next st, 2 sc in next st)*6 times =18 sts

Info :

Fasten off. Leave the long tail for sewing.

โ€” Ears (Make 2) :

Info :

With light brown yarn and hook 4mm make a magic ring.

Round 1 :

6 sc in magic ring =6 sts

Round 2 :

sc in each st around =6 sts

Round 3 :

2 sc in each st around =12 sts

Round 4 :

sc in each st around =12 sts

Round 5 :

(sc in next st, 2 sc in next st)*6 times =18 sts

Round 6 :

sc in each st around =18 sts

Round 7 :

(sc in next st, sc dec)*6 times =12 sts

Info :

Fasten off, cut yarn and weave in ends. One ear is done. Rep rnds 1-7 for the second ear.

โ€” Antlers (make 2) :

Item Name (P1) :

The first antler part: With dark brown plush yarn and hook 4mm make a magic ring. Round 1: 6 sc in magic ring =6 sts. Round 2: sc in each st around =6 sts. Fasten off and cut yarn.

Item Name (P2) :

The second antler part: With dark brown plush yarn and hook 4mm make a magic ring. Round 1: 6 sc in magic ring =6 sts. Rounds 2-3: sc in each st around =6 sts. Do not cut yarn!!!

Round 4 :

with the working yarn of 2nd antler part crochet around first antler part. Make 1 sc, sc dec, 1 sc, sc dec until reaching 2nd antler part. Continue on 2nd part with 1 sc, sc dec, 1 sc, sc dec =8 sts

Round 5 :

1 st, sc dec, 2 st, sc dec, 1 st =6 sts

Info :

Fasten off, cut yarn and weave in ends. One antler is done. Rep rnds 1-5 for the second antler.

โ€” Tail :

Info :

With white plush yarn and hook 4mm make a magic ring.

Round 1 :

6 sc in magic ring =6 sts

Round 2 :

(sc in next st, 2 sc in next st)*3 times =9 sts

Round 3 :

sc in each st around =9 sts

Info :

Fasten off, cut yarn and weave in ends.

โ€” Square Or Heart Patches For The Belly :

Section :

Work the patch back and forth in rows. This means that you need to make a turning chain at the end of each row.

Square Patch - Row 1 :

With white plush yarn and hook 4mm make ch 5. sc in 2nd chain from hook and in next 3 sts, ch1 =4 sts, turn

Square Patch - Row 2 :

sc in next 4 sts, ch1 =4 sts, turn

Square Patch - Row 3 :

sc in next 4 sts, ch1 =4 sts, turn

Square Patch - Row 4 :

sc in next 4 sts =4 sts

Info :

Fasten off.

Heart Patch :

Work with plush pink or red yarn make magic ring. Round 1 sc in next st, 3 dc in next st, 2 sc in next st, 1 hdc in next st, 2 sc in next st, 3 dc in next st, sl st =12 sts. Fasten off.

โ€” Scarf :

Info :

Work the scarf back and forth in rows. This means that you need to make a turning chain at the end of each row.

Scarf - Row 1 :

With red plush yarn and hook 4mm make ch 5. sc in 2nd chain from hook and in next 3 sts, ch1 =4 sts, turn

Scarf - Row 2-39 :

sc in next 4 sts, ch1 =4 sts, turn

Scarf - Row 40 :

sc in next 4 sts =4 sts

Info :

Fasten off, cut yarn and weave in ends.

โ€” Assembly :

Info :

1. If you use safe eyes, you must insert them when you crocheted the head. Or sew the eyes to the head between 11 and 12 round with 7 sts in between.

Info :

2. Sew the head to the body (attach linking sts from the round 20 of the head to sts from round 25 of the body).

Info :

3. Sew arms to the body between 24 and 25 rounds. Try to stick the needle in the same place that will help to keep arms flexible.

Info :

4. With the same thread using needle sculpting, shape the head. Use photo as a guide.

Info :

5. Stuff the muzzle a little bit and sew it to the head between rnd 13 and rnd 18.

Info :

6. Sew the nose to the top of the muzzle (between 1 and 4 rounds) and with the same brown thread make 2 large stitches to the down of muzzle.

Info :

7. With the same brown thread sew antlers to the top of the head (between round 2 and 5) and embroider eyebrows (between 7 and 10 rounds) as shown at the photo.

Info :

8. Than fold the ears in half lengthwise and sew the ears between 7 and 8 rounds of the head.

Info :

9. With white yarn embroider a few small stitches on the deer's forehead.

Info :

10. Then with white thread sew the tail on the back and the patch on the belly, sew several stitches on the patch with contrast yarn.

Info :

Final: Weave in all ends, trim any stray fibers and style the scarf and ears. That's all. Your toy is ready!

Assembly Instructions

  • Insert or sew safety eyes when the head is worked to rounds 11-12, spacing them 7 stitches apart for correct facial placement.
  • Sew the head to the body by attaching linking stitches from round 20 of the head to the stitches of round 25 of the body, securing firmly.
  • Position and sew the arms to the body between rounds 24 and 25, inserting the needle in the same place to keep arms flexible and symmetrical.
  • Stuff the muzzle lightly and sew it to the head between rounds 13 and 18, then sew the nose to the top of the muzzle and secure with brown thread for facial definition.
  • Sew antlers to the top of the head between rounds 2 and 5 and embroider eyebrows between rounds 7 and 10 using dark brown thread for expression.
  • Fold ears lengthwise and sew them between rounds 7 and 8 of the head, then sew the tail to the back and the belly patch in place and secure with contrast stitches.

Important Notes

  • ๐Ÿ’กInsert safety eyes between rounds 11 and 12 with 7 stitches between them to achieve the correct look and avoid repositioning later.
  • ๐Ÿ’กStuff legs and body as you goโ€”stuffing too late can cause difficulty shaping and uneven firmness in the finished toy.
  • ๐Ÿ’กDo not cut the yarn between the two legs; continue from the second leg to join legs seamlessly at round 11.
  • ๐Ÿ’กUse tight, consistent tension with plush yarn to prevent stuffing from showing, and weave in ends as you go for a neat finish.

This sweet deer amigurumi pattern helps you create a soft, cuddly companion with charming antlers and a cozy scarf. Perfect as a handmade gift or a nursery friend, it uses plush yarn for an irresistibly huggable finish. Happy crocheting and enjoy giving your handmade deer a forever home! ๐Ÿงถ๐Ÿงธ

You ask,

we answer.

FAQs

What size will the finished piece be?

The finished amigurumi measures approximately 12 in / 28 cm high using the original plush yarn and hook US size G/6 (4 mm).

Can I use different yarn weights for this pattern?

Yes, you can substitute yarns but the final size and texture will change; using a smaller hook and lighter yarn produces a smaller deer and a larger hook with bulkier yarn produces a bigger, chunkier toy.

Do I need prior crochet experience for this pattern?

This pattern is rated beginner friendly, so basic knowledge of single crochet, increases and decreases is recommended to follow the rounds and shaping.

When should I insert the safety eyes?

Insert safety eyes between rounds 11 and 12 of the head, spaced 7 stitches apart, before you stuff and continue shaping to ensure correct placement.

Can I make the antlers in regular yarn instead of plush?

Yesโ€”pattern suggests using medium dark brown yarn held double as an alternative to plush dark brown yarn for sturdier antlers and easier shaping.