๐Ÿงถ Beautiful โœจ Detailed ๐Ÿ’ Adorable

Dave The Duck Amigurumi Pattern

Dave The Duck Amigurumi Pattern
4.4โ˜… Rating
2-3 Hours Time Needed
1.5K Made This
โœ‚๏ธ

Beginner Friendly Level

Perfect for those just starting their crochet journey, with clear instructions and simple techniques

โฑ๏ธ

Bite-Sized Project

Finishes in 2-4 hoursโ€”perfect for an afternoon of creative relaxation.

๐Ÿงธ

Cute Companion

An adorable friend to cherish, handcrafted with love to bring comfort and joy for years to come.

About This Dave The Duck Amigurumi Pattern

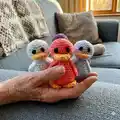
This pattern creates a tiny, adorable duck amigurumi named Dave, standing approximately 10cm tall when made with DK yarn and a 3.5mm hook. The design uses continuous spirals and simple UK stitches to shape the head, body, wings, beak and feet. Its compact size makes it perfect for gifts, keychain adaptations, or a little shelf companion.
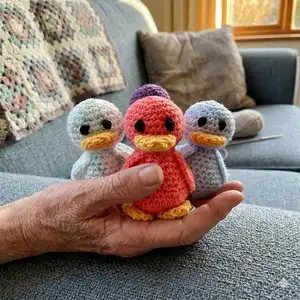
Dave The Duck Amigurumi Pattern crochet pattern - detailed view of completed project

Clear round-by-round instructions guide you through every piece with notes on assembly and finishing. Techniques used are basic UK crochet terms with a US conversion included for convenience.

Why You'll Love This Dave The Duck Amigurumi Pattern

I absolutely love this pattern because it transforms a few simple stitches into a delightful little character that brings a smile. I enjoy how quickly one duck can be made, letting me create a whole family of colours in an afternoon. I also love the small detailsโ€”the tiny beak and feetโ€”that really give Dave personality. Sharing this pattern has become one of my favorite ways to spread handmade joy and inspire simple creative projects.

Dave The Duck Amigurumi Pattern step 1 - construction progress Dave The Duck Amigurumi Pattern step 2 - assembly progress Dave The Duck Amigurumi Pattern step 3 - details and accessories Dave The Duck Amigurumi Pattern step 4 - final assembly and finishing

Switch Things Up

I love experimenting with colours when I make Dave โ€” try pastel blends, variegated DK, or bold solids to change his personality.

If you want a larger Dave, I change yarn weight and increase the hook size; a bulkier yarn makes a cuddlier, bigger duck.

For a tiny keychain version I use a finer yarn and a smaller hook, and leave a long tail of yarn to attach a split ring before stuffing completely.

I often swap the embroidered eyes for small safety eyes for a glossier look, but always ensure they are secured safely if giving to children.

Try changing the beak colour or shape slightlyโ€”shorter beaks give a cuter look while longer beaks add character.

Adding a tiny crocheted scarf or a felt bow is an easy way I personalise each duck for gifts or themed sets.

I sometimes stitch a small bell inside the body before finishing for a playful jingle when handled.

To make him poseable, I add a thin wire through the wings or base of the body; it gives extra play value for display poses.

I like to embroider tiny eyelashes or a smile for different expressions; subtle changes really alter the personality.

Make a family of Dave ducks in graduated sizes and colours โ€” they look delightful grouped together and make a lovely handmade gift set.

Common Mistakes & How to Fix Them

โœ— Skipping the instruction to use continuous spirals can make seams visible and uneven; always crochet in continuous rounds unless the pattern instructs you to join with a slip stitch. โœ— Forgetting to stuff gradually will cause lumps and poor shaping; stuff the head and body little by little while shaping to maintain a smooth silhouette. โœ— Not leaving a long tail when fastening off small pieces makes sewing difficult; always leave a long sewing tail for attaching beak, feet and wings securely. โœ— Placing the beak or eyes without measuring can result in an unbalanced face; mark the middle and check placement before sewing to ensure symmetry and correct height.
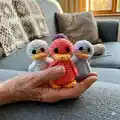
Dave The Duck Amigurumi Pattern

Make a charming little Dave the Duck amigurumi using DK yarn and a 3.5mm hook. This pattern walks you through the head, body, wings, beak and feet with clear round-by-round instructions. It is quick to make and perfect as a small gift or a set of pocket-sized friends. Youll enjoy simple shaping and a sweet finished duck about 10cm tall.

Beginner Friendly 2-3 Hours

Materials Needed for Dave The Duck Amigurumi Pattern

โ€” Main Fabric

  • 01
    DK wool of any colour (1 ball) - I like to use Robin DK (personal preference)
  • 02
    Small amount of orange or yellow yarn for the beak and feet
  • 03
    Small amount of black yarn for embroidering the eyes
  • 04
    Non-toxic toy stuffing (suitable amount to firmly stuff head and body)

โ€” Tools Required

  • 01
    3.5mm crochet hook
  • 02
    Sewing needle (for sewing pieces together and embroidering eyes)
  • 03
    Non-toxic toy stuffing

Progress Tracker

0% Complete

โ€” Materials :

Infos :

Materials you will need: DK wool of any colour (1 ball) - I like to use Robin DK (my personal preference) Small amount of orange or yellow for the beak and feet. Non-toxic toy stuffing Sewing needle 3.5mm crochet hook Small amount of black for the eyes Toy is approx. 10cm in height

โ€” Notes :

Info :

This design is made using continuous spirals. Do not join rounds with a slip stitch unless specified in the pattern. The pattern is made UK terms. However, the US terms are as follows: UK: US: Dc = Sc Htr = hdc Tr = dc

โ€” Head :

Round 0 :

Make a magic ring, 6dc into the ring and pull the ring closed.

Round 1 :

2dc in each stitch

Round 2 :

(dc, 2dc in next stitch) to end

Round 3 :

(2dc, 2dc in next stitch) to end

Round 4 :

(3dc, 2dc in next stitch) to end

Round 5 to 8 :

dc in each stitch

Round 9 :

(3dc, dc2together) to end

Round 10 :

(2dc, dc2together) to end

Round 11 :

(dc, dc2together) to end

Info :

Stuff the head

Round 12 :

dc2together to end

Info :

Fasten off and sew up the gap.

โ€” Beak :

Info :

In orange make a magic ring, 6dc into the ring and pull the ring closed.

Round 1 :

2dc in each stitch

Round 2 to 3 :

dc in each stitch

Info :

Fasten off. Leaving a long tail for sewing to head.

โ€” Feet :

Info :

Feet (make 2): In orange make a magic ring, 6dc into the ring and pull the ring closed.

Round 1 :

2dc in each stitch

Round 2 to 3 :

dc in each stitch

Info :

Fasten off. Leaving a long tail for sewing to the body.

โ€” Wings :

Wings (make 2) :

Make a magic ring, 5dc into the ring and pull the ring closed.

Row 1 :

turn, chain 1, 2dc in next st, 2htr in next st, 2tr in next st, 2htr in next st, 2dc in next st.

Row 2 :

turn, chain 1, dc, 2dc in next st, htr, 2htr in next st, tr, 2tr in next st, htr, 2htr in next st, dc, 2dc in next st.

Row 3 :

turn, chain 1, 2dc, 2dc in next st, 2htr, 2htr in next st, 2tr, 2tr in next st, 2htr, 2htr in next st, 2dc, 2dc in next st.

Info :

Fasten off. Leaving a long tail for sewing to the body.

โ€” Body :

Info :

Make a magic ring, 6dc into the ring and pull the ring closed.

Round 1 :

2dc in each stitch

Round 2 :

(dc, 2dc in next stitch) to end

Round 3 :

(2dc, 2dc in next stitch) to end

Round 4 :

(3dc, 2dc in next stitch) to end

Round 5 to 6 :

dc in each stitch

Round 7 :

(3dc, dc2together) to end

Round 8 to 11 :

dc in each stitch

Round 12 :

(2dc, dc2together) to end

Round 13 to 14 :

dc in each stitch

Round 15 :

(dc, dc2together) to end

Info :

Stuff body

Round 16 :

dc2together to end

Info :

Fasten off leaving a long tail to sew.

โ€” To make up :

Info :

Sew the head so that it sits level on the top of the body (the fastened off part of the head joining with the fastened off part of the body.) Sew the two wings to either side of the body making sure they sit to the sides and are level in height. (The point of the wings should be facing downwards.) Sew the orange beak to the front of the head making sure it is central and level. The beak should sit in the middle but lower part of the head. Sew the two orange feet to the bottom of the body so that the feet stick out slightly at the front. With black wool embroider the eyes so that they sit central above the beak. Leaving and approx. finger width space between the two eyes.

Assembly Instructions

  • Sew the head so that it sits level on the top of the body, aligning the fastened off edge of the head with the fastened off edge of the body and stitch securely.
  • Sew the two wings to either side of the body, making sure they are level in height and that the pointed ends face downwards for a natural look.
  • Sew the orange beak to the centre front of the head, positioning it in the middle-lower part of the head and sewing securely so it sits flat and central.
  • Attach the two orange feet to the bottom front of the body so they stick out slightly, spacing them evenly for stability.
  • Embroider the eyes with black wool so they sit centrally above the beak with approximately a finger-width space between them.

Important Notes

  • ๐Ÿ’กThis pattern is worked in continuous spirals; do not join rounds with a slip stitch unless the pattern explicitly tells you to.
  • ๐Ÿ’กPattern uses UK crochet terms; refer to the included UK to US conversion (Dc = Sc, Htr = hdc, Tr = dc) if you prefer US terminology.
  • ๐Ÿ’กLeave long tails when fastening off small pieces to make sewing and secure attachment much easier and neater.

Dave the Duck is a tiny, lovable amigurumi perfect for gifting or collecting. ๐Ÿงถ This pattern is quick to make and great for a cosy afternoon craft session. ๐Ÿค Make a flock of colourful ducks to brighten any shelf or package. โœจ

You ask,

we answer.

FAQs

What size will the finished piece be?

The finished amigurumi measures approximately 10 cm in height when made with DK yarn and a 3.5mm hook.

Can I use different yarn weights for this pattern?

Yes, you can use different yarn weights but the final size will change; choose an appropriate hook for your yarn to maintain correct tension and shape.

Do I need prior crochet experience for this pattern?

This pattern is rated Beginner Friendly, so basic knowledge of crochet stitches and working in the round is recommended for best results.

How long does this project typically take to complete?

Most crocheters complete this project in about 2-3 hours, though time may vary depending on experience and speed.