This festive collection brings quick, stash-busting crochet projects for the holidays. You will find ornament covers, ruffled trees, playful garlands and a reusable gift bag formula—perfect for using scraps and making handmade decor. Clear step-by-step rounds and helpful assembly tips make these projects approachable and fun for makers who love seasonal crafting.
Progress Tracker
0% Complete
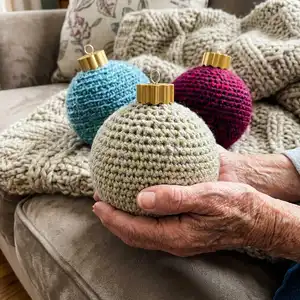
— Ornament Covers ("Have a Holly, Jolly Christmas") :
Info :
*I do not join and chain, but continue to work in the next stitch. Use a stitch marker for this so you don’t lose your place.
Info :
Working in the CONTINUOUS Round:
Round 1 :
Chain 2. Single crochet 6 in the second chain from the hook and work over your starting tail (6)
Round 2 :
Starting in the first sc make 2 sc in that stitch and in each stitch around. (12) *Still work over the starting tail.
Round 3 :
(Make 1 sc in next stitch, make 2 sc in the next stitch) repeat around (18)
Round 4 :
(Make 1 sc in next 2 stitches, make 2 sc in the next stitch) repeat around (24)
Round 5 :
(Make 1 sc in next 3 stitches, make 2 sc in the next stitch) repeat around (30)
Round 6 :
(Make 1 sc in next 4 stitches, make 2 sc in the next stitch) repeat around (36)
Round 7 :
(Make 1 sc in next 5 stitches, make 2 sc in the next stitch) repeat around (42)
Round 8 :
(Make 1 sc in next 6 stitches, make 2 sc in the next stitch) repeat around (48)
Round 9 :
(Make 1 sc in next 7 stitches, make 2 sc in the next stitch) repeat around (54)
Round 10-17 :
sc in each stitch around (54)
Info :
When you get to this part you want to have your crochet fit just a little larger than your ball. You want it to be snug when you get done with your crochet work, but you don’t want to stretch your stitches. So, fold it around the top of your ball and see how it fits. It should look "loose" around the edges. If you need continue in the increase pattern above and make more increases or if you think it’s just way too large pull back a row.
Round 18 :
To go from 54 to 48: (Make 1 sc in next 7 stitches, make an inv dec over the next two stitches) repeat around
Round 19 :
To go from 48 to 42: (Make 1 sc in next 6 stitches, make an inv dec over the next two stitches) repeat around
Round 20 :
To go from 42 to 36: (Make 1 sc in next 5 stitches, make an inv dec over the next two stitches) repeat around
Round 21 :
To go from 36 to 30: (Make 1 sc in next 4 stitches, make an inv dec over the next two stitches) repeat around
Info :
***Once I got here to 30 stitches around, I inserted my foam ball. If you are using balls like mine and they have a hole make sure you put the hole facing you. It might be a little tight – just stretch it and pop it in. You will have to do the rest of the decreases with the foam inserted. Just pull out the stitches a little as you work into them.
Round 22 :
To go from 30 to 24: (Make 1 sc in next 3 stitches, make an inv dec over the next two stitches) repeat around
Round 23 :
To go from 24 to 18: (Make 1 sc in next 2 stitches, make an inv dec over the next two stitches) repeat around
Round 24 :
To go from 18 to 12: (Make 1 sc in next stitch, make an inv dec over the next two stitches) repeat around.
Round 25 :
make one sc in each stitch around (12) and leave a tail to weave opening shut. I use only one of my two tails to weave shut and then when you come back around tie the two together and hide tails with your needle under a few stitches.
Info :
This blue and teal ball is worked with the exact same pattern as above, but I have worked in the Back Loop Only (BLO) all the way around.
— Trees #2 & #3 ("Deck the Halls with Boughs of Holly") :
Info :
Materials: Yarn: For these two trees I have used green from my stash. For the smaller tree, I alternated two colors and for the larger tree I tried to put them together in a sort of "ombre" method and used 7 different greens. Hooks: For these trees I have used my I//5.5mm hook for all the "discs" except the topper of the tree and for the top I have used my H/5.0mm hook.
Info :
First thing to decide is how many layers or "discs" you want your tree to have. I chose 6 for the small one and 7 for the larger one. You can easily do less layers and then add more rows to each one.
Info :
So, the first step is to chain the number of chains you want for where you want it to sit on your cone. I tried to stick with multiples of 5.
Round 1 :
So, chain around and join and then chain up 3 (for this pattern chain 3 DOES count as a double crochet) – after you chain up 3 and double crochet around in each chain join to the top of the chain 3 and that completes the first round.
Round 2 :
Chain up 3 and make 2dc in each double crochet around. Join to the top of the chain 3 and chain up 3 again (do this for each round)
Round 3 :
Double crochet one double crochet in double crochet around.
Info :
You can decide now if you want to continue to do an increase round (Round 2) or work straight a few rounds until you reach the length you want. Most of my discs had 5 rounds and then I did a final round of half double crochet. The increase rounds are what makes the discs "wavy" at the end and helps them drop down.
Info :
For the small tree I just finished in a simple half double crochet, but for the large tree I did a chain 3 between every 5 hdc – so, it would be (hdc in next 5, chain 5, hdc in next 5) repeat.
Info :
Assemble. I can’t STRESS enough how much difference it makes to steam your discs. It’s a huge thing! It makes your cheap, 4-ply old yarn into a soft, fluffy, nice draping tree. Look at the difference before and after steaming. I painted my cone and then while the paint was drying I steamed all of my disc.
Info :
The top of the tree is made a little different. Starting with your smaller hook, chain 2. In the 2nd chain from the hook make 4 sc.
Round 2 (Top) :
Join and chain up 1 and make 1 sc in each stitch around. (4 sc)
Round 3 (Top) :
Join and chain up 1 and make 2sc in the 1st sc and then sc in each of the rest of the stitches around. (5 sc)
Round 4 (Top) :
Join and chain up 1 and make a sc in each stitch around. (5)
Round 5 (Top) :
Join and chain up 1 and make 2sc in the 1st sc and then sc in each of the rest of the stitches around. (6 sc)
Round 6 (Top) :
Join and chain up 1 and make a sc in each stitch around. (6 sc)
Round 7 (Top) :
Join and chain up 1 and make 2sc in the 1st sc and then sc in each of the rest of the stitches around. (7 sc)
Round 8 (Top) :
Join and chain up 1 and make 2sc in the 1st sc and then sc in each of the rest of the stitches around. (8 sc)
Round 9 (Top) :
Join and chain up 1 and make 2sc in the 1st sc and then sc in each of the rest of the stitches around. (9 sc)
Round 10 (Top) :
Join and chain up 1 and make 2sc in the 1st sc and then sc in each of the rest of the stitches around. (10 sc)
Round 11 (Top) :
Join and chain up 1 and make 2sc in the 1st sc and then sc in each of the rest of the stitches around. (11 sc)
Round 12 (Top) :
Join and chain up 1 and make 2sc in the 1st sc and then sc in each of the rest of the stitches around. (12 sc)
Round 13 (Top) :
Join. Chain up 3 and make 2dc in each double crochet around. Join to the top of the chain 3 and chain up 3 again (do this for each round) (24dc)
Round 14 (Top) :
Double crochet one double crochet in double crochet around. (24)
Round 15 (Top) :
Repeat Round 13 *you may decide you don’t want to increase again and just work straight up.
Round 16 (Top) :
Repeat Round 14 *repeat this row for the length you want.
— Garlands :
Info :
IDEAS: String on some beads before you start and pull one up on the last round for "ornaments." Add some white fluffy yarn on the last round for "snow." Use some metallic yarn for "tinsel."
Item Name (Garland 1 P1) :
For the first garland, I grabbed the green and red metallic, my big bucket of pony beads and my yarn needle (use a soft bendy one for this is you have it). I threaded onto both strands held together 250 pony beads. For this first one I just chained 10 and pulled up a bead, chained 10, pulled up a bead and repeated. I did this all the way down for all of my 250 beads.
Item Name (Garland 2 P1) :
For this second garland, I grabbed these two skeins I had and held them together and used my L/8mm hook again. I just did simple back and forth rows. I started with a chain 5 and did 4 hdc in each row. I just worked until I ran out of yarn. When finished I steamed and stretched along the length - steam, stretch, steam, stretch.
Item Name (Garland 3 P1) :
For Garland #3 I grabbed bits of leftovers and held two strands. I used my J/6mm hook. I started with a chain 10 and then did a half double crochet (hdc) back down/up the chain, then repeat: (chain 25, slip on 3 beads, hdc in the 3rd chain from the hook and in the next 13-15 chains)* - you get this fun dangly piece with all these fun little curls all over it.
Item Name (Garland 4 P1) :
Garland #4: I chained 20, slipped up a bead and repeated until I ran out of yarn. This was a final stash-buster after many beads and little bits remained.
— Gift Bag #2 :
Info :
Gift Bag #2 is more of a "formula" than an exact pattern. It is a photo heavy tutorial on how to make your own custom-sized reusable gift bag in ANY size. This bag is so fabulous it makes any gift even better! It can also be used as a tote bag or purse.
Info :
Materials: any yarn you want (I used two strands of 4-ply worsted weight yarn). With this "formula" you can pretty much use any yarn, but for a nice, sturdy gift bag I encourage at least two strands of 4-ply yarn. I used my J/6mm hook to keep the fabric stiff. You will also need some type of sturdy material for the bottom of the bag. I used plastic canvas, but you can also use a thick piece of cardboard or other similar sturdy material.
Info :
To start you need to decide what measurements you want your bag to have. You’ll need to know the width (from left to right with the bag facing you), the depth (from front to back with bag facing you) and the height you want. Once you decide the measurements you want, you will start with the piece that will make up the front, back and bottom.
Info :
Chain the desired width *note: your chain is going to grow by as much as ½ an inch after you start crocheting your stitches into it. So, if you want your bag to be 10” wide you should start with a 9.5” chain and see how that goes. I chose to work in half double crochet, two strands held together and did a chain 1 and turn after each row. Single crochet would also make a very nice bag.
Info :
You will crochet in rows working back and forth to make a long piece of fabric that will be the height of your bag x 2 + the depth of the bottom. So, if you want to make a 12” high bag that is 6” in depth you will add 12+12+6+30. You first piece of fabric needs to be 30” high. Just lay flat and measure as you go. You don’t want to pull or stretch your work. Just work mindlessly back and forth until you have the measurement that you need. My bag in the photos was going to be 14” wide and have a 6” front and back with 4” of depth – so, 16”.
Info :
For the second piece of fabric you will be also working in rows – but, your width of the fabric is going to be the depth of your bag. So, in your example of a 6” depth, the second piece of fabric is going to be worked in 6” rows. *so, your starting chain should be around 5.5”. In my example for my shorter, wider bag I had a side piece of 4”
Info :
The length of this piece is going to be the width of your bag (in my example I needed 14” plus 6” on each side so 30”. *you want all your "height" pieces to be the same so measure all the parts that don’t overlap in the photo below and make sure your height is the same all the way around.
Info :
This part involves measuring and cutting your canvas or cardboard. This piece gets inserted between the two overlapping bottom layers to provide support for you gift. It needs to be just a bit smaller than your side/gusset piece because you are going to stitch it in between those layers and don’t want it to poke through – SO, if you are using plastic canvas like in my example and trim it make sure to get all those little jagged edges off and have smooth sides. See my photo here on where it goes and how you need to position it.
Info :
Now, to keep this piece secure add a few running stitches to hold it in place. If you are using cardboard you might need a few streams of hot glue between the layers. You don’t want this piece to shift while you are sewing the layers together. I used some matching yarn and just stitched along the sides. I didn’t bother securing the stitches at all until the final part of sewing all the layers together.
Info :
Now, flip your side piece with plastic canvas attached under your main piece. The canvas/cardboard goes in between the two layers and should not be visible. Measure again before you stitch the pieces up – you can’t measure enough! Make sure all of your "height" pieces are exactly the same or at least as close as you can possibly get.
Info :
Now, using whatever yarn/thread you are going to use to sew your pieces together, start stitching the bottom pieces together as I have in the next photos: You will first want to stitch all along the bottom – all four sides. This is easiest to do before you sew up the sides.
Info :
Now, pin up all 4 sides evenly and start stitching. I used a contrasting color and made my stitches visible and fun, but you can choose how to do this part. I started in one upper corner and worked down to the bottom section and then tied that leftover tail from the bottom with and working thread and then weaved in the ends. I chose to go back over the bottom in my colored yarn and up the next side to stitch together and across and back down the bottom and repeat- it made a fun, colorful border of "sewing" in my 4 corners and on the bottom.
Info :
The next part is just making some fun handles. I chose to make 6 strips – three for each side and pull them through – one strand per three stitches next to each other- knot – braid – pull through three stitches on opposite side, and knot.
This holiday collection is designed to use up your yarn stash while creating charming seasonal decor that lasts. Try different colors, hold strands together, and make a full set of ornaments, trees, garlands and gift bags for a coordinated holiday display. Happy crocheting and stash-busting! 🎄🧶✨