🧢 Beautiful ✨ Detailed πŸ’ Adorable

Cute Plush Ghost Amigurumi Pattern

Cute Plush Ghost Amigurumi Pattern
4.2β˜… Rating
5-7 Hours Time Needed
3.8K Made This
βœ‚οΈ

Beginner Friendly Level

Perfect for those just starting their crochet journey, with clear instructions and simple techniques

⏱️

Weekend Treat

Takes 5-7 hours, making it an enjoyable project to finish over a couple of days.

🧸

Cute Companion

An adorable friend to cherish, handcrafted with love to bring comfort and joy for years to come.

About This Cute Plush Ghost Amigurumi Pattern

This pattern creates a soft plush ghost amigurumi approximately 25 cm (10") tall without the hat when made with the suggested plush yarn and 4.0 mm hook. It includes round-by-round instructions for arms, body, head, hat and embroidery placement to finish a sweet, expressive face. The design features simple shaping, a removable witch hat, and embroidered eyebrows and mouth for a charming personality.

Cute Plush Ghost Amigurumi Pattern crochet pattern - detailed view of completed project

The pattern uses US terminology and assumes familiarity with basic crochet stitches like single crochet, increases and decreases. It is rated EASY and is suitable for confident beginners who have worked in rounds before.

Why You'll Love This Cute Plush Ghost Amigurumi Pattern

I absolutely love this pattern because it turns a few basic stitches into a character full of personality and charm. I enjoy how fast it comes together while still giving room for little custom touches like the tilted witch hat and pink blush cheeks. The plush yarn creates an irresistibly soft finish that is perfect for cuddling and gifting. Sewing and embroidering the face is a relaxing final step that really brings the ghost to life, and I love seeing how small details change its expression.

Cute Plush Ghost Amigurumi Pattern step 1 - construction progress Cute Plush Ghost Amigurumi Pattern step 2 - assembly progress Cute Plush Ghost Amigurumi Pattern step 3 - details and accessories Cute Plush Ghost Amigurumi Pattern step 4 - final assembly and finishing

Switch Things Up

I love to customize this ghost by changing the hat colors and band to match seasons or personal tastesβ€”try pastels for a baby shower or autumn shades for Halloween.

If you want a mini keychain version, switch to a sport or DK weight yarn and a smaller hook to shrink the pattern proportionally.

You can make the ghost extra cuddly by choosing a bulkier plush yarn and a larger hook for a squishier finished toy.

I often add small accessories like a tiny crochet pumpkin or a felt bow sewn to the hat to give each ghost a unique personality.

Try embroidering different mouth shapes and eyebrow placements to change the expression from shy to cheerful or surprised.

For a portable pocket pal, attach a keyring to the hat or a loop at the top so it can hang from bags or backpacks.

Experiment with safety eye sizes and positions to alter the face's lookβ€”larger eyes create a more whimsical, cartoon style.

Use a contrasting yarn for the hat brim or add a simple surface slip stitch pattern for texture and interest.

I sometimes leave the hat removable and make several hats in different styles so the ghost can 'dress up' for different occasions.

Don’t be afraid to combine materialsβ€”felt cheeks, tiny beads, or embroidered freckles can make each ghost one-of-a-kind.

Common Mistakes & How to Fix Them

βœ— Skipping the instruction to stuff as you go can make shaping difficult; stuff gradually during rounds to maintain the intended silhouette and avoid lumps. βœ— Not inserting safety eyes at the specified rounds can misplace facial features; insert the safety eyes between rounds 6 and 7 with 8 stitches between them to ensure proper alignment. βœ— Cutting the white yarn after joining arms will interrupt the head construction; do not cut the white yarn after round 24 so you can continue seamlessly with the head. βœ— Failing to flatten the arm before crocheting through both sides will make the seam bulky; flatten the arm and crochet 4 sc through both sides for a neat finish. βœ— Overstuffing the head before closing can distort the face and make embroidery difficult; stuff the head firmly but gradually and shape before closing the opening.

Cute Plush Ghost Amigurumi Pattern

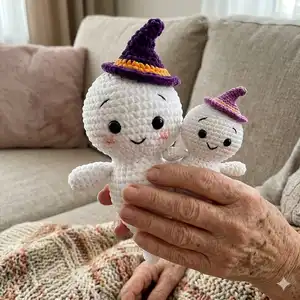
Make a cuddly plush ghost amigurumi with this easy, photo-guided pattern. You will work with plush yarn to create a soft, huggable ghost complete with a removable witch hat and embroidered face. The pattern uses simple amigurumi shaping techniques and clear round-by-round instructions so you can crochet with confidence. Perfect for Halloween gifts, nursery decor, or a fun weekend project.

Beginner Friendly 5-7 Hours

Materials Needed for Cute Plush Ghost Amigurumi Pattern

β€” Main Fabric

  • 01
    Plush yarn (100g/120m) White - Himalaya Dolphin Baby 80301 (enough to make 1 ghost approx. 25 cm tall)
  • 02
    Plush yarn (100g/120m) Purple - Himalaya Dolphin Baby 80340 (small amount for hat and details)
  • 03
    Plush yarn (100g/120m) Orange - Himalaya Dolphin Baby 80316 (small amount for hat band)
  • 04
    Black thread for embroidery - YarnArt Jeans 53 (for eyebrows and mouth)
  • 05
    Safety eyes 14 mm (2 pieces)
  • 06
    Polyester fiber fill stuffing (enough to stuff body and head)

β€” Tools Required

  • 01
    Safety eyes 14 mm (2 pieces)
  • 02
    Crochet hook 4.00 mm
  • 03
    Black thread for embroidery (YarnArt Jeans 53)
  • 04
    Polyester fiber fill stuffing

Progress Tracker

0% Complete

β€” Materials and Tools :

Info :

Plush yarn (100g/120m): White (Himalaya Dolphin Baby 80301). Purple (Himalaya Dolphin Baby 80340). Orange (Himalaya Dolphin Baby 80316). Black thread to embroider the eyebrows and the mouth (I use YarnArt Jeans 53). Safety eyes 14 mm. Crochet hook 4.00 mm. Stuffing (Polyester fiber fill). If you use these materials, the finished toy is around 25 cm (10") tall without the hat. There are no crochet instructions included in the pattern. It's assumed that you're familiar with the basic crochet stitches. The difficulty level of the pattern is EASY. I use US terminology in this pattern.

β€” Abbreviations :

Infos :

st - stitch. ch - chain. sl st - slip stitch. sc - single crochet. inc - increase. dec - decrease. (sc, inc)* n - repeat those in brackets n-times.

β€” Arms :

Info :

Crochet with the white yarn. Stuff only lower half of the arm.

Round 1 :

6 sc into a magic ring (6)

Round 2 :

6 inc (12)

Round 3-4 :

12 sc (2 rounds)

Round 5 :

(4 sc, dec)*2 (10)

Round 6 :

10 sc

Round 7 :

(3 sc, dec)*2 (8)

Round 8 :

8 sc

Round 9 :

Flatten the arm and crochet 4 sc through both sides.

Info :

Fasten off and cut the yarn.

β€” Body :

Info :

Crochet with the white yarn. Stuff as you go.

Round 1 :

6 sc into a magic ring (6)

Round 2 :

6 sc (6)

Round 3 :

(sc, inc)*3 (9)

Round 4 :

(2 sc, inc)*3 (12)

Round 5 :

4 inc, 4 dec (12)

Round 6 :

(sc, inc)*6 (18)

Round 7 :

3 sc, 4 inc, 3 sc, 4 dec (18)

Round 8 :

(2 sc, inc)*6 (24)

Round 9 :

6 sc, 4 inc, 6 sc, 4 dec (24)

Round 10 :

(3 sc, inc)*6 (30)

Round 11 :

9 sc, 4 inc, 9 sc, 4 dec (30)

Round 12 :

(4 sc, inc)*6 (36)

Round 13 :

12 sc, 4 inc, 12 sc, 4 dec (36)

Round 14 :

(11 sc, inc)*3 (39)

Round 15-18 :

39 sc (4 rounds)

Round 19 :

(11 sc, dec)*3 (36)

Round 20 :

36 sc

Round 21 :

(4 sc, dec)*6 (30)

Info :

Now we will join the arms:

Round 22 :

7 sc, 4 sc through the first arm and the body, 10 sc, 4 sc through the second arm and the body, 5 sc (30)

Round 23 :

(3 sc, dec)*6 (24)

Round 24 :

24 sc

Info :

Don't cut the white yarn, we will continue with the head.

β€” Head :

Info :

Continue crocheting with the white yarn. Stuff as you go.

Round 1 :

(sc, inc)*12 (36)

Round 2 :

(2 sc, inc)*12 (48)

Round 3 :

(7 sc, inc)*6 (54)

Round 4 :

4 sc, inc, (8 sc, inc)*5, 4 sc (60)

Round 5-7 :

60 sc (3 rounds)

Round 8 :

4 sc, dec, (8 sc, dec)*5, 4 sc (54)

Round 9-11 :

54 sc (3 rounds)

Info :

Insert the safety eyes between rounds 6 and 7 with 8 stitches between them (6 stitches visible). The marker is in the back of the head.

Round 12 :

(7 sc, dec)*6 (48)

Round 13 :

3 sc, dec, (6 sc, dec)*5, 3 sc (42)

Round 14 :

(5 sc, dec)*6 (36)

Round 15 :

2 sc, dec, (4 sc, dec)*5, 2 sc (30)

Round 16 :

(3 sc, dec)*6 (24)

Round 17 :

sc, dec, (2 sc, dec)*5, sc (18)

Round 18 :

(sc, dec)*6 (12)

Round 19 :

6 dec (6)

Info :

Make sure that the head is stuffed firmly. Close the opening and hide the yarn inside.

β€” Embroidering :

Info :

With a black thread embroider the eyebrows in round 10. They are 2 st wide and with 8 st between them. Embroider the mouth in round 4. It's 3 st wide. Color the cheeks with pink blush.

β€” Hat :

Info :

Start crocheting with the purple yarn. Stuff lightly.

Round 1 :

6 sc into a magic ring (6)

Round 2-3 :

6 sc (2 rounds)

Round 4 :

(sc, inc)*3 (9)

Round 5-6 :

9 sc (2 rounds)

Round 7 :

6 sc, 3 inc (12)

Round 8 :

6 sc, (sc, inc)*3 (15)

Round 9 :

9 sc, (sc, inc)*3 (18)

Round 10 :

(2 sc, inc)*6 (24)

Info :

Change the yarn to orange color.

Round 11 :

(3 sc, inc)*6 (30)

Round 12 :

30 sc

Info :

Change the yarn to purple color.

Round 13 :

Front loops only: (sc, inc)*15 (45)

Round 14 :

45 sc

Info :

Make a sl st, fasten off and cut the yarn, leaving a tail for sewing.

Info :

Sew the hat to the top of the head in the back loops of round 13. I sew it tilted to one side.

β€” Final Notes :

Info :

Your cute plush ghost is ready! I hope you have fun making it with me! If you have any questions about the pattern, feel free to write to me. I'm always happy to help.

Assembly Instructions

  • Insert safety eyes between rounds 6 and 7 of the head with 8 stitches between them (6 stitches visible) and secure backs firmly.
  • Sew the hat to the top of the head in the back loops of round 13, positioning it slightly tilted to one side for character.
  • Attach the arms to the body when joining rounds: during round 22 crochet 4 sc through the first arm and the body and 4 sc through the second arm and the body to secure them.
  • Close the head opening after stuffing firmly, hide the yarn tail inside and weave in ends to finish neatly.
  • Embroider the eyebrows with black thread at round 10 (2 stitches wide with 8 stitches between them) and embroider the mouth at round 4 (3 stitches wide).

Important Notes

  • πŸ’‘Insert the safety eyes before closing the head to ensure correct placement and a secure fit.
  • πŸ’‘Do not cut the white yarn after round 24 since you will continue crocheting the head without joining a new yarn.
  • πŸ’‘Stuff the body and head gradually as you crochet to keep smooth shaping and avoid lumps.
  • πŸ’‘Flatten each arm before crocheting 4 sc through both sides for a clean finish and neat seam.

This adorable plush ghost was designed to be quick, soft, and irresistibly cute β€” perfect for gifts and seasonal decor. It uses plush yarn for a cuddly finish and a tiny witch hat for personality. Make one now and give it a loving home! πŸ§ΆπŸ‘»

You ask,

we answer.

FAQs

What size will the finished piece be?

The finished amigurumi is around 25 cm (10") tall without the hat when made with the recommended yarn and 4.0 mm hook.

Can I use different yarn weights for this pattern?

Yes, you can change yarn weight, but this will affect the final size and texture; adjust the hook size accordingly and expect changes in finished dimensions.

Do I need prior crochet experience for this pattern?

This pattern is rated Beginner Friendly, but it assumes you are familiar with basic stitches worked in rounds such as single crochet, increases and decreases.

How long does this project typically take to complete?

Most crocheters complete this project in 5-7 hours, though time may vary depending on experience and how many custom details you add.

Where do I place the safety eyes?

Insert the safety eyes between rounds 6 and 7 of the head with 8 stitches between them (6 stitches visible) and secure the safety backs.