🧢 Beautiful ✨ Detailed πŸ’ Adorable

Cute Bunny Comforter Amigurumi Pattern

Cute Bunny Comforter Amigurumi Pattern
4.4β˜… Rating
2-3 Hours Time Needed
2.7K Made This
βœ‚οΈ

Beginner Friendly Level

Perfect for those just starting their crochet journey, with clear instructions and simple techniques

⏱️

Bite-Sized Project

Finishes in 2-4 hoursβ€”perfect for an afternoon of creative relaxation.

🧸

Cute Companion

An adorable friend to cherish, handcrafted with love to bring comfort and joy for years to come.

About This Cute Bunny Comforter Amigurumi Pattern

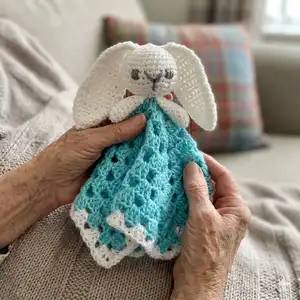
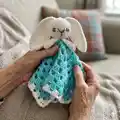
This pattern creates a small bunny comforter β€” a granny square blanket with a crocheted bunny head, ears and arms attached. The design uses basic US stitches and simple shaping to keep things quick and fun. Perfect for gifting to babies or for making a comforting handmade toy to keep close.

Cute Bunny Comforter Amigurumi Pattern crochet pattern - detailed view of completed project

You will make a small blanket body and a stuffed head worked in continuous rounds, plus flat ears and simple arms. All pieces are sewn together and finished with an embroidered face for safety.

Why You'll Love This Cute Bunny Comforter Amigurumi Pattern

I absolutely love this pattern because it combines a classic granny square with a cute amigurumi head for an irresistible comforter. I enjoy how fast the blanket grows and how quickly you can make the head and ears. The stitches are simple but the finished look feels polished and handmade. I also love that the face is embroidered with yarn, making it safe for little ones and extra cuddly.

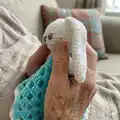
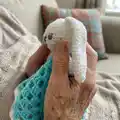
Cute Bunny Comforter Amigurumi Pattern step 1 - construction progress Cute Bunny Comforter Amigurumi Pattern step 2 - assembly progress Cute Bunny Comforter Amigurumi Pattern step 3 - details and accessories Cute Bunny Comforter Amigurumi Pattern step 4 - final assembly and finishing

Switch Things Up

I love how easy it is to customize this pattern with color changes; try a pastel blanket and white head for a classic nursery look.

I sometimes make a mini version by using fingering weight yarn and a smaller hook to create a pocket-sized keychain lovey.

For a chunkier, super-cuddly comforter, use bulky yarn and a larger hook β€” the stitch definition will change but the assembly stays the same.

I like adding a tiny crocheted bow or scarf to the bunny for seasonal variation or to match nursery decor.

Try changing the blanket motif from a granny square to simple rows of dc for a different texture and faster construction.

I occasionally embroider eyelashes or freckles on the face to give the bunny extra personality and charm.

Want a more modern look? Use tonal or variegated yarn for the blanket and a solid color for the bunny head to keep focus on the face.

I recommend experimenting with ear length and width: longer ears give a floppy, cute vibe while shorter ears look more classic.

For gifting, attach a small loop at a corner of the blanket so it can be clipped to a stroller or bouncer as a soft companion.

I also enjoy making setsβ€”match the comforter with a tiny hat or booties using the same color scheme for a coordinated newborn gift.

When I want an eco-friendly option, I use organic cotton yarn and a tight gauge to ensure durability and easy washing.

Consider embroidering the child’s initial on the blanket corner for a personalized, keepsake finish.

Common Mistakes & How to Fix Them

βœ— Not using a stitch marker for continuous rounds leads to losing track of round starts; use a stitch marker and move it at the start of each round to keep your place. βœ— Stuffing the head too loosely will cause a floppy shape and visible stuffing; stuff firmly and gradually while shaping to maintain structure. βœ— Skipping counts on increase/decrease rounds causes uneven shaping; count your stitches at the end of each round, especially after increases or sc2tog decreases. βœ— Pulling stitches too tight when working the head can distort shaping and make sewing difficult; keep tension even and slightly firm but not overly tight to allow sewing and finishing. βœ— Forgetting to leave long tails for sewing pieces together makes assembly harder; leave a long tail when fastening off to make attaching the head, ears and arms easy.

Cute Bunny Comforter Amigurumi Pattern

Make a sweet, cuddly bunny comforter that doubles as a tiny lovey and a decorative blanket. This pattern walks you through a simple granny square blanket plus an adorable amigurumi-style bunny head, ears and arms. You will enjoy quick rounds and clear shaping notes that make this a fast, satisfying project. Perfect for gifting or keeping as a cozy nursery companion.

Beginner Friendly 2-3 Hours

Materials Needed for Cute Bunny Comforter Amigurumi Pattern

β€” Main Fabric

  • 01
    3/Light/Worsted/8ply yarn - 15g of one color for bunny head, arms and ears
  • 02
    3/Light/Worsted/8ply yarn - 15g of another color for blanket (body/dress)
  • 03
    Small amount of contrasting yarn for face embroidery/details

β€” Tools Required

  • 01
    Crochet hook H (5mm)
  • 02
    Stitch marker
  • 03
    Darning needle / yarn needle for sewing and embroidery
  • 04
    Scissors
  • 05
    Polyester stuffing for head (small amount)
  • 06
    Pins for assembly (optional)

Progress Tracker

0% Complete

β€” Granny Square Blanket :

Info :

Useful Granny Square Tutorial link from The Crochet Crowd: http://www.youtube.com/watch?v=BFnyfJEWCd8

Info :

Ch4 and sl st to the beginning ch to form ring.

Round 1 :

Ch3 (counts as a dc from now on), work 2dc into the ring, *ch2, 3dc into the ring*, rep from * twice more, ch2 and sl st to the top of the ch3 that started the round.

Round 2 :

Ch3, work 2dc into the same sp, *ch1, work 3dc, ch2, 3dc into next ch2 corner sp. Repeat from * all the way around. Your final sts should be 3dc, ch2 and then sl st to the top of the ch3 that started the round.

Round 3 :

Ch3, work 2dc into the same sp, ch1 * work 3dc, ch1, into each ch sp across to corner sp. In corner sp, work 3dc, ch2, 3dc, ch1. Repeat from * all the way around. Your final corner should have 3dc, ch2 and then sl st to the top of the ch3 that started the round.

Info :

Repeat round 3 nine times. Each round will cause the square to increase in size.

β€” Head :

Infos :

Rounds are worked in continuous spirals; do not join. Do not turn work at the end of each round but use stitch markers as indicated.

Round 1 :

Ch2, work 6sc in furthest ch from hook. Place stitch marker in first st for beg of next Round; move marker up at start of each Round.

Round 2 :

Work 2 sc in each sc around (12sc).

Round 3 :

*2sc in next sc, sc in next sc; repeat from * around (18sc).

Round 4 :

*2sc in next sc, sc in each of next 2sc; repeat from * around (24sc).

Round 5 :

*2 sc in next sc, sc in each of next 3sc; repeat from * around (30sc).

Round 6-10 :

Sc in each st around.

Round 11 :

*Sc2tog, sc in each of next 3sc; repeat from * around (24sc)

Round 12 :

*Sc2tog, sc in each of next 2sc; repeat from * around (18sc).

Round 13 :

*Sc2tog, sc in next sc; repeat from * around (12sc)

Info :

Stuff firmly.

Round 14 :

Sc2tog around (6sc).

Info :

Fasten off, leaving a long tail to use to sew head to centre of blanket.

β€” Bunny Ears (make 2) :

Info :

Note: Turning ch1 does not count as a st.

Row 1 :

Starting at bottom of ear, ch 2, 3 sc in 2nd ch from hook, ch 1, turn (3sc)

Row 2 :

Sc in each st across, ch 1, turn (3sc)

Row 3 :

2sc in first sc, sc in next sc, 2sc in last sc, ch 1, turn (5sc)

Rows 4 & 5 :

Sc in each st across, ch1, turn (5sc)

Row 6 :

2sc in first st, sc in each st to last st, 2sc in last st, ch1, turn (7sc)

Rows 7 - 18 :

Sc in each sc across, ch1, turn.

Row 19 :

Sc2tog, sc in each st to last 2 sts, sc2tog, ch1, turn (5sc)

Row 20 :

Sc in each sc across, ch1, turn.

Row 21 :

Sc2tog, sc in next st, sc2tog, ch1, DO NOT TURN (3sc)

Edging :

Work 21 sc down side of ear, work 3 sc across opposite side of starting ch, work 21 sc up side of ear, ch1, join with a sl st to first sc of row 21. Leaving a length of yarn for sewing, fasten off.

Info :

Fold ear in half lengthwise and sew the top of row 21 together. Sew ears to top of head.

β€” Arms (make 2) :

Infos :

Rounds are worked in continuous spirals; do not join. Do not turn work at the end of each round but use stitch markers as indicated.

Round 1 :

Ch2, work 5sc in furthest ch from hook. Place stitch marker in first st for beg of next round; move marker up at start of each Round (6sc)

Round 2 :

Work 2sc in each sc around (12sc).

Rounds 3 - 4 :

Work 1sc in each st around (12sc)

Round 5 :

Sc2tog, sc in next two sts around (9sc)

Rounds 6 - 9 :

Work 1sc in each st around (9sc)

Info :

Do not stuff arms, sew open end shut and tie off leaving a long tail. Using tail sew arms just beneath the head onto the blanket body.

Info :

Finish by sewing a simple face onto the bunny using a darning needle - using yarn makes this comforter very safe for little ones.

Info :

I hope you like this pattern! If you have any problems with it please don't hesitate to let me know and I'll see if I can help!

β€” Special Stitches :

Info :

sc2tog (sc dec) (Insert hook into next st and draw up a lp) twice, yo and draw through all 3 lps on hook - 1 sc decreased

Assembly Instructions

  • Attach head to centre of the granny square blanket by aligning the opening of the head with the centre of the blanket and sewing through the long tail left when fastening off, securing tightly and evenly.
  • Fold each ear in half lengthwise and sew the top of row 21 together; position ears at the top of the head and sew them in place using the yarn tail left when fastening off.
  • Sew arms to the blanket body just beneath the head, using the long tail left from the arm to stitch them securely and keep the seam neat and flat.
  • Embroider the face using a darning needle and yarn, following photos for eye and nose placement; using yarn for facial features makes this comforter safe for little ones.
  • Weave in all ends and hide yarn tails within the blanket and head to ensure a tidy, secure finish and to prevent loose ends for babies.

Important Notes

  • πŸ’‘Use stitch markers to keep track of round starts in continuous spiral rounds; move the marker up at the start of each round.
  • πŸ’‘Stuff the head firmly but gradually while shaping to avoid lumps and to keep the stuffed shape neat and secure.
  • πŸ’‘Do not stuff the arms; sew the open end shut and leave a long tail to sew arms to the blanket body.
  • πŸ’‘Fold ears and sew the top closed before attaching to ensure symmetric shape and clean edges.

This Cute Bunny Comforter is a quick and heartwarming make that makes a perfect baby gift or nursery keepsake. It combines a soft granny square blanket with a tiny amigurumi bunny head, ears and arms for instant charm. Whether you make one for a new baby or to keep on your own couch, it will bring smiles and cozy cuddles. 🧢🧸

You ask,

we answer.

FAQs

What size will the finished piece be?

The finished comforter size depends on how many rounds you add to the granny square; the pattern as written produces a small lovey suitable for babies and toddlers (approx. 20-25 cm square depending on tension).

Can I use different yarn weights for this pattern?

Yes, you can use different yarn weights but your finished size will change; use a suitable hook for your chosen yarn and expect a larger or smaller comforter accordingly.

Do I need to use safety eyes or embroidery for the face?

This pattern recommends sewing a simple face with yarn using a darning needle to keep the comforter safe for little ones; avoid safety eyes for baby toys unless they are professionally secured.

Do I need prior crochet experience for this pattern?

This pattern is beginner friendly and uses basic stitches (sc, dc, ch) and simple shaping; familiarity with working in the round and counting stitches will be helpful.