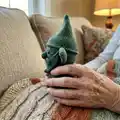
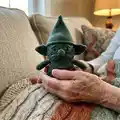
Make a fun, warm leopard-print earflap hat worked in chunky and DK yarns. This pattern includes crown shaping, triangular earflaps, facings, ears, a crocheted nose and multi-size spots so you can customise the look. Follow clear round-by-round instructions and charts to create a cosy, playful hat for child or adult sizes.
Progress Tracker
0% Complete
— Materials and Notes :
Info :
Materials: King Cole Merino Blend Chunky (A) 3[4] x 50g balls 928 Old Gold; King Cole Merino Blend DK (B) 1[1] x 50g ball 048 Black; King Cole Baby Alpaca DK (C) 1[1] x 50g ball 500 Camel. Hooks: 3mm, 5mm and 6mm. Buttons: 2 brown 3/4[7/8]in and 2 black 1/2[5/8]in. Darning needle, sewing needle, black sewing thread, small toy stuffing and thin card for pompoms.
Info :
Sizes: To fit child up to 20in (51cm) head circumference [adult up to 22in (56cm)]. Tension: 13 sts and 14 rows to 4in (10cm) over double crochet on 6mm hook. Adjust hook if necessary to obtain correct tension.
Info :
Method: The main part of the hat is crocheted in rounds, starting from the top and increasing the stitches to shape the crown. The earflaps are crocheted in rows and decreased to form the triangular shape. The leopard's ears are worked in rounds. They are lightly stuffed and attached to the hat along with a crocheted nose and leopard spots. Buttons are stitched on for eyes.
— Main piece :
Setup :
Starting at the top of the hat, with 6mm hook and A, make 4 ch and sl st to first ch to form a ring.
Round 1 :
1 ch (does not count as a st), work 6 dc into ring, sl st into first dc (6 sts)
Round 2 (inc) :
1 ch (does not count as a st), (dc2inc) 6 times, sl st into first dc (12 sts)
Round 3 (inc) :
1 ch (does not count as a st), (dc2inc, 1 dc) 6 times, sl st into first dc (18 sts)
Round 4 (inc) :
1 ch (does not count as a st), (dc2inc, 2 dc) 6 times, sl st into first dc (24 sts)
Round 5 (inc) :
1 ch (does not count as a st), (dc2inc, 3 dc) 6 times, sl st into first dc (30 sts)
Round 6 (inc) :
1 ch (does not count as a st), (dc2inc, 4 dc) 6 times, sl st into first dc (36 sts)
Round 7 (inc) :
1 ch (does not count as a st), (dc2inc, 5 dc) 6 times, sl st into first dc (42 sts)
Round 8 (inc) :
1 ch (does not count as a st), (dc2inc, 6 dc) 6 times, sl st into first dc (48 sts)
Round 9 (inc) :
1 ch (does not count as a st), (dc2inc, 7 dc) 6 times, sl st into first dc (54 sts)
Round 10 (inc) :
1 ch (does not count as a st), (dc2inc, 8 dc) 6 times, sl st into first dc (60 sts)
Round 11 (Adult size only) :
1 ch (does not count as a st), (dc2inc, 9 dc) 6 times, sl st into first dc (66 sts)
Next (Both sizes) :
1 ch (does not count as a st), work 1 dc in each dc, sl st into first dc. Rep last round 16[18] times more.
— Earflaps and edging :
Info :
Main piece Earflaps and edging Child size: follow chart for earflap placement and edging (see diagram). The first earflap starts at the centre back of the hat as indicated in the main piece chart.
First earflap - Setup :
Next: Starting at the centre back, 1 ch (does not count as a st), work 1 dc in next 5[6] dc. The following is worked in rows.
Adult size only Row 1 (RS) :
Work 1 dc in next 15 dc, turn.
Adult size only Row 2 (WS) (dec) :
1 ch (does not count as a st), dc2dec, 1 dc in next 11 dc, dc2dec, turn, 1 ch (does not count as a st).
Both sizes Next :
Work 1 dc in next 13 dc, turn.
Both sizes Next (dec) :
*1 ch (does not count as a st), dc2dec, 1 dc in next 9 dc, dc2dec, turn (11 sts)
Both sizes Next :
1 ch (does not count as a st), work 1 dc in each dc, turn.
Both sizes Next (dec) :
1 ch (does not count as a st), dc2dec, 1 dc in next 7 dc, dc2dec, turn (9 sts)
Both sizes Next :
1 ch (does not count as a st), work 1 dc in each dc, turn.
Both sizes Next (dec) :
1 ch (does not count as a st), dc2dec, 1 dc in next 5 dc, dc2dec, turn (7 sts)
Both sizes Next :
1 ch (does not count as a st), work 1 dc in each dc, turn.
Both sizes Next (dec) :
1 ch (does not count as a st), dc2dec, 1 dc in next 3 dc, dc2dec, turn (5 sts)
Both sizes Next :
1 ch (does not count as a st), work 1 dc in each dc, turn.
Both sizes Next (dec) :
1 ch (does not count as a st), dc2dec, 1 dc in next 1 dc, dc2dec, turn (3 sts)
Both sizes Finish :
Fasten off.
Second earflap - Setup :
With right side facing, rejoin A to the front of the hat. Work 1 dc in each of the 24 dc across the front of the hat. The following is worked in rows.
Adult size only Row 1 (RS) :
Work 1 dc in next 15 dc, turn.
Adult size only Row 2 (WS) (dec) :
1 ch (does not count as a st), dc2dec, 1 dc in next 11 dc, dc2dec, turn, 1 ch (does not count as a st).
Both sizes Next :
Work 1 dc in next 13 dc, turn.
Both sizes :
Work from * to * of first earflap. Fasten off.
— Earflap facings (MAKE 2) :
Note :
Omit if you plan to add a crocheted lining.
Both sizes Setup :
Using 6mm hook and A, make 14[16] ch.
Row 1 (RS) :
Work 1 dc in second ch from hook, 1 dc into next 12[14] ch, turn (13[15] sts)
Adult size only Row 2 (dec) :
1 ch (does not count as a st), dc2dec, 1 dc in next 11 dc, dc2dec, turn (13 sts)
Row 3 :
1 ch (does not count as a st), work 1 dc in each dc, turn.
Both sizes Next :
Work from * to * of the first earflap in the main piece pattern. Fasten off.
Edging :
Using 5mm hook and A, with right side of work facing and starting at row 1 of the earflap facing, work 1 dc into each stitch down the edge of the next 10[12] rows, work dc2inc, 1 dc, dc2inc in the next 3 dc along the lower edge of the earflap facing, work 1 dc into each stitch at the edge of the next 10[12] rows up the other side of the earflap facing (25[29] sts). Fasten off, leaving a long length of yarn at the end to sew and join. Work edging into earflap of main hat at same time to join.
— Ears (MAKE 2) :
Both sizes Round 1 :
Starting at the top of the ear, with 6mm hook and A, make 4 ch and sl st to first ch to form a ring. 1 ch (does not count as a st), work 5 dc into ring, sl st into first dc (5 sts)
Round 2 (inc) :
1 ch (does not count as a st), (dc2inc) 5 times, sl st into first dc (10 sts)
Round 3 (inc) :
1 ch (does not count as a st), (dc2inc, 1 dc) 5 times, sl st into first dc (15 sts)
Round 4 (inc) :
1 ch (does not count as a st), (dc2inc, 2 dc) 5 times, sl st into first dc (20 sts)
Adult size only Next (inc) :
1 ch (does not count as a st), (dc2inc, 4 dc) 4 times, sl st into first dc (24 sts)
Both sizes Next :
1 ch (does not count as a st), work 1 dc in each dc, sl st into first dc. Rep last round 4[6] more times. Fasten off, leaving a long length of yarn at the end.
— Nose :
Both sizes Setup :
With 3mm hook and B, make 4 ch and sl st to first ch to form a ring.
Next :
1 ch (does not count as a st), work 6 dc into ring, sl st into first dc (6 sts)
Child size Next round :
1 ch (does not count as a st), work 1 dc in each dc, sl st to first dc
Child size Next round (inc) :
1 ch (does not count as a st), (dc2inc) 6 times, sl st into first dc (12 sts)
Child size Next round (inc) :
1 ch (does not count as a st), (dc2inc) 12 times, sl st into first dc (24 sts)
Adult size only Next (inc) :
1 ch (does not count as a st), (dc2inc) 6 times, sl st into first dc (12 sts)
Adult size Next round :
1 ch (does not count as a st), work 1 dc in each dc, sl st to first dc
Adult size Next round :
Rep last round
Adult size Next round (inc) :
1 ch (does not count as a st), (dc2inc) 12 times, sl st into first dc (24 sts)
Adult size Next round :
1 ch (does not count as a st), (dc2inc, 2 dc) 8 times, sl st into first dc (32 sts)
Both sizes Finish :
Fasten off, leaving a long length of yarn at the end for sewing.
— Spots :
Tiny (make 10[10]) :
With 3mm hook and C, make 4 ch and sl st to first ch to form a ring. Round 1: 1 ch (does not count as a st), work 5 dc into ring, sl st into first dc (5 sts). Join in yarn B. Round 2 (inc): With B, make 1 ch (does not count as a st), (dc2inc) 5 times (10 sts). Fasten off, leaving a long length of yarn.
Small (make 10[6]) :
With 3mm hook and C, make 4 ch and sl st to first ch to form a ring. Row 1: 1 ch (does not count as a st), work 6 dc into ring, turn (6 sts). Row 2 (inc): 1 ch (does not count as a st), (dc2inc) 3 times, join and continue in yarn B, (dc2inc) 3 times, turn (12 sts). Row 3 (inc): With B, 1 ch (does not count as a st), (dc2inc, 1 dc) 6 times (18 sts). Fasten off, leaving a long length.
Medium (make 6[6]) :
With 3mm hook and C, make 4 ch and sl st to first ch to form a ring. Round 1: 1 ch (does not count as a st), work 5 dc into ring, sl st into first dc (5 sts). Round 2 (inc): 1 ch, (dc2inc) 5 times (10 sts). Round 3 (inc): 1 ch, (dc2inc, 1 dc) twice, join and continue in yarn B, (dc2inc, 1 dc) 3 times, sl st into first dc (15 sts). Round 4 (inc): With B, 1 ch (does not count as a st), (dc2inc, 2 dc) 4 times, sl st into first dc. Fasten off leaving long length of B at the end.
Large (make 0[6]) :
With 3mm hook and C, make 4 ch and sl st to first ch to form a ring. Round 1: 1 ch, work 6 dc into ring, sl st into first dc (6 sts). Round 2 (inc): 1 ch, (dc2inc) 6 times (12 sts). Join in yarn B. Round 3 (inc): With B, 1 ch, (dc2inc, 1 dc) 6 times, turn (18 sts). Next: With B, miss first dc, 1 dc in next 2 dc, (dc2inc, 2 dc) 3 times, sl st to next dc. Fasten off, leaving a long length of B at the end.
This playful leopard hat is designed to bring a smile and keep heads cosy all winter. Make one in bold colours for a statement piece or softer tones for subtle charm. The pattern includes clear instructions for two sizes and all the decorative elements you need to finish the look. 🐆🧶