🧢 Beautiful ✨ Detailed πŸ’ Adorable

Bunny Hand Puppet Amigurumi Pattern

Bunny Hand Puppet Amigurumi Pattern
4.9β˜… Rating
2-3 Hours Time Needed
1.2K Made This
βœ‚οΈ

Intermediate Level

Ideal for those with basic crochet experience, featuring slightly more advanced stitches and techniques to expand your skills.

⏱️

Bite-Sized Project

Finishes in 2-4 hoursβ€”perfect for an afternoon of creative relaxation.

🧸

Cute Companion

An adorable friend to cherish, handcrafted with love to bring comfort and joy for years to come.

About This Bunny Hand Puppet Amigurumi Pattern

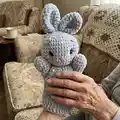
This pattern creates a soft, 28 cm (11") bunny hand puppet using super-bulky plush yarn for a plush, friendly finish. You will crochet a shaped head, ears, embroidered face details, arms, and a simple body that fits a hand. The instructions include exact round-by-round directions, eye placement, indenting technique, and sewing details for a polished result.

Bunny Hand Puppet Amigurumi Pattern crochet pattern - detailed view of completed project

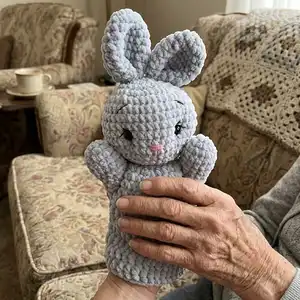
Perfect for gift-making or playtime, the puppet uses minimal sewing and quick shaping techniques. Clear photos and links to helpful videos are referenced to help you master tricky steps.

Why You'll Love This Bunny Hand Puppet Amigurumi Pattern

I absolutely love this pattern because it turns a few simple rounds into a charming, expressive character that kids and grown-ups adore. I love how quickly the plush yarn builds shape, making the project rewarding in a single sitting. The finishing touches β€” indented eyes and embroidered features β€” add so much personality, and I enjoy customizing those details each time. Making this puppet always feels cozy and satisfying, and I especially enjoy gifting them to friends and family.

Bunny Hand Puppet Amigurumi Pattern step 1 - construction progress Bunny Hand Puppet Amigurumi Pattern step 2 - assembly progress Bunny Hand Puppet Amigurumi Pattern step 3 - details and accessories Bunny Hand Puppet Amigurumi Pattern step 4 - final assembly and finishing

Switch Things Up

I love changing up colors to give each bunny a different personality; try pastel shades for a gentle nursery theme or bright colors for a playful toy.

I sometimes swap the super-bulky plush yarn for a medium-weight fluffy yarn and use a smaller hook to make a smaller, denser puppet.

I like to replace plastic eyes with embroidered eyes for a fully baby-safe version; using the same eye-indenting technique yields a soft, sleepy look.

Want a grumpy or sleepy bunny? Move the eyebrows and change the angle of the eyelash embroidery to alter expressions subtly.

Try adding tiny crocheted accessories like a scarf, bow, or removable hat to make a whole character set of puppets.

If you want a posable puppet, consider inserting a thin wire at the base of the ears before closing to let you shape ear positions.

I often use variegated or ombre yarn for the body to create a textured, unique fur effect without extra sewing.

For gifting, sew on a small pocket inside the body or add a bell for sensory play; just make sure any additions are securely attached.

If you want a flatter puppet for easier hand fit, reduce the number of dc rounds in the body section to shorten height slightly.

I recommend experimenting with eye size (6 mm or 10 mm) to change the character's expression and scale; always secure safety eyes firmly or embroider instead for safety.

Common Mistakes & How to Fix Them

βœ— Placing safety eyes too high or too low can throw off facial proportions; fix by counting rounds carefully and position eyes between rounds 10 and 11, leaving 9 single crochets between them. βœ— Overstuffing the head before decreases can distort shaping and make closing difficult; stuff gradually and lightly before rounds 15-17 so shaping remains smooth. βœ— Forgetting to leave a tail for sewing on ears and body panels can make assembly fiddly; always leave the long tail when finishing the last round of pieces for easy sewing. βœ— Skipping stitch markers during rounds with increases/decreases leads to miscounts; use markers to mark the beginning of rounds and every repeat section to keep stitch counts accurate.
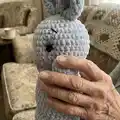
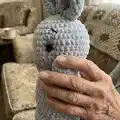
 βœ— Not folding and flattening ears correctly before sewing results in uneven placement; fold each ear in half, then quadruple as instructed and pin them 1-2 cm apart to match photo positioning.

Bunny Hand Puppet Amigurumi Pattern

Make a cuddly Bunny Hand Puppet using super-bulky plush yarn and simple amigurumi techniques. This pattern walks you through every round with clear step-by-step instructions so you can crochet a sweet puppet for play or gifts. Perfect for crocheters who enjoy quick, tactile projects with cute finishing details.

Intermediate 2-3 Hours

Materials Needed for Bunny Hand Puppet Amigurumi Pattern

β€” Main Fabric

  • 01
    Super bulky plush yarn - Himalaya Dolphin Baby (120m - 100g) or (131 yd - 3.52 oz); gray color (1 skein, No 80351)
  • 02
    Sport cotton yarn - Yarn Art Jeans (160m - 50g) or (175 yd - 1.76 oz) for embroidery and detailing
  • 03
    Black thin yarn (sport or cotton) for embroidery of eyebrows and eyelashes (small amount)
  • 04
    Pink thin yarn (sport or cotton) for embroidery of nose (small amount)
  • 05
    Gray cotton yarn for sewing and indenting eyes (small amount)
  • 06
    Fiber filler (small amount for head stuffing)
  • 07
    Plastic safety eyes 8 mm (1 pair)

β€” Tools Required

  • 01
    Crochet hook size 4.5 mm
  • 02
    Large sewing/embroidery needle
  • 03
    Yarn needle for sewing pieces
  • 04
    Stitch markers (knitting markers)
  • 05
    Scissors
  • 06
    Fiber filler (stuffing)
  • 07
    Plastic safety eyes 8 mm (1 pair)

Progress Tracker

0% Complete

β€” Head :

Info :

Use the gray plush yarn, hook 4.5 mm.

Round 1 :

7 sc in MR (7)

Round 2 :

inc * 7 (14)

Round 3 :

inc * 14 (28)

Round 4 :

(3 sc, inc) * 7 (35)

Round 5 :

(4 sc, inc) * 7 (42)

Round 6 :

(13 sc, inc) * 3 (45)

Round 7-11 :

45 sc (5 rounds)

Round 12 :

(13 sc, dec) * 3 (42)

Round 13 :

(4 sc, dec) * 7 (35)

Round 14 :

(3 sc, dec) * 7 (28)

Info :

Insert safe plastic eyes. Fix eyes between 10 and 11 rounds from the head's top. The distance between the eyes is 9 sc.

Info :

Stuff the head with fiber filler.

Round 15 :

(2 sc, dec) * 7 (21)

Round 16 :

(1 sc, dec) * 7 (14)

Round 17 :

dec * 7 (7)

Info :

Draw the yarn through 7 loops and tighten. Cut and secure the yarn.

Info :

HOW TO CLOSE A HOLE IN AMIGURUMI https://youtu.be/DdqCjifLtXA

β€” Ears :

Info :

Make 2 details. Use the gray plush yarn and crochet hook 4.5 mm.

Round 1 :

7 sc in MR (7)

Round 2 :

inc * 7 (14)

Round 3 :

sc (14)

Round 4 :

(1 sc, inc) * 7 (21)

Round 5-8 :

21 sc (4 rounds)

Round 9 :

(1 sc, dec) * 7 (14)

Round 10 :

14 sc, sl st

Info :

Leave the tail for sewing. Cut the yarn. Don't stuff the piece. Make 2 details.

Info :

Fold in half and then quadruple and sew on top of the head at a distance of 1-2 cm from each other.

Info :

HOW TO INDENT AMIGURUMI EYES https://youtu.be/ta3Hl1hU8SY

Info :

Use the gray cotton yarn. Take the thread. Pull it through the back of the head and pull it out above the left eye. Leave the tail on back head's part.

Info :

Pass the needle from below under the left eye and pull out under the right eye. Make sure that the yarn falls from the inside of the left eye.

Info :

Next, pass the needle from above the right eye, making sure that the thread lies on the inside of the eye. And pull out the needle in the same place behind the head.

Info :

Tighten both threads so that the eyes are sunken. Tie a knot, hide the tail inside the head.

β€” Embroidery :

Info :

Use the pink yarn and a large needle. Embroider nose as shown on photos.

Info :

Use the thin black yarn and a large needle. Embroider eyelashes as shown on photos. Embroider eyebrows as shown on photos.

β€” Arms :

Info :

Use the gray plush yarn. Crochet hook 4.5 mm. Make 2 pieces.

Round 1 :

6 sc in MR (6)

Round 2 :

inc * 6 (12)

Round 3 :

(2 sc, inc) * 4 (16)

Round 4-5 :

16 sc (2 rounds)

Round 6 :

(2 sc, dec) * 4 (12)

Round 7-9 :

12 sc (3 rounds)

Info :

Make sl st, cut the yarn. Don't stuff. Make 2 pieces.

β€” Body :

Info :

Use the gray plush yarn. Crochet hook 4.5 mm. Leave the tail for sewing, begin crochet without sl st. Make 24 ch, sl st in the first loop. Make a circle.

Round 1 :

24 sc

Round 2 :

(3 sc, inc) * 6 (30)

Round 3 :

(4 sc, inc) * 6 (36)

Round 4 :

(5 sc, inc) * 6 (42)

Info :

HOW TO ATTACH ARM TO BODY https://youtu.be/Bq3PAUiOh2M

Round 5 :

crochet together with arm - 7 sc, 13 sc only on the body, 7 sc together with another arm, 15 sc only on the body (42)

Info :

Crochet sc2tog on both sleeves sides to avoid holes.

Info :

HOW TO CROCHET SC2TOG https://youtu.be/tZqOHv2NJhM

Round 6 :

sc2tog, crochet only on the arm - 4 sc, sc2tog, 12 sc only on the body, sc2tog, 4 sc only on the another arm, sc2tog, 14 sc only on the body (38)

Round 7 :

dec, 2 sc, dec, 12 sc, dec, 2 sc, dec, 14 sc (34)

Round 8 :

34 sc, ch

Round 9-14 :

34 dc (6 rounds)

Info :

Sew the body to the head as shown in the photos.

β€” Finishing :

Info :

CONGRATULATIONS! Your hand puppet is ready.

Assembly Instructions

  • Attach ears: fold each ear in half, then fold again as shown and sew both ears to the top of the head about 1-2 cm apart for correct spacing.
  • Insert safety eyes between rounds 10 and 11 from the top of the head and space them 9 single crochets apart before securing backs.
  • Embroider nose with pink yarn and a large needle; embroider eyelashes and eyebrows with thin black yarn as shown in photos for facial expression.
  • Attach arms to the body by crocheting together in Round 5: work 7 sc together with first arm, 13 sc only on body, 7 sc together with second arm, then 15 sc only on body to finish the round.
  • Indent eyes: use gray cotton yarn and pass the thread through the back of the head and under/over the eyes following directions, tighten to sink eyes, knot and hide tails inside head.
  • Sew the body opening to the head securely using gray yarn and a whipstitch, making sure seams are even and stuffing is secured inside the head.

Important Notes

  • πŸ’‘Insert safety eyes before finishing round 14 and stuffing completely so backs can be attached; check spacing of 9 sc between eyes.
  • πŸ’‘Do not stuff the ears or small limbs; only stuff the head lightly and leave arms unstuffed for easy hand insertion.
  • πŸ’‘Leave long tails when finishing pieces intended for sewing to make assembly easier and neater.
  • πŸ’‘Use stitch markers to mark round beginnings and repeat boundaries to avoid losing count during increases and decreases.
  • πŸ’‘Fold and pin pieces in place before sewing to ensure symmetry and correct placement.

This Bunny Hand Puppet pattern brings soft plush texture and a sweet personality to life in every stitch. Create a lovable companion perfect for playtime or as a handmade gift that warms the heart. Try different color combinations and facial expressions to make each puppet uniquely yours. 🧢🐰

You ask,

we answer.

FAQs

What size will the finished piece be?

The finished hand puppet measures approximately 28 cm (11") tall when using the recommended super-bulky plush yarn and a 4.5 mm hook.

Can I use different yarn weights for this pattern?

Yes, you can use different yarn weights but your finished size will change; choose an appropriate hook for your yarn and test gauge on the head to estimate final size.

Do I need prior crochet experience for this pattern?

This pattern is rated intermediate and assumes familiarity with single crochet, increases, decreases, working in the round, and basic assembly/sewing techniques.

How long does this project typically take to complete?

Most crocheters complete this project in 2-3 hours, though time may vary depending on experience level and how much time you spend on embroidery and finishing touches.