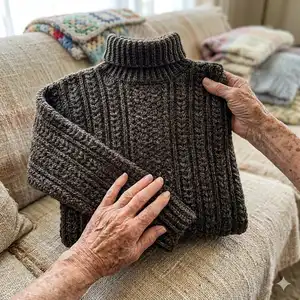
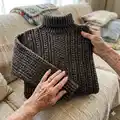
Create a classic cable-knit turtleneck sweater worked from the bottom up with clear shaping and charted cable panels. This pattern features detailed charts for side panels, body center, and sleeves so you can follow the cable crossings and increases precisely. Youll work the body in the round to the armholes, divide for front and back, then finish shoulders and sleeves separately. A timeless menswear piece that showcases cables and texture in a comfortable fitted shape.
Progress Tracker
0% Complete
— Main Part :
Info :
Work from the bottom up in one piece in the round to armhole level; at armhole, divide into Front and Back and finish separately. Shoulder seams are closed using the three-needle bind-off method. Sleeves are worked from the bottom up in the round, then sewn in.
Info :
Sizes: 34–36 (38–40; 42–44; 46–48) (50–52; 54–56; 58–60). Gauge: 28 sts and 32 rows/rounds = 10x10 cm in Main Pattern on 4 mm needles, after blocking and stretched.
Round 1 :
Using 3 mm [US2.5] needles and preferred cast-on method, cast on 268 (292; 316; 340) (364; 388; 412) sts, place BoR marker to indicate the beginning of the round, and join into the round without twisting.
Info :
While working the next round, place markers at the same time as follows to divide the round into sections: Front: work the 8 (12; 8; 12) (8; 12; 8) sts of the Side Panel, work (p2, k2) a total of 1; (2; 1; 2) (1; 2; 1) time(s), work Row 1 of Chart #1 a total of 4(4; 5; 5) (6; 6; 7) times width-wise, work Row 1 of Body Center Pattern Chart, work Row 1 of Chart #2 a total of 4(4; 5; 5) (6; 6; 7) times, work (k2, p2) a total of 1; (2; 1; 2) (1; 2; 1) time(s).
Info :
Back: Work the 8 (12; 8; 12) (8; 12; 8) sts of the Side Panel, work (p2, k2) a total of 1; (2; 1; 2) (1; 2; 1) time(s), work Row 1 of Chart #1 a total of 4(4; 5; 5) (6; 6; 7) times, work Row 1 of Body Center Pattern Chart, work Row 1 of Chart #2 a total of 4(4; 5; 5) (6; 6; 7) times, work (k2, p2) a total of 1; (2; 1; 2) (1; 2; 1) time(s).
Info :
Continue in the established order, repeating the Ribbing round according to the chart a total of 20 (20; 20; 20) (24; 24; 24) times, then work Decrease Round as follows: follow the front and back sequences for Row 2 of charts and decrease instructions supplied in the charted sequences.
Info :
Change to 4 mm [US6] needles and continue in earlier established pattern, following the appropriate charts. You should now have a total of 312 (336; 368; 392) (424; 448; 480) sts.
Info :
Repeat Rows 4–7 of the appropriate charts until the piece has either reached a height of 48 (50; 51; 52) (53; 54; 56) cm [19 (19.7; 20; 20.5) (20.9; 21; 22) in], or is 5 cm [2 in] shorter than desired overall garment length from cast-on edge to division into Front and Back, ending with a Round 4.
— Continue with Side Panel increases :
Info :
Front: Work 8 (12; 8; 12) (8; 12; 8) sts of the Side Panel from the increase chart for the size worked (see pages 14–15), work (p2, k2) a total of 1; (2; 1; 2) (1; 2; 1) time(s), work Row 5 of Chart #1 a total of 4(4; 5; 5) (6; 6; 7) times, work 22 sts for Row 5 of Body Center Pattern Chart, work Row 5 of Chart #2 a total of 4(4; 5; 5) (6; 6; 7) times, work (k2, p2) a total of 1; (2; 1; 2) (1; 2; 1) time(s).
Info :
Back: Work 8 (12; 8; 12) (8; 12; 8) sts of the Side Panel from the increase chart for the size worked (see pages 14–15), work (p2, k2) a total of 1; (2; 1; 2) (1; 2; 1) time(s), work Row 5 of Chart #1 a total of 4(4; 5; 5) (6; 6; 7) times, work 22 sts for Row 5 of Body Center Pattern Chart, work Row 5 of Chart #2 a total of 4(4; 5; 5) (6; 6; 7) times, work (k2, p2) a total of 1; (2; 1; 2) (1; 2; 1) time(s).
Info :
During the last round, divide work into Front and Back as follows: Remove BoR marker, work 11 (13; 11; 13) (11; 13; 11) sts of the Side Panel, transfer the next 170 (182; 198; 210) (226; 238; 254) sts (Back) to a stitch holder, piece of auxiliary yarn or spare cord for holding.
Info :
Continue to work over the sts of the only Front in the following order, working a WS row next: Work 11 (13; 11; 13) (11; 13; 11) sts according to Increase Chart #3 (5;3;5) (3;5;3) (working on the WS begins with the Set-Up row of the chart), work the following 148 (156; 176; 184) (204; 212; 232) sts in earlier established pattern, Row 5 of Body Center Pattern Chart and Charts #1 and #2, work 11 (13; 11; 13) (11; 13; 11) sts according to Increase Chart #4 (6;4;6) (4;6;4) (working on the WS begins with the Set-Up row of the chart).
Info :
From here on, continue in back-and-forth rows with turning, repeating Rows 4–7 of Body Center Pattern Chart and Charts #1 and #2 and following Charts #3 (5;3;5) (3;5;3) and #4 (6;4;6) (4;6;4) for increases at the beginning and end of the row – in Rows 20–23.
Info :
Work over the sts of the Front in the established pattern to a height of 18 (19; 22; 23) (24; 25; 26) cm [7 (7.5; 8.7; 9.1) (9.45; 9.8; 10.2) in] from division into Front and Back.
Info :
At the same time, when piece has reached a height of 10 (11; 14; 15) (16; 17; 18) cm [4 (4.3; 5.5; 5.9) (6.3; 6.7; 7) in] from division, bind off the middle 16 (16; 16; 18) (18; 18; 20) sts for the neckline, then finish up the resulting pieces separately, working both at the same time and each from its own ball of yarn. You should now have 83 (87; 97; 100) (110; 114; 123) sts for each one of the two shoulders.
Info :
Bind off sts for neckline shaping as follows: For the left half of the Front: at the beginning of every WS row. For the right half of the Front: at the beginning of every RS row. 4 sts – once; 3 sts – three times; 2 sts – three times; 1 st – two times. You should now have 62 (66; 76; 79) (89; 93; 102) sts for each shoulder.
— Shoulder sloping (Right half of the Front) :
Row 1 (RS) :
Work 12 (14; 16; 17) (19; 21; 22) sts in established pattern, turn work to wrong side. Slip 1 stitch purl-wise to the right needle, lead the working yarn behind the stitch, over the right needle. Pull the working yarn taut so both legs of the stitch sit on the right needle.
Row 2 (WS) :
Continue on the WS of the fabric, work to the end of the row in earlier established pattern.
Row 3 :
Work in earlier established pattern to the Double Stitch, knit both legs of the Double Stitch together as one, work 12 (14; 16; 17) (19; 21; 22) sts in earlier established pattern, turn work to wrong side. Slip 1 stitch purl-wise to the right needle, lead the working yarn behind the stitch, over the right needle. Pull the working yarn taut so both legs of the stitch sit on the right needle.
Row 4 :
Continue on the WS of the fabric, work to the end of the row in earlier established pattern.
Info :
Repeat Rows 3 and 4 once more, in the next RS row, work in earlier established pattern, knitting both legs of the Double Stitch together as one. Work the next WS row in established pattern. Place the shoulder sts on a stitch holder or spare cord, and put them temporarily aside.
— Left half of the Front :
Row 1 (RS) :
Work the row in earlier established pattern, turn work to wrong side.
Row 2 (WS) :
Work 36 (42; 48; 51) (57; 63; 66) sts in established pattern, turn work to right side. Slip 1 stitch knit-wise, lead the working yarn behind the stitch, over the right needle. Pull the working yarn taut so both legs of the stitch sit on the right needle.
Row 3 :
Continue on the RS of the fabric, work to the end of the row in earlier established pattern.
Row 4 :
Work 24 (28; 32; 34) (38; 42; 44) sts in established pattern, turn work to right side. Slip 1 stitch knit-wise, lead the working yarn behind the stitch, over the right needle. Pull the working yarn taut so both legs of the stitch sit on the right needle.
Row 5 :
Continue on the RS of the fabric, work to the end of the row in earlier established pattern.
Row 6 :
Work 12 (14; 16; 17) (19; 21; 22) sts in established pattern, turn work to right side. Slip 1 stitch knit-wise, lead the working yarn behind the stitch, over the right needle. Pull the working yarn taut so both legs of the stitch sit on the right needle.
Row 7 :
Continue on the RS of the fabric, work to the end of the row in earlier established pattern.
Info :
In the next WS row, work in earlier established pattern to the end of the row, purling both legs of the Double Stitch together as one. Place the shoulder sts on a stitch holder or spare cord, and put them temporarily aside.
Info :
Continue to work over the sts of the only Back, working a WS row next. Join new working yarn at the beginning of the row, then and continue working in the following order: Work 11 (13; 11; 13) (11; 13; 11) sts according to Increase Chart #3, work the next 148 (156; 176; 184) (204; 212; 232) sts in earlier established pattern, Row 5 of Body Center Pattern Chart and Charts #1 and #2, work 11 (13; 11; 13) (11; 13; 11) sts according to Increase Chart #4.
Info :
From here on, continue in back-and-forth rows with turning, repeating Rows 4–7 of Body Center Pattern Chart and Charts #1 and #2 and following Charts #3 and #4 for increases at the beginning and end of the row – in Rows 20–23. Work over the sts of the Back in the established pattern to a height of 18 (19; 22; 23) (24; 25; 26) cm from division into Front and Back.
Info :
At the same time, when piece has reached a height of 17 (18; 21; 22) (23; 24; 25) cm from division, bind off the middle 54 (54; 54; 56) (56; 56; 58) sts for the neckline, then finish up the resulting pieces separately, working both at the same time and each from its own ball of yarn. You should now have 64 (68; 78; 81) (91; 95; 104) sts for each shoulder.
Info :
Bind off sts for neckline shaping as follows: For the left half of the Back: at the beginning of every RS row. For the right half of the Back: at the beginning of every WS row. 2 sts – once. You should now have 62 (66; 76; 79) (89; 93; 102) sts for each shoulder.
Info :
At a height of 18 (19; 22; 23) (24; 25; 26) cm from division into Front and Back, begin shaping the shoulder sloping as detailed for the Front. While working the shoulder sloping, you can instead of the cable crossings for 2/2 cables just work 4 knit sts.
— Close the shoulder seams :
Info :
Close the shoulder seams using the 3-needle bind-off method: Place the two needles with the stitches that need to be joined parallel to each other wrong sides facing each other and right sides out. Insert a third needle into the first stitch of the front needle and the first stitch of the back needle at the same time and knit these 2 sts together as one. Knit both next sts (on the front and back needle) the same way. Pass the first stitch over the second one. Repeat from * until only 1 stitch remains on the third (right) needle. Break the working yarn, and pull the tail through the last loop to secure the stitch.
— Right Sleeve :
Round 1 :
Using 3 mm [US2.5] needles and preferred cast-on method, cast on 62 (66; 66; 70) (72; 74; 74) sts, place BoR marker to indicate the beginning of the round, and join into the round without twisting.
Info :
While working the next round, place markers at the same time as follows to divide the round into sections: Work 8 (12; 8; 12) (8; 12; 8) sts of the Side Panel, place marker 1, then work (p2, k2) – 3 (3; 3; 3) (4; 4; 4) times = 12 (12; 12; 12) (16; 16; 16) sts; purl 1 (1; 2; 2) (1; 1; 2) sts; place marker 2; work 28 (28; 30; 30) (30; 28; 30) sts in pattern for the center of the sleeve (Row 1 of Chart #1 (1; 2; 2) (2; 1; 2)); place marker 3; purl 1 (1; 2; 2) (1; 1; 2); work (k2, p2) – 3 (3; 3; 3) (4; 4; 4) times = 12 (12; 12; 12) (16; 16; 16) sts.
Info :
Continue working in established pattern, repeating Row 1 of Center of the Sleeve Pattern from Chart #1 (1; 2; 2) (2; 1; 2). After having worked in this manner for 20 (20; 20; 20) (24; 24; 24) rounds, work Increase Round (Row 2 of Chart #1 (1; 2; 2) (2; 1; 2)), then work Row 3, then change to 4 mm [US6] needles and continue. You should now have a total of 68 (72; 72; 76) (78; 80; 80) sts.
Info :
Slip BoR marker to right needle, work 8 (12; 8; 12) (8; 12; 8) sts of the Side Panel, slip marker 1 to right needle, work in established pattern to marker 2, slip marker 2 to right needle, work 34 (34; 36; 36) (36; 34; 36) sts in pattern for the center of the sleeve (Row 4 of the appropriate chart), slip marker 3 to right needle, work in established pattern to BoR marker.
— Increase Rounds 1–5 :
Info :
Work in earlier established pattern, work the center pattern of the sleeve from the appropriate following row of the chart.
Increase Round 6 :
Slip BoR marker to right needle, work the sts of the Side Panel in earlier established pattern, slip marker 1 to right needle, pfb, work in established pattern to marker 2, slip marker 2 to right needle, work 34 (34; 36; 36) (36; 34; 36) sts of the center of the sleeve pattern from the appropriate row of the chart, slip marker 3 to right needle, continue in established pattern to 2 sts before BoR marker, pfb, p1. Repeat Increase Rounds 1–6 another 2 times.
Increase Round 7 :
Slip BoR marker to right needle, work the sts of the Side Panel in earlier established pattern, slip marker 1 to right needle, p2, k1, p2, work in established pattern to marker 2, slip marker 2 to right needle, work 34 (34; 36; 36) (36; 34; 36) sts of the center of the sleeve pattern from the appropriate row of the chart, slip marker 3 to right needle, continue in established pattern to 5 sts before BoR marker, p2, k1, p2.
Info :
Increase Rounds 8–11: work in earlier established pattern, work the center pattern of the sleeve from the appropriate following row of the chart.
Increase Round 12 :
Slip BoR marker to right needle, work the sts of the Side Panel in earlier established pattern, slip marker 1 to right needle, p2, k1, LLI, work in established pattern to marker 2, slip marker 2 to right needle, work 34 (34; 36; 36) (36; 34; 36) sts of the center of the sleeve pattern from the appropriate row of the chart, slip marker 3 to right needle, continue in established pattern to 3 sts before BoR marker, RLI, k1, p2. Move BoR marker 4 sts to the right, and marker 1 – 4 sts to the left.
Info :
Repeat Increase Rounds 1–12, as noted between asterisks until there are 96 (102; 118; 124) (130; 136; 142) sts on the needles, then continue in the established order over an unchanged stitch count without further increases.
Info :
When sleeve has either reached a length of 45 (47; 50; 52) (54; 54; 56) cm from begin of work, or is 4 cm [1.6 in] shorter than desired sleeve length, work sleeve cap with short-row-shaping as follows (Row 1 RS instructions follow): work in established pattern to 7 sts before BoR marker, turn work to wrong side, slip 1 stitch purl-wise to the right needle, lead the working yarn behind the stitch, over the right needle and continue per short-row instructions in the pattern.
Info :
Repeat Rows 3 and 4 once more, then resume working in the round in established pattern. Remove markers, work 6 rounds even over an unchanged stitch count, then bind off all sts. Work the Left Sleeve the same way.
— Neckline Finishing :
Info :
Using 3 mm [US2.5] needles, pick up and knit a multiple of 5 sts around the neckline. Continue working in the following order: *(p3, k2) repeat from * to end of round. Work 3 cm [1.2 in] in established pattern.
Info :
Work the next round as follows: *(p2tog, p1, k2, p3, k2) repeat from * to end of round. In the following round, work all sts as they appear – knit sts in knit, and purl sts in purl. Work the next round as follows: *(p2, k2, p2tog, p1, k2) repeat from * to end of round. From here on, work "p2, k2" ribbing until collar has either reached a height of 20 cm [8 in] or desired height. To retain neckline elasticity, use a sewn bind-off to bind off the neckline sts.
Info :
Moisten the sweater, and block it until completely dry. Hide all ends. Happy knitting! ☺
— Charts and Symbols :
Info :
Charts indicate order of work and show all rows; read charts from bottom to top and from right to left in the round; in rows, RS rows from right to left, WS rows from left to right. Chart #1, Chart #2, Body Center Pattern Chart, Chart #3, Chart #4, Chart #5, Chart #6, and Side Panel Increase Charts are provided in the pattern pdf with row-by-row text. Symbols: filled square = knit, dash = purl, shaded square = no stitch, RLI/LLI definitions provided, 4-st RC and 4-st LC cable instructions defined in chart legends.
This Crossbill sweater pattern combines classic cables, lifted increases, and precise shaping to create a handsome menswear knit youll reach for again and again. The charts and detailed row instructions guide you through every cable crossing and shoulder finish, resulting in a professional-looking garment. Make it in deep merino DK for a soft cozy feel, then block and wear with pride. 🧶✨