About This Crocheted Bumblebee Amigurumi Pattern
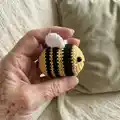
This pattern creates a small crocheted bumblebee amigurumi perfect for keychains or tiny toys. It uses simple single crochet rounds, basic increases and decreases, and a few colour changes for the classic bee stripes. The finished bee is stuffed and embellished with safety eyes and embroidered details for personality.

Clear step-by-step rounds make this pattern friendly for beginners who know basic stitches. Wings and finishing instructions are included so you can make a complete, polished little bee.
Why You'll Love This Crocheted Bumblebee Amigurumi Pattern
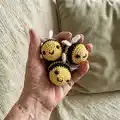
I absolutely love this pattern because it turns basic stitches into an irresistible tiny companion you can finish in just a few hours. I enjoy the simple colour changes that give each bee instant character and charm. The size is perfect for gifting or making a small batch for markets and fairs. I also appreciate that the design is forgiving—small variations still look adorable—and that the finishing touches let you personalize each bee.
Switch Things Up
I like to change the colours to make ladybirds, bees with pastel stripes, or even festive holiday versions by switching Colour B to red or green.
You can make the bee larger by using a thicker yarn and a bigger hook; conversely use a thinner yarn for tiny keychain minis.
I often add a small bell or a metal keyring to the hanging chain for extra charm and practicality.
Try embroidered eyes or felt cutouts instead of safety eyes for a softer, child-safe toy variant.
Adjust the chain length to make a short backpack charm or a long purse pendant depending on where you want to hang it.
For a slightly different silhouette, make the wings larger by adding an extra round or two before fastening off.
I sometimes stuff with lavender or a scented sachet to make a fragrant zipper pull or drawer freshener.
Experiment with bead accents or tiny bows sewn to the top to personalize each bee for gifts.
Use variegated yarn for a playful multicolour stripe without changing yarns between rounds.
Make a whole set in different colour combinations and display them as a decorative garland or gift topper.
Common Mistakes & How to Fix Them
✗ Not counting stitches after increases and decreases can throw off your round counts; always count at the end of each round to make sure you have the correct stitch total.
✗ Forgetting to change colour cleanly will leave messy joins between stripes; carry yarn neatly or fasten off and weave in ends when switching colours.
✗ Stuffing too early or too much before shaping can make decreases difficult; start stuffing after a few rounds and add stuffing gradually while closing.
✗ Placing safety eyes without measuring can make facial features look uneven; mark positions and ensure about 8 stitches between the eyes as instructed.
✗ Pulling stitches too tight on the magic ring may close the opening completely and distort shape; tighten the ring gently and adjust tension as needed.