🧢 Beautiful ✨ Detailed πŸ’ Adorable

Delilah Boho Bag Pattern

Delilah Boho Bag Pattern
4.0β˜… Rating
5-7 Hours Time Needed
3.5K Made This
βœ‚οΈ

Intermediate Level

Ideal for those with basic crochet experience, featuring slightly more advanced stitches and techniques to expand your skills.

⏱️

Weekend Treat

Takes 5-7 hours, making it an enjoyable project to finish over a couple of days.

✨

Stylish Touch

An elegant detail to elevate any look, combining traditional techniques with contemporary design sensibilities.

About This Delilah Boho Bag Pattern

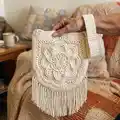
This pattern creates the Delilah Boho Bag β€” a textured, mandala-front shoulder bag with scalloped edges and fringe. It uses circular motif construction that is later joined and squared at the top to form the bag body. The design features raised petals, picot-like loops and layered rounds for a rich boho look.

Delilah Boho Bag Pattern crochet pattern - detailed view of completed project

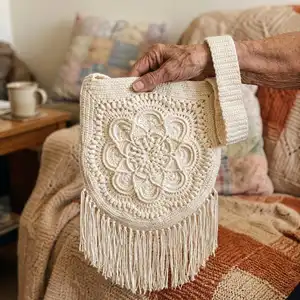
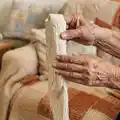
Photos are provided to be used alongside the written rounds for visual guidance. The project includes instructions for the motif, joining row, top edge, strap and final assembly.

Why You'll Love This Delilah Boho Bag Pattern

I absolutely love this pattern because it combines a delicate, floral mandala with practical bag construction to create something both beautiful and useful. The layered stitches and petals add depth and texture that look impressive even on first attempt. I enjoy how versatile the finished bag is β€” you can dress it up or wear it casually. The strap and top edge are designed to be sturdy and comfortable, which makes the bag wearable every day.

Delilah Boho Bag Pattern step 1 - construction progress Delilah Boho Bag Pattern step 2 - assembly progress Delilah Boho Bag Pattern step 3 - details and accessories Delilah Boho Bag Pattern step 4 - final assembly and finishing

Switch Things Up

I love how many ways you can customize this Delilah Boho Bag to make it your own; try using a soft pastel yarn for a more delicate, feminine result or deep jewel tones for a dramatic look.

To change the finished size, swap yarn weights and hook sizes β€” a bulkier yarn will create a chunkier bag while lighter yarn will give you a smaller, daintier version.

I often add color changes between rounds to emphasize the mandala layers; try alternating two colors every few rounds to make each petal layer pop.

Want extra durability? Add a sewn fabric lining and interfacing to the inside, which also gives a professional finish and helps the bag keep its shape.

For a different strap style, crochet an adjustable strap with buttonholes or add a sewn leather strap for contrast and strength.

Embellish the front with beads or small tassels attached to the fringe for a playful look that still matches the boho vibe.

You can also make a pair of matching accessories like a coin pouch or phone sleeve using the same motif scaled down with finer yarn and a smaller hook.

Try embroidering a small motif or initials onto the top edge before attaching the strap to personalize the bag as a gift.

Experiment with fringe length and placement β€” a shorter fringe gives a cleaner finish while a long fringe increases the boho flair.

If you want a sturdier base, add a removable hard base or crocheted reinforced base to the lower inside of the bag to help it stand upright.

Common Mistakes & How to Fix Them

βœ— Skipping the photo reference when shaping the petals will make your petals uneven; refer closely to the accompanying round photos for the placement and height of cluster stitches. βœ— Not counting your stitches at the end of each round can result in twist or distortion; count carefully after each round, especially where clusters and chain spaces are created. βœ— Pulling your yarn too tight during layered rounds will flatten the textured petals; maintain relaxed tension to preserve the raised stitch definition. βœ— Failing to pin and align panels before joining leads to mismatched edges; pin the motif to the backing and check symmetry before sewing or slip-stitch joining.

Delilah Boho Bag Pattern

Make a bohemian-inspired Delilah Boho Bag to add handmade charm to your wardrobe. This pattern combines a decorative mandala-style front panel with a structured top edge and a sturdy crocheted strap. You will love how the textured rounds and scalloped edges create a striking statement piece you can wear every day.

Intermediate 5-7 Hours

Materials Needed for Delilah Boho Bag Pattern

β€” Main Fabric

  • 01
    Cotton or cotton-blend yarn (shown in natural/cream) β€” aran/worsted weight suggested (approximate total 300-500g depending on final size)
  • 02
    Extra yarn for strap and fringe β€” additional 50-100g in matching color

β€” Tools Required

  • 01
    Crochet hook appropriate for aran/worsted weight yarn (recommended size 4.0mm-5.0mm depending on tension)
  • 02
    Scissors
  • 03
    Yarn needle for weaving and sewing pieces
  • 04
    Stitch markers
  • 05
    Measuring tape
  • 06
    Pins for assembly
  • 07
    Optional: wooden button for top closure

Progress Tracker

0% Complete

β€” Main Motif :

Info :

These photos are to be used in conjunction with the written pattern.

Round 1 :

Photo reference - see Round 1 image for foundation ring and round 1 stitch placement.

Round 2 :

Photo reference - see Round 2 image for stitch distribution around the ring.

Round 3 :

Photo reference - see Round 3 image showing the first petal clusters and placement.

Round 4 :

Photo reference - see Round 4 image for cluster shaping and transition rounds.

Round 5 :

Photo reference - see Round 5 image showing petal extensions and spacing.

Round 6 :

Photo reference - see Round 6 image where petals start to form distinct arches.

Round 7 :

Photo reference - see Round 7 close-up image for stitch pattern and joins at petal base.

Round 8 :

Photo reference - see Round 8 image illustrating the raised petal edges and chain arches.

Round 9 :

Photo reference - see Round 9 image for continuation of petal shaping and placement of connecting stitches.

Round 10 :

Photo reference - see Round 10 image for the completed petal caps and transition into outer rounds.

Round 11 :

Photo reference - see Round 11 image showing smoothing rounds working around the petal peaks.

Round 12 :

Photo reference - see Round 12 image for additional shaping and preparation for scalloped border.

Round 13 :

Photo reference - see Round 13 image where arches and raised details become prominent.

Round 14 :

Photo reference - see Round 14 image for outer loop formation and neat edging.

Round 15 :

Photo reference - see Round 15 image showing the scalloped or shell-like outer petals.

Round 16 :

Photo reference - see Round 16 image for additional openwork rows and arch detail.

Round 17 :

Photo reference - see Round 17 image where small cluster details appear; note marked areas for 'No ch3 space' in the photograph.

Round 18a :

Photo reference - see Round 18a image for first section of the multi-part Round 18 sequence.

Round 18b :

Photo reference - see Round 18b image for the repeating section noted as 'x5' in the photo; follow the written pattern for exact repeats.

Round 18c :

Photo reference - see Round 18c image showing the continuation of the 18 sequence across the motif edge.

Round 18d :

Photo reference - see Round 18d image for the shaping of the final portion of Round 18.

Round 18e :

Photo reference - see Round 18e image for the concluding stitches of the 18th round series.

Round 19 :

Photo reference - see Round 19 image showing the motif almost completed and smoothing rows added.

Round 20 :

Photo reference - see Round 20 image for further edging and shaping toward final motif size.

Round 21 :

Photo reference - see Round 21 image where motif is prepared for joining and squaring at the top.

β€” Joining and Top Edge :

Joining row :

Photo reference - see Joining row image for the method used to join the circular motif into the bag shape and begin forming the straight top edge.

Top edge - Round 1 :

Photo reference - see Top edge Round 1 image for the first round of straightening and shaping the top of the bag.

Top edge - Round 2 :

Photo reference - see Top edge Round 2 image showing additional rounds to square the top and even out stitch distribution.

Top edge - Round 3 :

Photo reference - see Top edge Round 3 image showing button loop placement and final top edge finishing.

β€” Strap :

Strap - Row 1 :

Photo reference - see Strap Row 1 image for the beginning of the strap construction worked in rows.

Strap - Row 2-61 :

Photo reference - see Strap Row 2-61 image; strap length shown is worked back and forth for many rows to create a sturdy strap (photo shows typical rows).

Strap - Joining :

Photo reference - see Strap Joining image for how the strap is attached and the join is finished neatly on the back of the bag.

β€” Finishing :

Info :

Use the photos as a visual guide to match texture, placement and proportions while following the written stitch counts in the full pattern document.

Assembly Instructions

  • Join the completed circular motif to form the bag body along the top edge following the joining row photo; align the straightened top edges so the motif becomes a bag shape and sew or slip-stitch securely.
  • Work the top edge rounds (Rounds 1-3 of Top edge) to square and reinforce the opening; add the button loop at the center top as shown in the Top edge - Round 3 photo.
  • Construct the strap by crocheting the strap rows (Row 1 then Rows 2-61 as shown) to desired length, then attach the strap ends to either side of the top edge using the Strap Joining photo as reference and sew securely.
  • Weave in all ends and block the motif lightly if desired to flatten and shape the petals and scallops before final assembly.
  • Add fringe to the bottom edge if desired to match the sample photo: cut equal lengths of yarn, fold and attach evenly across the lower scalloped edge.

Important Notes

  • πŸ’‘Refer to the accompanying photographs closely β€” many shaping cues are shown in the images rather than as text, especially for the petal and scallop details.
  • πŸ’‘Use stitch markers to identify the start of rounds and junction points where petals meet the base rounds to maintain symmetry.
  • πŸ’‘Block the motif lightly before joining to ensure petals sit correctly and the top edge can be squared more easily.
  • πŸ’‘When joining the strap, reinforce the attachment with several passing stitches to ensure the strap is secure for everyday use.

This Delilah Boho Bag pattern brings bohemian texture and modern practicality together into a lovely wearable piece. The layered mandala front is a standout feature, while the squared top and sturdy strap make it truly usable for daily life. Make one in a natural tone or customize with color for your own signature style. 🧢✨

You ask,

we answer.

FAQs

What size will the finished piece be?

The finished bag measures approximately a medium shoulder bag size when using aran/worsted weight yarn and the strap length shown; exact dimensions depend on yarn, hook size and tension.

Can I change the yarn weight for a larger or smaller bag?

Yes, using a thicker yarn and larger hook will make a chunkier, larger bag, while thinner yarn and a smaller hook will produce a smaller, more delicate version; adjust strap rows accordingly.

Do I need advanced crochet skills to make this bag?

This pattern is rated Intermediate β€” you should be comfortable working in rounds, making clusters and following photos for shaping details.

How long does this project typically take to complete?

Most crocheters complete this project in about 5-7 hours, depending on experience, but time will vary based on how carefully you follow decorative rounds and trimming.

Is there a lining recommended for the bag?

A fabric lining is optional; if you plan to carry small items, a lining will add structure and prevent items from slipping through decorative openwork.