🧶 Beautiful ✨ Detailed 💝 Adorable

Crochet Snowman Ornaments Amigurumi Pattern

Crochet Snowman Ornaments Amigurumi Pattern
4.1★ Rating
2-3 Hours Time Needed
3.3K Made This
✂️

Intermediate Level

Ideal for those with basic crochet experience, featuring slightly more advanced stitches and techniques to expand your skills.

⏱️

Bite-Sized Project

Finishes in 2-4 hours—perfect for an afternoon of creative relaxation.

🧸

Cute Companion

An adorable friend to cherish, handcrafted with love to bring comfort and joy for years to come.

About This Crochet Snowman Ornaments Amigurumi Pattern

This pattern creates small crochet snowman ornaments featuring a round head, a tiny crocheted carrot nose and a jaunty little hat. The design uses single crochet in spiral rounds for smooth shaping and a neat finish. Detailed round-by-round instructions make it easy to follow and recreate multiple color variations for hats.

Crochet Snowman Ornaments Amigurumi Pattern crochet pattern - detailed view of completed project

Includes complete instructions for the nose, head and hat, plus finishing tips for assembly and facial details. Ideal for gifting, tree decoration or as a pocket-sized handmade keepsake.

Why You'll Love This Crochet Snowman Ornaments Amigurumi Pattern

I absolutely love this pattern because it captures a lot of personality in a very small project. I enjoy how a few simple rounds and careful stuffing transform yarn into a smiley snowman ornament. The hat and nose color choices let me get creative and make a set with different personalities. I also appreciate that the pattern is compact enough to finish in an afternoon but detailed enough to feel rewarding.

Crochet Snowman Ornaments Amigurumi Pattern step 1 - construction progress Crochet Snowman Ornaments Amigurumi Pattern step 2 - assembly progress Crochet Snowman Ornaments Amigurumi Pattern step 3 - details and accessories Crochet Snowman Ornaments Amigurumi Pattern step 4 - final assembly and finishing

Switch Things Up

I love customizing these little snowmen by changing hat colors and yarn textures — try bright reds, soft pastels, or metallic yarn for a festive look.

To make a larger version, swap to a thicker yarn and a larger hook; conversely, use a finer yarn and smaller hook to create tiny keychain-sized ornaments.

I often add tiny embroidered eyebrows or tiny felt accessories like scarves or miniature buttons to give each snowman its own personality.

Consider using safety eyes of different sizes or embroider the eyes for a softer, more child-safe ornament option.

For a vintage look, use natural wool and muted tones, and for a modern set try neon or ombre yarns for coordinating hat collections.

Attach a loop of metallic thread or ribbon on the hat before closing to make hanging ready ornaments straightaway.

I sometimes add a small bell or bead inside the hat for a little sound when the ornament moves; just ensure it is securely enclosed.

Experiment with different stuffing levels: a firmer head vs a slightly squishy one will change the overall feel and weight of the ornament.

Make sets with matching hats or mix-and-match colors for a playful garland that looks great on mantelpieces or wreaths.

If you want a movable hat, stitch less securely so you can reposition it, or fasten it more firmly for a permanent, neat finish.

Common Mistakes & How to Fix Them

✗ Skipping a stitch marker in continuous spiral rounds can cause rounds to shift; use a stitch marker at the first stitch of every round to maintain your place. ✗ Overstuffing the head causes lumps and may split stitches; stuff gradually using small pieces of stuffing and shape as you go to avoid distortion. ✗ Not placing safety eyes at the correct rounds will misplace facial features; position the eyes between rounds 10 and 11 with two stitches between for correct spacing. ✗ Closing the magic ring too tightly for the nose will flatten its base; when making the nose leave a small hole (do not pull to close fully) to preserve the round shape for sewing. ✗ Forgetting to pull the long tail through the remaining stitches when closing the head leaves an open hole; always thread the tail through a tapestry needle, pull through all remaining stitches and tighten to fully close.

Crochet Snowman Ornaments Amigurumi Pattern

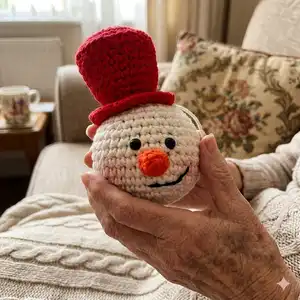
Make charming crochet snowman ornaments to decorate your home or give as thoughtful handmade gifts. This pattern walks you through each tiny detail — nose, head and hat — with clear step-by-step rounds and helpful tips. Perfect for creating festive, collectible ornaments with bright hats and sweet expressions. Grab your yarn and hooks and enjoy a cozy crafting session!

Intermediate 2-3 Hours

Materials Needed for Crochet Snowman Ornaments Amigurumi Pattern

— Main Fabric

  • 01
    Drops Paris color No. 17 (for head) - 50g / 1.8oz, 75m / 82yds
  • 02
    YarnArt Jeans Bamboo (for hats and noses) - 50g / 1.8oz, 150m / 164yds; suggested colors No. 107, 119, 121, 137, 138, 141, 144
  • 03
    Additional yarn in colors of choice for hats and details - small amounts for each ornament

— Tools Required

  • 01
    Crochet hook size 2.0 mm
  • 02
    Crochet hook size 3.0 mm
  • 03
    Crochet hook size 3.5 mm
  • 04
    6 mm safety eyes (2 per ornament)
  • 05
    Polyester stuffing
  • 06
    Tapestry needle
  • 07
    Scissors
  • 08
    Stitch marker
  • 09
    Blush for the cheeks (optional)
  • 10
    Black embroidery thread for the smile

Progress Tracker

0% Complete

— Nose :

Info :

For the nose we will start from the bottom up

Info :

With hook No. 2 make a MR

Round 1 :

10 sc in MR ( do not pull to close the hole fully, just create a circle) (10)

Round 2 :

3 sc, InvDec, 3sc, InvDec (8)

Round 3 :

2 sc, InvDec, 2 sc, InvDec (6)

Round 4 :

3 sc, InvDec, 1 sc (5)

Round 5 :

InvDec, 1 sc, leave the last 2 stitches unworked, ch1 and FO leaving a long tail for sewing (40 cm/16 in)

Info :

Pull the yarn from the tip of the nose to the base, so we can sew it later.

— Head :

Info :

With hook No. 3.5 make a magic ring (MR)

Round 1 :

6 sc into MR, pull yarn to tighten the circle (6)

Round 2 :

Inc in each st around (12)

Round 3 :

*1 sc, Inc* repeat from * 5 more times (18)

Round 4 :

1 sc, Inc, *2 sc, Inc* repeat from * 4 more times, 1 sc (24)

Round 5 :

*3 sc, Inc* repeat from * 5 more times (30)

Round 6 :

Sc around (30)

Round 7 :

*4 sc, Inc* repeat from * 5 more times (36)

Round 8-12 :

Sc around (36)

Info :

Put the safety eyes between rounds 10 and 11, with two stitches space in between.

Info :

Sew the nose between rounds 7 and 10.

Info :

~Start filling the head here~

Round 13 :

*4 sc, InvDec* repeat from * 5 more times (30)

Round 14 :

Sc around (30)

Round 15 :

*3 sc, InvDec* repeat from * 5 more times (24)

Round 16 :

1 sc, InvDec, *2 sc, InvDec* repeat from * 4 more times, 1 sc in last st (18)

Round 17 :

*1 sc, InvDec* repeat from * 5 more times (12)

Info :

~Stuff the head some more~

Round 18 :

12 InvDec (6)

Info :

FO leaving a long tail (20 cm/8 in), thread your tapestry needle and pull the tail through every one of your 6 sts. Pull tight to close the hole and hide the rest of the yarn inside the head.

— Hat :

Info :

With hook No. 3 make a magic ring (MR)

Round 1 :

8 sc into MR, pull yarn to tighten the circle (8)

Round 2 :

Inc in each st around (16)

Round 3 :

*1 sc, Inc* repeat from * 7 more times (24)

Round 4 :

1 sc, Inc, *2 sc, Inc* repeat from * 6 more times, 1 sc (32)

Round 5 :

*3 sc, Inc* repeat from * 7 more times (40)

Info :

For the next round ONLY we will be working in BLO, even the Decreases.

Round 6 :

*3 sc, Dec* repeat from * 7 more times (32)

Info :

(back to normal)

Round 7 :

1 sc, InvDec, *2 sc, InvDec,* repeat from * 6 more times, 1 sc (24)

Round 8-11 :

Sc around (24)

Round 12 :

*2 sc, InvDec* repeat from * 5 more times (18)

Round 13 :

Sc around (18)

Round 14 :

*2 sc, Inc* repeat from * 5 more times (24)

Round 15 :

1 sc, Inc, *3 sc, Inc* repeat from * 4 more times, 2 sc (30)

Round 16 :

*2 sc, Inc* repeat from * 9 more times (40)

Info :

Slst on the next stitch and FO leaving a long tail (20 cm/8 in)

Assembly Instructions

  • Place and attach 6 mm safety eyes between rounds 10 and 11 of the head, leaving two stitches space in between, securing the safety backs firmly.
  • Sew the crocheted nose onto the head between rounds 7 and 10, aligning the base and using the long tail to stitch it securely through the head.
  • Close the head by threading the long tail through a tapestry needle, pulling it through the remaining 6 stitches, tightening to close the hole and hiding the yarn inside the head.
  • Stuff the hat a little bit to keep the shape and sew it on top of the head, positioning it centered and securing with small whip stitches.
  • Add blush to the cheeks if desired and embroider a smile with black embroidery thread to finish the facial features.

Important Notes

  • 💡Use a stitch marker to keep track of the first stitch in each spiral round since you will not be joining at the end of rounds.
  • 💡Stuff gradually with small chunks of polyester stuffing to avoid overfilling and to maintain a smooth shape without the stuffing showing through.
  • 💡Place safety eyes and the nose before closing the head to make sewing easier and to ensure accurate placement.
  • 💡Work with consistent tension when crocheting single crochet spirals to keep the rounds even and to ensure the hat fits correctly.

Create a delightful set of snowman ornaments that bring holiday cheer to any home. 🎄 These sweet, handmade decorations are perfect for gift-giving or trimming your tree with a cozy, personal touch. 🧶 Happy crafting and enjoy making each tiny snowman with love! ✨

You ask,

we answer.

FAQs

What size will the finished piece be?

The finished snowman ornament measures around 3.2 in (8 cm) wide and 4.5 in (11 cm) tall including the hat when using the recommended yarn and hooks.

Can I use different yarn weights for this pattern?

Yes, you can use different yarn weights but the final size will vary; choose an appropriate hook size for your yarn and expect changes in ornament proportions.

Do I need prior crochet experience for this pattern?

This pattern is rated intermediate, so familiarity with single crochet, increases, decreases and invisible decreases is recommended for best results.

How long does this project typically take to complete?

Most crocheters complete one ornament in about 2-3 hours, depending on experience and how quickly you work through small assembly steps.