🧶 Beautiful ✨ Detailed 💝 Adorable

Crochet Hexi Hooded Pullover Pattern

Crochet Hexi Hooded Pullover Pattern
4.5★ Rating
8-10 Hours Time Needed
2.5K Made This
✂️

Beginner Friendly Level

Perfect for those just starting their crochet journey, with clear instructions and simple techniques

⏱️

All-Day Adventure

Requires 8-10 hours, ideal for a full day of immersive crocheting.

👕

Casual Chic

Relaxed style with a modern twist, perfect for everyday wear while maintaining that handcrafted uniqueness.

About This Crochet Hexi Hooded Pullover Pattern

This pattern creates a relaxed hexagon-panel pullover with a built-in hood and cropped body lines, worked in Bernat Softee Cotton. You will make two large hexagons, seam them to form sleeves and body, then add a shaped hood and cuffs for a polished finish. The striped color pattern and simple 3-dc groups create a striking geometric look with easy repeating rounds.
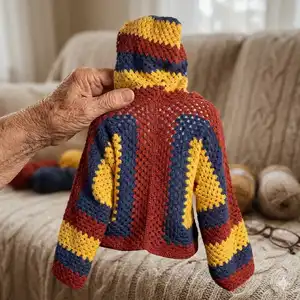
Crochet Hexi Hooded Pullover Pattern crochet pattern - detailed view of completed project

Suitable for an easy skill level, this project uses double crochet groups and simple joins to build the hexagon panels. The instructions include measurements for multiple sizes and diagrams to help with finishing and hood shaping.

Why You'll Love This Crochet Hexi Hooded Pullover Pattern

I absolutely love this pattern because it turns simple double crochet groups into a bold, modern garment that looks designer-made. I enjoy how the hexagon construction makes assembly creative and satisfying, folding points to form sleeves and shaping a cozy hood. The stripe pattern is addictive to stitch and lets you play with color without complicated colorwork. I also appreciate that the pattern is easy to follow yet produces a visually striking finished sweater I want to wear.

Crochet Hexi Hooded Pullover Pattern step 1 - construction progress Crochet Hexi Hooded Pullover Pattern step 2 - assembly progress Crochet Hexi Hooded Pullover Pattern step 3 - details and accessories Crochet Hexi Hooded Pullover Pattern step 4 - final assembly and finishing

Switch Things Up

I love how easy it is to personalize the color placement by changing the Striping Pattern; try swapping the number of rounds for each color to create different visual balances.

I often make a monochrome version using tonal shades of one color for a subtle textured look that still shows the hexagon construction beautifully.

To make a smaller or larger pullover, I change the yarn weight and hook size; bulky yarn with a larger hook makes a chunkier, quicker sweater while lighter yarn and smaller hook make a delicate version.

I add embroidered motifs or surface crochet onto the hexagon panels after assembly to give a one-of-a-kind finish and more detail to the front panels.

If I want more drape, I switch from cotton to a cotton-blend or acrylic and adjust the hook to match gauge for a softer hand and different hang.

For a cropped look, I reduce the length of the hexagon from center to edge before seaming; for extra length, I continue the Stripe Pat until the desired measurement is reached.

I sometimes change the hood depth by adding or removing the repeat rows when shaping the hood to make a slouchier or snugger fit depending on preference.

I like to add contrast trim to the hem and sleeve edges using single crochet or reverse single crochet to highlight the shape and finish the garment cleanly.

To make a child-sized version, I use a lighter yarn and follow the smallest size decreases in the pattern while keeping the construction method the same.

I also experiment with adding buttons or ties to the front opening instead of leaving it open to adapt the pullover into a cardigan-style piece.

Common Mistakes & How to Fix Them

✗ Not counting groups of 3-dc can lead to uneven hexagon sides; count each 3-dc group after every round to ensure symmetry and correct stitch counts. ✗ Skipping the stitch marker at the start of rounds causes lost round starts and misaligned stripes; place a marker at the beginning of each round and move it up as you work. ✗ Overstuffing or underblocking before seaming will distort the hexagon shape; allow hexagons to relax and check measurements before folding and seaming for best results. ✗ Inconsistent tension makes the striped sections wave or wonky; maintain steady tension and check gauge frequently so your hexagon sides match the given measurements. ✗ Joining colors without weaving tails securely can cause loose joins later; weave in ends and secure color changes neatly to prevent unraveling during wear.


Crochet Hexi Hooded Pullover Pattern

Create a cozy, colorblocked Hexi Hooded Pullover using Bernat Softee Cotton. This easy crochet pattern walks you through making two hexagon panels, seaming them into a comfy pullover with a shaped hood and cuff details. Perfect for adding bold stripes and geometric texture to your handmade wardrobe.

Beginner Friendly 8-10 Hours

Materials Needed for Crochet Hexi Hooded Pullover Pattern

— Main Fabric

  • 01
    Bernat Softee Cotton (4.2 oz / 120 g; 254 yds / 232 m) - worsted/light category
  • 02
    Contrast A: Warm Red (69007) - Balls: XS/S 3, M/L 4, 1/2/3XL 4, 4/5XL 5
  • 03
    Contrast B: Golden (69023) - Balls: XS/S 2, M/L 3, 1/2/3XL 3, 4/5XL 3
  • 04
    Contrast C: Seaside Blue (69011) - Balls: XS/S 2, M/L 3, 1/2/3XL 3, 4/5XL 3
  • 05
    Note: Use yarn amounts for your chosen size and have extra for swatching and gauge adjustments.

— Tools Required

  • 01
    Crochet hook size U.S. G/6 (4.0 mm) Susan Bates® Silvalume® or size needed to obtain gauge
  • 02
    Susan Bates® stitch markers
  • 03
    Susan Bates® steel yarn needle (tapestry needle) for sewing seams
  • 04
    Scissors
  • 05
    Measuring tape
  • 06
    Pins for holding seams (optional)

Progress Tracker

0% Complete

— Stripe Pat :

Info :

5 rnds of A. 7 rnds of B. 5 rnd of C. These 17 rnds form Stripe Pat.

— Hexagon (Make 2) :

Info :

See diagram on page 5. With A, ch 4. Join with sl st to first ch to form ring.

1st rnd :

Ch 5 (counts as dc and ch-2). (3 dc. Ch 2) 5 times in ring. 2 dc in ring. Join with sl st to 3rd ch of ch-5. 6 groups of 3 dc and 6 ch-2 sps.

2nd rnd :

Sl st in next ch-2 sp. Ch 5 (counts as dc and ch-2). 3 dc in same sp as last sl st. *Skip next 3 dc. (3 dc. Ch 2. 3 dc) in next ch-2 sp. Rep from * 4 times more. 2 dc in first ch-2 sp. Join with sl st to 3rd ch of ch-5.

3rd rnd :

Sl st in next ch-2 sp. Ch 5 (counts as dc and ch-2). 2 dc in same sp as last sl st. *Skip next 3 dc. 3 dc in sp between next 2 groups of 3-dc. Skip next 3 dc. (3 dc. Ch 2. 3 dc) in next corner ch-2 sp. Rep from * 4 times more. Skip next 3 dc. 2 dc in first ch-2 sp. Join with sl st to 3rd ch of ch-5.

4th rnd :

Sl st in next ch-2 sp. Ch 5 (counts as dc and ch-2). 2 dc in same sp as last sl st. *(Skip next 3 dc. 3 dc in sp between next 2 groups of 3-dc) twice. Skip next 3 dc. (3 dc. Ch 2. 3 dc) in next corner ch-2 sp. Rep from * 4 times more. (Skip next 3 dc. 3 dc in sp between next 2 groups of 3-dc) twice. Skip last 3 dc. 2 dc in first ch-2 sp. Join with sl st to 3rd ch of ch-5.

5th rnd :

Sl st in next ch-2 sp. Ch 5 (counts as dc and ch-2). 2 dc in same sp as last sl st. *Skip next 3 dc. 3 dc in sp between next 2 groups of 3-dc.* Rep from * to * to next corner ch-2 sp. Skip next 3 dc. (3 dc. Ch 2. 3 dc) in next corner ch-2 sp. Rep from * to * to end of rnd. Skip last 3 dc. 2 dc in first ch-2 sp. Join with sl st to 3rd ch of ch-5.

Info :

NOTE: Your work will not lay flat at this point, don't worry! It's part of the process!

Info :

First 3 rnds of Stripe Pat are complete.

4th rnd :

Sl st in next ch-2 sp. Ch 5 (counts as dc and ch-2). 2 dc in same sp as last sl st. *(Skip next 3 dc. 3 dc in sp between next 2 groups of 3-dc. 3 dc. Ch 2. 3 dc) in next corner ch-2 sp. Rep from * 4 times more. (Skip next 3 dc. 3 dc in sp between next 2 groups of 3-dc) twice. Skip next 3 dc. (3 dc. Ch 2. 3 dc) in next corner ch-2 sp. Rep from * 4 times more. (Skip next 3 dc. 3 dc in sp between next 2 groups of 3-dc) twice. Skip last 3 dc. 2 dc in first ch-2 sp. Join with sl st to 3rd ch of ch-5.

5th rnd :

Sl st in next ch-2 sp. Ch 5 (counts as dc and ch-2). 2 dc in same sp as last sl st. *Skip next 3 dc. 3 dc in sp between next 2 groups of 3-dc.* Rep from * to * to next corner ch-2 sp. Skip next 3 dc. (3 dc. Ch 2. 3 dc) in next corner ch-2 sp. Rep from * to * 5 times. Rep from * to * to end of rnd. Skip last 3 dc. 2 dc in first ch-2 sp. Join with sl st to 3rd ch of ch-5.

Info :

Keeping cont of Stripe Pat, rep last rnd until work from center to straight side of hexagon measures approx 10bd (12-14bd-16bd)" [26.5 (30.5-37-42) cm]. Fasten off.

— Finishing before Hood :

Infos :

Following diagrams below, bring opposite points of Left Side hexagon together and fold to form Left Side of Cardigan. Rep for Right Side. PM between 3-dc groups along top edge 4 (4-5-5) groups of 3-dc from front edge. Sew back seam. Sew top sleeve seams to markers. Sew front seam, leaving 5" [12.5 cm] from top corners for front opening.

— Hood :

Info :

See diagrams on page 4. With RS facing, join A with sl st to corner ch-2 sp of front lapel of Right Front.

1st row :

(RS). Ch 3 (counts as dc). 2 dc in same sp as sl st. *Skip next 3 dc. 3 dc in sp between next 2 groups of 3-dc.* Rep from * to * to last 3 dc before right shoulder seam. 3 dc in sp of shoulder seam. Rep from * to * to last 3 dc before Back seam. Skip next 3 dc. 3 dc in corner ch-2 sp before seam. Ch 3. 3 dc in next corner ch-2 sp after seam. Rep from * to * to last 3 dc before left shoulder seam. 3 dc in sp of shoulder seam. Rep from * to * to last 3-dc group before corner of left side lapel. Skip next 3 dc. 3 dc in corner ch-2 sp. Turn. 18 (18-20-20) groups of 3-dc and ch-3 sp.

2nd row :

(Inc row). Ch 4 (counts as dc and ch 1). *Skip next 3 dc. 3 dc in sp between next 2 groups of 3-dc.* Rep from * to center back ch-3 sp. [3 dc. Ch 1. 1 dc (center dc). Ch 1. 3 dc] in center back ch-3 sp. Rep from * to last 3 dc. Ch 1. Skip next 2 dc. 1 dc in last dc. Turn.

3rd row :

Ch 3 (counts as dc). 2 dc in first ch-1 sp. *Skip next 3 dc. 3 dc in sp between next 2 groups of 3-dc.* Rep from * to ch-1 sp before center dc. 3 dc in next ch-1 sp. Skip next (center) dc. 3 dc in next ch-1 sp. Rep from * to last ch-1 sp. 2 dc in last ch-1 sp. 1 dc in last dc. Turn. 20 (20-22-22) groups of 3-dc.

4th row :

Ch 4 (counts as dc and ch 1). *Skip next 3 dc. 3 dc in sp between next 2 groups of 3-dc. Rep from * to last 3 dc. Skip next 2 dc. Ch 1. 1 dc in last dc. Turn.

5th row :

Ch 3 (counts as dc). 2 dc in first ch-1 sp. (Skip next 3 dc. 3 dc in sp between next 2 groups of 3-dc) 9 (9-10-10) times. Ch 3 (center back). *Skip next 3 dc. 3 dc in sp between next 2 groups of 3-dc. Rep from * to last ch-1 sp. 2 dc in last ch-1 sp. 1 dc in last dc. Turn.

6th to 11th rows :

Rep 2nd to 5th rows once more, then 2nd and 3rd rows once, having 1 more 3-dc group before center. 24 (24-26-26) groups of 3-dc at end of last rep.

12th row :

Ch 4 (counts as dc and Ch 1). *Skip next 3 dc. 3 dc in sp between next 2 groups of 3-dc. Rep from * to last 3 dc. Skip next 2 dc. Ch 1. 1 dc in last dc. Turn.

13th row :

Ch 3 (counts as dc). 2 dc in next ch-1 sp. *Skip next 3 dc. 3 dc in sp between next 2 groups of 3-dc. Rep from * to last ch-1 sp. 2 dc in last ch-1 sp. 1 dc in last dc. Turn.

Info :

Keeping cont of Stripe Pat, rep 12th and 13th rows until Hood measures approx 10" [25.5 cm], ending on 2nd row.

— Shape top of Hood :

1st row :

Ch 4 (counts as dc. Ch 1). (Skip next 3 dc. 3 dc in sp between next 2 groups of 3-dc) 10 (10-11-11) times. Skip next 2 groups of 3-dc. *3 dc in sp between next 2 groups of 3-dc. Skip next 3 dc. Rep from * to last 3 dc. Skip next 2 dc. Ch 1. 1 dc in last dc. Turn.

Info :

Fasten off leaving a tail 20" [51 cm] long for seaming. Fold top of Hood in half. Using tail, sew Hood seam, being sure to keep edges flat.

— Sleeve Cuffs :

Info :

See diagram on page 5. With RS facing, join corresponding color to keep cont of Stripe Pat with sl st in sp between 2 groups of 3-dc (in last sp between 2 groups of 3-dc before shoulder seam) on last row of Sleeve at bottom of Sleeve.

Info :

Keeping cont of Stripe Pat, rep last rnd until work from center to straight side of hexagon measures approx 10bd (12-14bd-16bd)" [26.5 (30.5-37-42) cm]. Fasten off.

Assembly Instructions

  • Fold each hexagon along opposite points as shown in diagrams to form Left and Right Sides of Cardigan and align top edges before seaming.
  • Place markers between 3-dc groups along the top edge and sew back seam by whipstitching the marked groups together to form the back center seam.
  • Sew top sleeve seams to the marker positions to form sleeves, matching the hexagon points and maintaining Stripe Pat continuity.
  • Sew the front seam, leaving 5" [12.5 cm] from the top corners for the front opening before fastening off and weaving in ends.
  • Fold top of Hood in half and sew the hood seam along center back, keeping the hood edges flat and aligned with the neckline opening.

Important Notes

  • 💡Use stitch markers to keep track of points and round starts, especially when seaming hexagon panels together.
  • 💡Work stripe pattern exactly as written for consistent color placement; carry yarn neatly at color changes to avoid bulk.
  • 💡Check your gauge before starting and occasionally as you work; hexagon measurements determine final fit and arm placement.
  • 💡Pin parts in place and check symmetry before permanently sewing seams to ensure even sleeve and shoulder alignment.

This Hexi Hooded Pullover blends bold stripes and geometric hexagon construction for a modern handmade sweater. The pattern is friendly and approachable, giving a big visual impact with simple repeating stitches. Enjoy the process and wear your cozy, colorful creation with pride! 🧶👕

You ask,

we answer.

FAQs

What sizes does this pattern include?

This pattern includes multiple sizes to fit chest measurements XS/S 28-34" [71-86.5 cm], M/L 36-42" [91.5-106.5 cm], 1/2/3XL 44-54" [112-137 cm], and 4/5XL 56-60" [142-152.5 cm].

What yarn is recommended for the pullover?

Bernat Softee Cotton is recommended (4.2 oz / 120 g; 254 yds / 232 m). The pattern lists balls required per size for three contrast colors: Warm Red, Golden, and Seaside Blue.

How long will this project take to complete?

Estimated time is 8-10 hours, depending on your speed and familiarity with double crochet groups and seaming.

Do I need the pattern diagrams to finish the hood?

Yes, diagrams on pages 4 and 5 show hood shaping, seam placement and sleeve cuff diagrams which are helpful for accurate assembly.