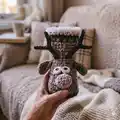
🧢 Beautiful ✨ Detailed πŸ’ Adorable

Crazy Deer Amigurumi Pattern

Crazy Deer Amigurumi Pattern
4.3β˜… Rating
8-10 Hours Time Needed
4.1K Made This
βœ‚οΈ

Intermediate Level

Ideal for those with basic crochet experience, featuring slightly more advanced stitches and techniques to expand your skills.

⏱️

All-Day Adventure

Requires 8-10 hours, ideal for a full day of immersive crocheting.

🧸

Cute Companion

An adorable friend to cherish, handcrafted with love to bring comfort and joy for years to come.

About This Crazy Deer Amigurumi Pattern

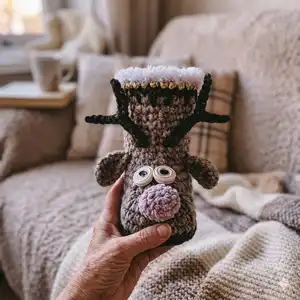
This pattern creates a whimsical Crazy Deer slipper/boot with a three-dimensional muzzle, ears, horns and rolled eyes. It uses bulky cords and t-shirt yarn to achieve a soft, textured look and sturdy wooden bottom. The instructions include clear photo steps, stitch counts and helpful shaping notes to guide you from start to finish.

Crazy Deer Amigurumi Pattern crochet pattern - detailed view of completed project

You will crochet horns, ears, a plush nose and a detailed muzzle, then assemble and decorate the face. The finished boot stands approximately 8 1/2 inches (21 cm) tall from the specified materials.

Why You'll Love This Crazy Deer Amigurumi Pattern

I absolutely love this pattern because it transforms simple cord yarn into a whimsical, characterful slipper that brings a smile. The design balances quick, repetitive stitches with small detailed pieces like the nose and rolled eyes, so you get fast progress and satisfying finishing touches. I enjoy how the wooden bottom gives structure and how the muzzle shaping creates real personality. Making these feels like crafting a tiny handmade companion you can wear or gift, and I always feel proud to display a finished pair.

Crazy Deer Amigurumi Pattern step 1 - construction progress Crazy Deer Amigurumi Pattern step 2 - assembly progress Crazy Deer Amigurumi Pattern step 3 - details and accessories Crazy Deer Amigurumi Pattern step 4 - final assembly and finishing

Switch Things Up

I love how easy it is to customize this pattern by changing yarn color and texture; try pastel shades for a soft nursery slipper or bright colors for a fun holiday pair.

Want a chunkier, faster version? I switch to a bulkier cord and a larger hook to create a robust, cozy slipper in half the time.

I often add small accessories like little crochet scarves or tiny bells on the horns to give each deer its own personality.

If you want a smaller keychain-style version, use thin yarn and a smaller hook and omit the wooden bottom for a pocket-sized amigurumi.

I sometimes swap the wooden bottom for a felt sole for quieter, indoor-only slippers β€” just adjust the stitch count to fit the sole.

For a different eye style, I replace rolled t-shirt yarn eyes with safety eyes or embroidered eyes for a softer or more secure finish.

Change the nose color or substitute a pompom for a different look β€” a small faux-fur pom can give a playful texture contrast.

I like to experiment with embroidery for freckles, stitches or smile lines to change the facial expression and character.

To make the slippers machine-washable, choose washable t-shirt yarn and avoid glued accents; sew pieces on securely instead of using hot glue.

I recommend trying different wooden bottom sizes to fit various foot sizes β€” scaling the pattern slightly and adjusting increases makes customization straightforward.

Common Mistakes & How to Fix Them

βœ— Skipping stitch markers during shaping can lead to misplaced decreases and cluster sections; place markers exactly where indicated and rearrange them after each row to keep track. βœ— Pulling cords or t-shirt yarn too tightly will distort the wooden bottom edge and make sewing difficult; maintain a consistent, moderate tension and pull just enough to close gaps. βœ— Not leaving long tails when instructed for sewing the nose or muzzle will make attachment awkward; leave the recommended length (for example 27 inches for the nose) so you can easily sew and hide ends. βœ— Forgetting to count loops when working the trim around the wooden base results in uneven stitch counts; count and mark the start point, then crochet each hole and make increases only where shown.

Crazy Deer Amigurumi Pattern

Make a lovable Crazy Deer amigurumi with this detailed step-by-step crochet pattern. You'll create cozy deer slippers/boot with charming muzzle, ears, horns and cute eyes using t-shirt yarn and velvet cord. The pattern includes clear photos, stitch counts, and assembly tips so you can follow along easily and get a polished finished piece. Perfect for gifting or keeping as a whimsical home accessory that doubles as wearable comfort.

Intermediate 8-10 Hours

Materials Needed for Crazy Deer Amigurumi Pattern

β€” Main Fabric

  • 01
    Any cord, 4-5 mm, 77 yards (70 m) beige color and 55 yards (50 m) brown color (example: velvet cord Shikimiki AVE)
  • 02
    T-shirt metallic yarn, 4-5 mm, about 4.4 yards (4 m)
  • 03
    Any fur yarn white color, 3.3 yards (3 m) (example: YarnArt mink)
  • 04
    T-shirt yarn white color for eyes, 24 inches (60 cm)
  • 05
    Piece of felt or leather for pupil, 10 x 20 mm
  • 06
    Plush yarn pink color for nose 120 m/100 gr, about 3.3 yards (3 m) (examples: Himalaya Dolphin Baby, YarnArt Dolce Baby)
  • 07
    Little soft stuffing (for nose)
  • 08
    Wooden bottom with 37 holes, 8 inches (20 cm)

β€” Tools Required

  • 01
    Crochet hook size 5.5 mm
  • 02
    Crochet hook size 4 mm
  • 03
    Glue gun
  • 04
    Plastic with large eyelet
  • 05
    Scissors
  • 06
    2 stitch markers
  • 07
    Yarn needle for sewing and hiding ends
  • 08
    Little soft stuffing
  • 09
    Small iron and damp cloth for steaming muzzle (optional)

Progress Tracker

0% Complete

β€” Crochet the horns (*2) :

Info :

Take the brown cord and 5.5 mm hook.

Round 1 :

Crochet 12 CH.

Round 2 :

5 SlSt from the 2nd loop from the hook.

Round 3 :

6 CH, 5 SlSt from the 2nd loop from the hook.

Round 4 :

6 YO SlSt, cut the thread, pull out the end.

Info :

Similarly crochet the 2nd horn.

β€” Crochet the ears (*2) :

Info :

Take the beige cord and 5.5 mm hook. Leave the end of the thread 16 inches (40 cm) long.

Round 1 :

Crochet the chain of 6 CH with two threads. For that: chain knot, yarn over with end, yarn over, pull through all 2; yarn over with end, yarn over, pull through all 2, continue so on...

Round 2 :

Next crochet from the 2nd loop from the hook: SC, HDC, DC, HDC, (SC, 3 CH, SC) in 1, HDC, DC, HDC, SC, SlSt in the 1st loop. Cut the thread, pull out the end.

Info :

Similarly crochet the 2nd ear.

β€” Crochet the nose :

Info :

Take the pink plush yarn and 4 mm hook.

Round 1 :

Crochet 2 CH.

Round 2 :

1 row. 6 SC in the 2nd loop from the hook, SlSt, CH.

Round 3 :

2 row. 6 Inc (=12), SlSt, CH.

Round 4 :

3 row (SC, 1 Inc)*6 (=18), SlSt, CH.

Round 5 :

4 row. 18 SC, SlSt. Leave the end for sewing the nose 27 inches (70 cm) long. Cut the thread, pull out the end.

Info :

Add little soft stuffing.

β€” Crochet the trim of the bottom :

Info :

Take the brown cord and 5.5 mm hook. Leave the end of the thread 8 inches (20 cm) long.

Round 1 :

Insert the hook in the hole, pull the loop, CH.

Round 2 :

Crochet SC in the each hole. Make increases in the holes marked on the picture.

Round 3 :

Crochet the last SC with the end of the thread, pull out the end, close the row with the end (=46).

Round 4 :

1 row. Insert the hook on the back loop and the jumper only.

Round 5 :

Pull the loop, CH.

Round 6 :

45 SC on the back loop and the jumper only. Cut the thread, pull out the end, close the row (=46). Tie the knot and hide the ends on the wrong side.

Info :

You may have a different number of the loops, depending on the size of the bottom. Crochet similarly, making the necessary number of increases and decreases in the places indicated in this pattern.

β€” Crochet the muzzle :

Info :

Take the beige cord and 5.5 mm hook. Leave the end of the thread 39 inches (1 m) long.

Round 1 :

2 row. Insert the hook under the last SC of the previous row. Pull the loop, CH.

Round 2 :

45 SC, crochet the last SC with the end of the thread, and the each subsequent row. Pull out the end, close the row with the end (=46).

Round 3 :

3 row. Insert the hook under the last SC of the previous row. Pull the loop, CH, 45 SC, close the row with the end (=46).

Info :

Count 16 loops in the middle of the toe. Place the markers in the 1st end the 16th loops.

Round 4 :

4 row. Insert the hook under the last SC of the previous row. Pull the loop, CH, 22 SC to the 1st marker, 8 DC together (clusters), 7 SC, close the row with the end (=38).

Info :

Rearrange the markers in the 1st and the 8th clusters.

Round 5 :

5 row. Insert the hook under the last SC of the previous row. Pull the loop, CH, 22 SC to the 1st marker, 4 clusters with 2 DC together (insert the hook from front to back to front around the cluster of the previous row), 7 SC, close the row with the end (=34).

Info :

Rearrange the markers in the 1st and the 4th clusters.

Round 6 :

6 row. Insert the hook under the last SC of the previous row. Pull the loop, CH, 6 SC, Dec, 14 SC to the 1st marker, 2 clusters with 2 DC together (insert the hook from front to back to front around the cluster of the previous row), 7 SC, close the row with the end (=31).

Info :

Rearrange the markers in the 1st and the 2nd clusters.

Round 7 :

7 row. Insert the hook under the last SC of the previous row. Pull the loop, CH, 6 SC, Dec, 10 SC, 4 Dec three loops before the 1st marker, 4 SC, close the row with the end (=26).

Info :

Rearrange the markers in the 2nd and the 3rd decreases.

Round 8 :

8 row. Insert the hook under the last SC of the previous row. Pull the loop, CH, 18 SC to the 1st marker, Dec, 5 SC, close the row with the end (=25).

Info :

Steam the muzzle with an iron through a damp cloth. Put a small towel in the middle to add volume.

β€” Decorate the muzzle :

Info :

Sew on the nose with the plastic needle above the 3rd row in the middle of the toe.

Round 1 :

Take two pieces of the white T-shirt yarn 12 inches (30 cm) long. Roll into a roller, glue with the glue gun.

Round 2 :

Cut off two circles (pupils) with a diameter 7-8 mm and glue on in the middle of the eyes.

Round 3 :

Glue on the eyes above the nose.

Round 4 :

Embroidery the eyebrows with the brown cord.

Round 5 :

Fasten the ears in the 8th row at a distance of 6 SC from each other. Strengthen and hide the ends on the wrong side.

Round 6 :

9 row. Insert the hook under the last SC of the previous row. Pull the loop, CH, 24 SC, close the row with the end (=25).

Round 7 :

10 row. Insert the hook under the last SC of the previous row. Pull the loop, CH, 24 SC, close the row with the end (=25).

Round 8 :

11 row. Insert the hook under the last SC of the previous row. Pull the loop, CH, 6 SC, Inc, 17 SC, close the row with the end (=26).

Assembly Instructions

  • Sew the plush nose to the muzzle above the 3rd row, using the long tail left (about 27 inches/70 cm) and a plastic needle; secure and hide the ends on the wrong side.
  • Glue the rolled white T-shirt yarn eyes to the muzzle above the nose, then glue 7-8 mm black pupils in the center; use a glue gun for a secure hold.
  • Attach the ears to the 8th row of the muzzle, spacing them 6 SC apart; reinforce stitching and hide the ends inside the piece for a clean finish.
  • Fit the brown trim around the wooden bottom by inserting hooks into each hole and crocheting SC into each hole; finish and close the row, then work one row in back loops only and secure.
  • Sew the muzzle assembly onto the toe area of the boot, aligning the middle of the muzzle with the counted center (16 loops) and secure with strong stitches through the beige cord.
  • Embroider eyebrows with brown cord above the eyes and secure any decorative pieces (horns, ears) firmly; steam and shape the muzzle as instructed for best volume and appearance.

Important Notes

  • πŸ’‘Use stitch markers to mark the center and clusters during muzzle shaping and rearrange them as instructed after each row.
  • πŸ’‘Leave long sewing tails when instructed (nose 27 inches, muzzle 39 inches) so you have enough length to attach and hide ends securely.
  • πŸ’‘Count and double-check loop counts when working around the wooden bottom; holes or cord thickness can change your total number so adjust increases accordingly.
  • πŸ’‘Steam the muzzle through a damp cloth to shape and add volume, and use a small towel inside the muzzle while steaming to hold shape.

This Crazy Deer amigurumi slipper is a playful, cozy project that adds personality to your handmade collection. It combines chunky cord, cuddly plush details and a sturdy wooden bottom for structure. Great for gifts or a quirky home treat β€” have fun stitching every whimsical detail! 🧢🦌

You ask,

we answer.

FAQs

What size will the finished piece be?

The finished boot from the specified materials measures approximately 8 1/2 inches (21 cm) in height; final dimensions depend on yarn, tension and wooden bottom size.

Can I use different yarn weights for this pattern?

Yes, you can use different yarn weights but the final size and fit will change; if you choose thicker or thinner yarn, adjust hook size and the wooden bottom accordingly.

Do I need prior crochet experience for this pattern?

This pattern is rated intermediate, so basic crochet knowledge (SC, HDC, DC, increases, decreases and working in back loops) and experience with shaping is recommended.

How long does this project typically take to complete?

Most crocheters complete this project in 8-10 hours, though time may vary depending on experience level, customization and assembly time.