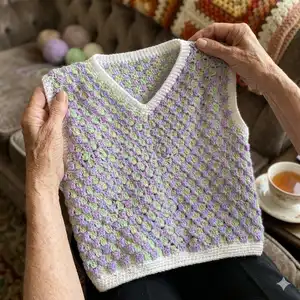
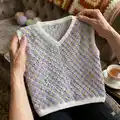
🧢 Beautiful ✨ Detailed πŸ’ Adorable

Corner To Corner Vest Pattern

Corner To Corner Vest Pattern
4.4β˜… Rating
5-7 Hours Time Needed
2.3K Made This
βœ‚οΈ

Intermediate Level

Ideal for those with basic crochet experience, featuring slightly more advanced stitches and techniques to expand your skills.

⏱️

Weekend Treat

Takes 5-7 hours, making it an enjoyable project to finish over a couple of days.

πŸ‘•

Casual Chic

Relaxed style with a modern twist, perfect for everyday wear while maintaining that handcrafted uniqueness.

About This Corner To Corner Vest Pattern

This pattern creates a stylish c2c (corner to corner) crochet vest worked in a checkerboard colorway. Youll make two front panels and one back panel, then seam and add ribbing for a neat finish. The design uses DK weight yarn and alternating colors to create the textured, diagonal blocks that give the vest its signature look.

Corner To Corner Vest Pattern crochet pattern - detailed view of completed project

Includes full row-by-row instructions for S/M, L/XL and 2X/3X sizes and large color charts for easy following. A video tutorial and extra photos are referenced to help you with the c2c stitch and color changes.

Why You'll Love This Corner To Corner Vest Pattern

I absolutely love this pattern because the corner-to-corner technique creates such a beautiful textured surface with surprisingly simple repeats. I designed it to be versatile so you can play with colors and make a classic vest or a bold statement piece. Working diagonally keeps the shaping intuitive and the checkerboard color changes feel rewarding as the piece grows. Every time I make this vest I find small ways to personalize the edging or color balance, and it always turns out cozy and wearable.

Corner To Corner Vest Pattern step 1 - construction progress Corner To Corner Vest Pattern step 2 - assembly progress Corner To Corner Vest Pattern step 3 - details and accessories Corner To Corner Vest Pattern step 4 - final assembly and finishing

Switch Things Up

I love how easy it is to customize this vest by changing colors: try monochrome neutrals for a subtle look or bright contrasting shades for a playful checkerboard.

Want a smaller or larger version? Change your yarn weight and hook β€” bulky yarn with a larger hook makes a chunky cozy vest while fingering weight and a smaller hook gives a delicate mini-vest.

I often swap the ribbing style: try working single crochet ribbing, half double crochet camel stitch, or even a picot edge for a different finish.

Add embroidery over selected blocks or sew on buttons at the shoulder for a decorative touch that makes your vest unique.

For a longer length, extend the back panel and bottom by adding extra rows of blocks before seaming β€” just keep the checkerboard alternation consistent.

I sometimes make a sleeved version by crocheting additional c2c panels for sleeves and seaming them into the arm openings for a quick cardigan adaptation.

Consider using a gradient or variegated DK yarn as one of the two alternating colors to create a subtle, shifting color effect across the checkerboard.

To make this vest more fitted, reduce the number of blocks along the bottom edge and work waist shaping by decreasing and increasing rows as needed.

I also like adding a decorative trim: a contrasting reverse single crochet (crab stitch) around the neckline and hem gives a polished, slightly raised border.

Finally, experiment with textured yarns for the ribbing only to add contrast in both color and texture while keeping the body in smooth DK yarn.

Common Mistakes & How to Fix Them

βœ— Skipping the c2c chain corner instructions and not counting blocks; solution: count blocks at the end of each row and follow the row-by-row block count to ensure accurate shaping. βœ— Not alternating colors each row consistently which leads to muddled checkerboard effect; solution: change colors at the end of each row exactly as directed and carry yarn or weave in ends as you go. βœ— Forgetting the special decreases (slip stitch into ch3 space) which makes the underarm/neck shaping incorrect; solution: follow the short hand instructions for decreases and perform the slip stitch and ch1 steps precisely. βœ— Not leaving the final rows unseamed for the V-neck opening which ruins neckline shaping; solution: when seaming front panels leave the final V rows unseamed and pin before sewing to make sure the V sits correctly. βœ— Using the wrong yarn weight or hook that changes gauge and bust measurement; solution: make a c2c gauge swatch (9x9 clusters =5in/13cm) and adjust hook or yarn choice to match the gauge.

Corner To Corner Vest Pattern

Make a stylish corner-to-corner (c2c) crochet vest that is quick to customize and easy to wear. This pattern includes full c2c charts, row-by-row instructions for multiple sizes, and finishing tips so you can create a polished, wearable vest. Youll love the textured checkerboard look that emerges from alternating colors each row. Perfect for a relaxed layered look or to stitch up as a seasonal gift.

Intermediate 5-7 Hours

Materials Needed for Corner To Corner Vest Pattern

β€” Main Fabric

  • 01
    DK weight yarn (3) - About 1000 yds (900 m) total for sample (increase ~15% for larger sizes over S/M)
  • 02
    If using two colors: divide the yardage in half for each color (approximately 500 yds/450 m per main color for S/M)
  • 03
    If using one color for the back: 3/4ths of yardage in one color and 1/4th in the other (approx ratios for S/M)
  • 04
    Small amount of a third contrasting color for ribbing/edging (optional)
  • 05
    Suggested yarn example: Paintbox Yarns Simply DK or similar DK weight yarn

β€” Tools Required

  • 01
    Crochet hook 4mm (US G)
  • 02
    Scissors
  • 03
    Tapestry/yarn needle for weaving in ends and seaming
  • 04
    Stitch markers (optional, helpful for seaming alignment)
  • 05
    Measuring tape or ruler for gauge swatch
  • 06
    Pins for blocking and holding seams in place

Progress Tracker

0% Complete

β€” Materials :

Info :

Yarn: About 1000y (900m) of a DK weight (3) yarn like Paintbox Yarns Simply DK (15% more for each size over S/M). Divide the yardage in half for each color if using two colors. If using 1 color for the back, you'll need 3/4ths of the yardage in one color and 1/4th in the other. A small amount of a 3rd color for ribbing/edging is optional.

Info :

Hook: 4mm US G

β€” Gauge and Sizing :

Info :

C2c gauge: A square sample of c2c, 9x9 clusters will be 5in (13cm) wide/tall. Sizing: Finished bust measurement: S/M-36in (91cm) L/XL-42in (105cm) 2XL/3XL - 56in (142cm). When pattern differs for different sizes, instructions are written for smallest with larger in parenthesis.

β€” How to Read C2C Graphs :

Infos :

Row 1: Up - 1W. Row 2: Down - 2W. Row 3: 1W, 1P, 1W. Row 4: 1W, 2P, 1W. Row 5: 1W, 1P, 1G, 1P, 1W. Row 6: 1W, 1P, 2G, 1P, 1W. Row 7: 2W, 1G, 1B, 1G, 2W. Row 8: 3W, 2B, 3W. C2c double crochet blocks are indicated by a number (# of blocks) and a color (W=white, P=purple and so on). In my c2c graphs, odd number rows will be "Up" rows and even numbered rows will be "Down" rows. "Up" instructions are reading the graph left to right, low to high. "Down" instructions are the reverse, reading the graph from right to left, high to low.

β€” Overview :

Info :

This pattern is made using the corner to corner stitch (c2c) to diagonally make a series of 3 double crochet clusters or "blocks." The c2c stitch does not lend itself well to written instructions so there is a video tutorial which you can find HERE which will demonstrate both the c2c stitch and how to change color every row (which is normally a challenge in c2c crochet). If you are already familiar with the c2c stitch, you'll find the chart pattern below where each c2c block is represented by a single square. The pattern is also written out row by row indicating how many blocks are in each row. The pattern is made in three pieces. Two front pieces which are seamed along the middle, and a large back piece seamed along the sides and shoulders. You may work ribbing along the raw edges of your work after seaming.

β€” Short hand instructions :

Info :

Front panel (make 2) Alternating colors each row, increase in c2c until you're piece has 16 (18, 20) blocks along one side. On the next row, decrease at the end of the row by slip stitching into the last ch3 space, ch1, and slip stitch back along the 3dcs of the block you just made(underarm corner).

For the S/M size only :

Decrease at the end of the next row. Then, increase at the end of odd numbered rows and decrease at the end of even numbered rows until you have 11 blocks above the underarm corner. Then, decrease at the end of each row until 11 blocks remain in the row. Fasten off.

For the L/XL size only :

Then, work 18 blocks. Decrease at the beginning of row 21 and increase at the end of row 21. Then, continue, increasing at the end of odd numbered rows and decreasing at the end of even numbered rows until you have 13 blocks above the underarm corner. Then, decrease at the end of each row until 11 blocks remain in the row. Fasten off.

For the 2X/3X size only :

Then, continue increasing at the end of each row until the long side of your work has 27 blocks. Then, increase at the end of odd numbered rows and decrease at the end of even numbered rows until you have 15 blocks above the underarm corner. Then, decrease at the end of each row until 12 blocks remain in the row. Fasten off.

Info :

Repeat the front panel instructions for the 2nd panel, starting with the opposite color from the first panel. Then, complete the back panel in one piece with double the number of blocks along the bottom edge and the same number of sleeve/side seam blocks along the vertical edge.

β€” Front panel :

Row 1 :

(Up) 1 block in color A

Row 2 :

(Down) 2 blocks in color B

Row 3 :

3 blocks in color A

Row 4 :

4 blocks in color B

Row 5 :

5 blocks in color A

Row 6 :

6 blocks in color B

Row 7 :

7 blocks in color A

Row 8 :

8 blocks in color B

Row 9 :

9 blocks in color A

Row 10 :

10 blocks in color B

Row 11 :

11 blocks in color A

Row 12 :

12 blocks in color B

Row 13 :

13 blocks in color A

Row 14 :

14 blocks in color B

Row 15 :

15 blocks in color A

Row 16 :

16 blocks in color B

Row 17 :

16 (17,17) blocks in color A *first decrease at end of row for S/M

Row 18 :

15 (18, 18) blocks in color B

Row 19 :

15 (18,19) blocks in color A *first decrease at end of row for L/XL

Row 20 :

15 (18,20) blocks in color B

Row 21 :

15 (18,20) blocks in color A *first decrease at end of row for 2/3X

Row 22 :

15 (18,20) blocks in color B

Row 23 :

15 (18,21) blocks in color A

Row 24 :

15 (18,22) blocks in color B

Row 25 :

15 (18,23) blocks in color A

Row 26 :

15 (18, 24) blocks in color B

Row 27 :

15 (18, 25) blocks in color A

Row 28 :

15 (18, 25) blocks in color B

Row 29 :

15 (18,25) blocks in color A

Row 30 :

14 (18, 25) blocks in color B

Row 31 :

13 (18, 25) blocks in color A

Row 32 :

12 (18, 25) blocks in color B

Row 33 :

11 (18, 25) blocks in color A

Info :

Large-3XL only

Row 34 :

(17, 25) blocks in color B

Row 35 :

(16, 25) blocks in color A

Row 36 :

(15, 25) blocks in color B

Row 37 :

(14, 25) blocks in color A

Row 38 :

(13, 24) blocks in color B

Row 39 :

(12, 23) blocks in color A

Row 40 :

(11, 23) blocks in color B

Info :

2X/3X only

Row 41 :

21 blocks in color A

Row 42 :

20 blocks in color B

Row 43 :

19 blocks in color A

Row 44 :

18 blocks in color B

Row 45 :

17 blocks in color A

Row 46 :

16 blocks in color B

Row 47 :

15 blocks in color A

Row 48 :

14 blocks in color B

Row 49 :

13 blocks in color A

Row 50 :

12 blocks in color B

β€” Seaming :

Info :

Seam the two front panels together up the middle, leaving the final rows unseamed for the V-neck opening. Seam back panel to front panels up the sides and along the shoulders.

β€” Finishing off the raw edges :

Info :

Attach a new yarn at one shoulder. Heading towards the center point of the V neck, work 1dc, 1hdc, 1sc along the first block. Sl st into the next ch3 space. Again work 1dc, 1hdc, 1sc, and sl st into next ch 3 sp to level off the scalloped edge of the V neck. Continue, 1dc, 1hdc, 1sc, 1 sl st into the ch 3 space along the raw edge. When you reach the center two blocks and begin working up the opposite side, work 1sc, 1hdc, 1dc and slip stitch. *1sc, 1hdc, 1dc, sl st* to even out the c2c edge on the other side.

β€” Adding Ribbing :

Info :

Add ribbing of your choice along the bottom edge, sleeve openings and neckline. While adding stitches along the c2c edges, alternate 3sts and 2sts along the edge of each c2c block. On the bottom edge, work 2sts for each block for a more sinched in look. I worked "camel stitch" by working half double crochet into the "back bar" of the stitch in the round.

β€” Extra Resources :

Info :

Extra photos and a video tutorial are referenced in the pattern β€” click the thumbnail in the original post for the video demonstration of c2c and color changes.

Assembly Instructions

  • Seam the two front panels together up the middle, leaving the final rows unseamed for the V-neck opening so the V shape remains open and neat.
  • Seam the back panel to the front panels along the sides and along the shoulders, aligning the block rows carefully to maintain the checkerboard pattern.
  • Attach a new yarn at one shoulder and work the finishing edge into the ch3 spaces around the V-neck: 1dc, 1hdc, 1sc, sl st into next ch3 space repeating to level the scalloped edge.
  • Add ribbing along the bottom edge, sleeve openings and neckline; along c2c edges alternate 3sts and 2sts per block and on the bottom edge work 2 sts per block for a slightly cinched look.

Important Notes

  • πŸ’‘Make a c2c gauge swatch (9x9 c2c clusters = 5in/13cm) before starting to ensure finished measurements match the pattern.
  • πŸ’‘Alternate colors every row exactly as instructed to maintain the checkerboard pattern and reduce excessive ends to weave in.
  • πŸ’‘Pin and block panels before seaming to ensure straight edges and correct alignment of blocks for a neat finish.
  • πŸ’‘Leave the final V-neck rows unseamed when joining front panels to preserve the neckline shape and avoid distorting the V.
  • πŸ’‘When adding ribbing, work into the chain-3 spaces to stabilize the c2c edge and maintain a neat neckline and hem.

This Corner to Corner Vest pattern is a fun and rewarding weekend project you can wear with pride. Try bold color combinations or soft neutrals to match your wardrobe and make a statement. Whether youre gifting it or keeping it, this vest adds handmade charm to any outfit. 🧢✨

You ask,

we answer.

FAQs

What size will the finished piece be?

The finished vest measures approximately S/M: 36in (91cm) bust; L/XL: 42in (105cm); 2XL/3XL: 56in (142cm) when using the recommended DK yarn and 4mm hook.

Can I use different yarn weights for this pattern?

Yes, you can use different yarn weights, but this will change the finished size and drape; make a gauge swatch and adjust hook size accordingly to maintain stitch gauge.

Do I need prior crochet experience for this pattern?

This pattern is rated intermediate. Basic knowledge of c2c (corner-to-corner) crochet, color changes, and standard stitches (dc, hdc, sc, sl st) is recommended for best results.

How long does this project typically take to complete?

Most crocheters complete this vest in 5-7 hours, though total time depends on your experience level, size chosen, and how much finishing work you do.