🧢 Beautiful ✨ Detailed πŸ’ Adorable

Colourful Mini Dino Amigurumi Pattern

Colourful Mini Dino Amigurumi Pattern
3.9β˜… Rating
2-4 Hours Time Needed
1.3K Made This
βœ‚οΈ

Intermediate Level

Ideal for those with basic crochet experience, featuring slightly more advanced stitches and techniques to expand your skills.

⏱️

Bite-Sized Project

Finishes in 2-4 hoursβ€”perfect for an afternoon of creative relaxation.

🎁

Tiny Treasure

Small, sweet, and gift-worthy creations that fit perfectly in the palm of your hand with detailed charm.

About This Colourful Mini Dino Amigurumi Pattern

This pattern creates a tiny, colourful amigurumi dino with a rounded head/body, crocheted tail and a line of spikes down the back. The head and body are made as one piece, with the tail worked directly into the body for a neat finish. It uses DK (8 ply) cotton and UK double crochet (dc) terminology.
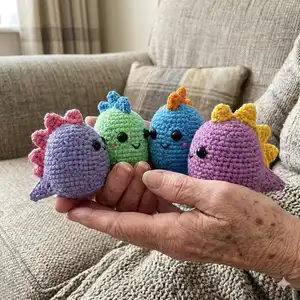
Colourful Mini Dino Amigurumi Pattern crochet pattern - detailed view of completed project

Perfect for using up scraps of bright or pastel cotton yarn, the finished dino measures approximately 7.5cm tall with the recommended hook and yarn. Includes full stitch-by-stitch rounds, spike templates and assembly notes.

Why You'll Love This Colourful Mini Dino Amigurumi Pattern

I absolutely love this pattern because it turns a few simple rounds into such a charming little character. I enjoy how the tail is crocheted directly to the body β€” it makes assembly quick and secure. The spikes add a playful, customizable detail that lets you experiment with colours and sizes. I also appreciate that the pattern is compact, so you can make several in different palettes in one afternoon. Sharing these tiny dinos always brings a smile and makes a lovely handmade gift.

Colourful Mini Dino Amigurumi Pattern step 1 - construction progress Colourful Mini Dino Amigurumi Pattern step 2 - assembly progress Colourful Mini Dino Amigurumi Pattern step 3 - details and accessories Colourful Mini Dino Amigurumi Pattern step 4 - final assembly and finishing

Switch Things Up

I love how easy it is to customise the spikes β€” try alternating two colours for a rainbow back or make each spike a different pastel for a soft look.

If you want a larger dino, I often use a bulkier yarn and a larger hook to scale the whole pattern up while keeping the same stitch relationships.

For a miniature keychain version, use finer yarn and smaller safety eyes and add a keyring before closing the head.

I sometimes embroider extra details like tiny eyebrows or freckles to give each dino a unique expression and personality.

Consider making the spikes in textured yarn or fuzzy yarn for a tactile contrast against the smooth cotton body.

I like to change eye styles β€” safety eyes, embroidered eyes, or tiny felt circles each change the character of the dino.

To make the dino more poseable, you can insert a short piece of wire into the tail before closing, then wrap with yarn and stuff gently.

Swap the body colour and spike colour to match themes β€” holiday colours, team colours, or baby shower palettes work beautifully.

I sometimes add a tiny crocheted scarf or a felt heart sewn to the front for a personalised gift finish.

Experiment with placement of the spikes β€” closer together gives a row of small bumps, while wider spacing produces a dramatic silhouette.

Common Mistakes & How to Fix Them

βœ— Forgetting to place safety eyes before closing the head will make attachment difficult later; place the eyes between rounds 9 and 10 (st 12 and st 18) before closing the opening. βœ— Skipping stitch counts during increases and decreases leads to uneven shaping; count your stitches at the end of each round and compare to the stitch totals in brackets. βœ— Not using a stitch marker for continuous rounds can cause misaligned shaping; use a stitch marker or scrap yarn to mark the start of each round and move it each round. βœ— Overstuffing the body will distort the dino's shape and make sewing spikes difficult; stuff gradually and finish stuffing before final decreases so shape remains smooth. βœ— Leaving very short tails when fastening off prevents neat sewing of spikes and tail; leave a long thread when instructed so you can sew pieces securely in place.
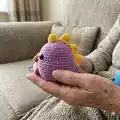
Colourful Mini Dino Amigurumi Pattern

Make a sweet, pocket-sized dino you can finish in an afternoon. This colourful amigurumi uses DK cotton and simple shaping to create a cute rounded body with a crocheted tail and adorable spikes. Clear rounds and helpful placement notes guide you through each step so your mini dino turns out neat and sturdy. Perfect for gifting or making a whole colourful collection.

Intermediate 2-4 Hours

Materials Needed for Colourful Mini Dino Amigurumi Pattern

β€” Main Fabric

  • 01
    Head and body: 8 ply (DK) cotton in green (colour and quantity as desired)
  • 02
    Spikes: 8 ply (DK) cotton in blue (or contrasting colour)
  • 03
    Black embroidery thread to embroider mouth
  • 04
    Pink embroidery thread to embroider cheeks
  • 05
    Polyester fibrefill stuffing

β€” Tools Required

  • 01
    3mm crochet hook
  • 02
    Yarn needle for sewing and weaving ends
  • 03
    8mm safety eyes (2)
  • 04
    Scissors
  • 05
    Stitch markers or small pieces of scrap yarn
  • 06
    Pins for assembly (optional)

Progress Tracker

0% Complete

β€” Head and Body :

Round 1 :

6 dc in magic circle [6 sts]

Round 2 :

(inc) x 6 [12 sts]

Round 3 :

(dc 1, inc) x 6 [18 sts]

Round 4 :

(dc 1, inc, dc 1) x 6 [24 sts]

Round 5 :

(dc 3, inc) x 6 [30 sts]

Round 6 :

dc in each st [30 sts]

Round 7 :

(dc 7, inc, dc 7) x 2 [32 sts]

Round 8 :

(dc 15, inc) x 2 [34 sts]

Round 9 :

(dc 8, inc, dc 8) x 2 [36 sts]

Info :

Place safety eyes between rounds 9 and 10 (st 12 and st 18). This placing is important as we will be crocheting the tail to the body.

Round 10 :

dc in each st [36 sts]

Round 11 :

(dc 5, inc) x 6 [42 sts]

Round 12 - 15 :

dc in each st i.e. 4 rounds [42 sts]

Info :

Embroider a mouth between the eyes and some cheeks next to the eyes.

Round 16 :

dc 34, ch 8, skip 8 sts [42 sts]

Info :

We will be crocheting the tail using this chain and the skipped 8 stitches later on.

Round 17 - 18 :

dc in each st i.e. 2 rounds [42 sts]

Round 19 :

(dc 5, dec) x 6 [36 sts]

Round 20 :

(dc 2, dec, dc 2) x 6 [30 sts]

Round 21 :

(dc 3, dec) x 6 [24 sts]

Round 22 :

(dc 1, dec, dc 1) x 6 [18 sts]

Info :

Begin stuffing

Round 23 :

(dec) x 9 [9 sts]

Info :

Finish stuffing. Fasten off and leave a long thread. Thread the yarn through the front loops of the 9 sts and pull to close. Weave in the end.

β€” Tail :

Info :

Re-join yarn to first skipped stitch of R16 using a standing dc (or your preferred method). The standing dc will count as the first st of the round.

Round 1 :

dc in each st [16 sts]

Round 2 :

(dc 3, dec, dc 3) x 2 [14 sts]

Round 3 :

(dc 5, dec) x 2 [12 sts]

Round 4 :

(dc 2, dec, dc 2) x 2 [10 sts]

Info :

Begin stuffing

Round 5 :

(dc 3, dec) x 2 [8 sts]

Info :

Continued on next page

Round 6 :

(dc 1, dec, dc 1) x 2 [6 sts]

Round 7 :

(dc 1, dec) x 2 [4 sts]

Info :

Finish stuffing. Fasten off and leave a long thread. Thread the yarn through the front loops of the 4 sts and pull to close. Weave in the end.

β€” Small Spike (make 1) :

Round 1 :

4 dc in magic circle [4 sts]

Round 2 :

(dc 1, inc) x 2 [6 sts]

Round 3 :

(dc 1, inc, dc 1) x 2 [8 sts]

Info :

Fasten off and leave a long thread for sewing - we will be using the thread from the small spike to sew all the spikes to the body.

β€” Medium Spike (make 3) :

Round 1 :

4 dc in magic circle [4 sts]

Round 2 :

(dc 1, inc) x 2 [6 sts]

Round 3 :

(dc 1, inc, dc 1) x 2 [8 sts]

Round 4 :

(dc 3, inc) x 2 [10 sts]

Info :

Fasten off - no need to leave a long thread as we will be using the thread from the small spike to sew these spikes to the body.

β€” X-Small Spike (make 1) - optional :

Round 1 :

4 dc in magic circle [4 sts]

Round 2 :

(dc 1, inc) x 2 [6 sts]

Info :

Fasten off - no need to leave a long thread as we will be using the thread from the small spike to sew this spike to the body.

β€” Putting it all together :

Info :

Sew small spike over rounds 1 and 3 of the head and body. Sew the 3 medium spikes in a line using the thread from small spike. (Optional) Sew x-small spike last.

Assembly Instructions

  • Place safety eyes between rounds 9 and 10 (position at st 12 and st 18) before closing the head, then embroider the mouth between the eyes and add cheeks beside the eyes.
  • After completing R16 (dc 34, ch 8, skip 8 sts) re-join yarn to the first skipped stitch and crochet the tail into the chain and skipped stitches so the tail is joined seamlessly to the body.
  • Sew the small spike over rounds 1 and 3 of the head and body using the long tail left from the small spike; use that same thread to sew the three medium spikes in a line along the back.
  • Position the spikes evenly along the top/back of the dino and pin in place before sewing to ensure symmetry and spacing that matches the sample photos.
  • Weave in all ends securely and close the head and tail openings by threading yarn through the front loops of the final stitches and pulling tight, then weave in the tail for a neat finish.

Important Notes

  • πŸ’‘This pattern uses UK terminology and double crochet (dc) throughout; refer to the conversion table if you prefer US terms.
  • πŸ’‘Work in continuous rounds unless otherwise specified and use a stitch marker or scrap yarn to mark the start of each round for accurate shaping.
  • πŸ’‘Place safety eyes before closing the head and before crocheting the tail into the body so positioning remains correct and secure.
  • πŸ’‘Stuff gradually while shaping and finish stuffing just before the final decreases for a smooth, well-shaped body and tail.

Thank you for making this little dino β€” I hope it brings a pop of colour to your day! This pattern is perfect for scrap-busting and makes a lovely handmade gift for friends and family. Share your makes with the hashtags #handmadebyani and #colourfulminidino β€” I cant wait to see your creations! 🧢🎁

You ask,

we answer.

FAQs

What size will the finished piece be?

The finished amigurumi will be approximately 7.5 cm tall when using 8 ply (DK) cotton and a 3mm hook as suggested in the pattern.

Can I use different yarn weights for this pattern?

Yes, but changing yarn weight and hook size will affect the final size; use a suitable hook for your chosen yarn and expect differences in stitch counts and proportions.

Do I need prior crochet experience for this pattern?

This pattern is rated intermediate, so basic knowledge of crochet in rounds, increases, decreases and finishing techniques is recommended for best results.

How long does this project typically take to complete?

Most crocheters complete this tiny dino in 2-4 hours depending on experience and whether you make multiple spikes or color changes.

Where should I place the safety eyes?

Place safety eyes between rounds 9 and 10 (approximately at stitch 12 and stitch 18) as noted in the pattern before finishing the head.