🧢 Beautiful ✨ Detailed πŸ’ Adorable

Citrus Slice Coasters Pattern

Citrus Slice Coasters Pattern
4.4β˜… Rating
2-3 Hours Time Needed
3.2K Made This
βœ‚οΈ

Intermediate Level

Ideal for those with basic crochet experience, featuring slightly more advanced stitches and techniques to expand your skills.

⏱️

Bite-Sized Project

Finishes in 2-4 hoursβ€”perfect for an afternoon of creative relaxation.

🏑

Cozy Accent

A warm touch for your space that transforms ordinary corners into inviting nooks filled with handmade charm.

About This Citrus Slice Coasters Pattern

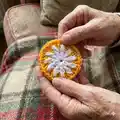
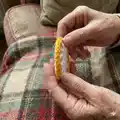
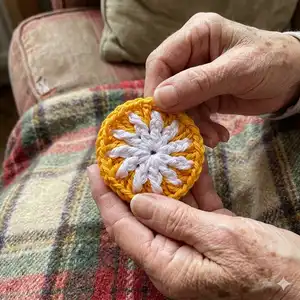
This pattern creates four cheerful citrus slice coasters with crisp wedge details and a contrasting border. You will work rounds combining front post stitches and color changes to form the segments and rind. The pattern uses cotton yarn for a durable, washable finish that sits nicely under cups. It is a fun project to customize with your favorite color combinations.

Citrus Slice Coasters Pattern crochet pattern - detailed view of completed project

Includes complete round-by-round instructions and stitch counts for accurate shaping. Suitable for crocheters comfortable with FPdc and working into stitches two rounds below.

Why You'll Love This Citrus Slice Coasters Pattern

I absolutely love this pattern because it turns simple crochet stitches into a playful, graphic coaster that brightens any table. I enjoy how the front post stitches create defined segments that really pop against the white center. The small size makes it a satisfying, quick project with instant results. I also love that you can mix and match colors to create a coordinated set for gifts or seasonal decor. It feels great to finish a set in a single afternoon.

Citrus Slice Coasters Pattern step 1 - construction progress Citrus Slice Coasters Pattern step 2 - assembly progress Citrus Slice Coasters Pattern step 3 - details and accessories Citrus Slice Coasters Pattern step 4 - final assembly and finishing

Switch Things Up

I love customizing these coasters by switching the main and contrasting colors to create different citrus fruits; try pastel shades for a softer look.

I sometimes use a slightly thicker cotton yarn and a 3.5 mm hook to make a sturdier, larger coaster for mugs with wide bases.

I enjoy adding a slim sc border in a third color for a more finished, polished edge that complements the main slice.

I often embroider tiny seeds or lines with embroidery thread across the wedges for extra detail and texture.

I like to make a matching set of four in coordinating colors so they stack neatly and look great on a kitchen table.

I have experimented with a washable fabric stiffener to make coasters lie perfectly flat and resist moisture better.

I recommend substituting similar acrylic-cotton blends if you want more color variety, but always check gauge to maintain size.

I sometimes chain a small loop in the border so the coasters can be hung as decorations when not in use.

I encourage trying variegated yarn for the wedges for a marbled fruit effectβ€”it's unexpected and charming.

I also like to gift these in sets wrapped with twine and a small tag that names the fruit; it makes a simple handmade present feel special.

Common Mistakes & How to Fix Them

βœ— Changing color in the middle of a round instead of at the end causes loose ends and visible joins; follow the instruction to drop the first color and complete the last sl st with the second color to join, leaving tails on the wrong side. βœ— Working into the wrong stitch when instructed to work two rounds below will distort the wedge shaping and alignment; always identify the stitch two rounds below and work FPdc in front of the chain-spaces as directed. βœ— Leaving the stitch marker in when instructed to remove it will prevent correct placement when working in the marked stitch; remove the marker only when working in the marked stitch and keep it when working around the marked stitch. βœ— Skipping counting stitches after increases and FPdc rounds can lead to a mismatched number of segments; count stitch and ch-sps after each round to confirm you have the stated stitch counts and adjust before continuing. βœ— Pulling post stitches too tight will pucker the fabric and change the coaster diameter; keep consistent, relaxed tension when making FPdc to maintain a flat coaster.

Citrus Slice Coasters Pattern

Make bright, cheerful citrus slice coasters to protect surfaces and add a pop of color to your home. This pattern uses simple crochet stitches with clear step-by-step rounds so you can create crisp wedge details and a neat border. You will enjoy mixing main and contrasting colors to make lemon, lime, orange, and grapefruit slices. Perfect for gifting or a colorful table display.

Intermediate 2-3 Hours

Materials Needed for Citrus Slice Coasters Pattern

β€” Main Fabric

  • 01
    Scheepjes Catona 50 (100% cotton, 125 m [137 yds]/50 g [1.8 oz]), color 106 Snow White - 1 skein for all coasters
  • 02
    Scheepjes Catona 10 (100% cotton, 25 m [27 yds]/10 g [0.35 oz]) - 1 skein each main and contrasting colors as follows:
  • 03
    Main Color (MC) Lemon: 403 Lemonade - 1 skein Catona 10
  • 04
    Contrasting Color (CC) Lemon: 280 Lemon - 1 skein Catona 10
  • 05
    Main Color (MC) Lime: 392 Lime Juice - 1 skein Catona 10
  • 06
    Contrasting Color (CC) Lime: 412 Forest Green - 1 skein Catona 10
  • 07
    Main Color (MC) Orange: 208 Yellow Gold - 1 skein Catona 10
  • 08
    Contrasting Color (CC) Orange: 281 Tangerine - 1 skein Catona 10
  • 09
    Main Color (MC) Grapefruit: 252 Watermelon - 1 skein Catona 10
  • 10
    Contrasting Color (CC) Grapefruit: 524 Apricot - 1 skein Catona 10

β€” Tools Required

  • 01
    3 mm (US Size D/3) crochet hook
  • 02
    Stitch marker
  • 03
    Yarn needle

Progress Tracker

0% Complete

β€” Pattern Notes :

Infos :

The color change is made at the end of the round: work as indicated until the end of the round, drop 1st color, work the last sl st with the 2nd color to join the round, continue the next round with the new color. Make sure all yarn tails and carries are on WS of work. From Round 4 to Round 9 the sts are worked in sts of the same color 2 rounds below. When working in sts of the same color 2 rounds below, always work in front of ch-sps of the previous round. Remove stitch maker when working in marked stitch, but do NOT remove if working around marked stitch.

β€” Instructions :

Info :

With White, ch 4, sl st to form a ring.

Round 1 (White) :

Ch 3 (counts as dc), dc in ring, place marker in st just made, 9 dc in ring, sl st in 3rd ch of beginning ch-3 sp to join. (11 dc)

Round 2 (White) :

Ch 1 (doesn't count), FPdc around st at base of ch-1, ch 2, [FPdc around next st, ch 2] 10 times, with MC sl st in first FPdc to join. (11 FPdc, 11 ch-2 sps)

Round 3 (MC) :

Ch 1, working in front of ch-sps, 2 dc in marked st of Round 1, place marker in first dc just made, [ch 1, skip FPdc of Round 2, 2 dc in next st of Round 1] 10 times, with White sl st in the beginning ch-1 to join. (22 dc, 11 ch-1 sps)

Round 4 (White) :

Ch 1 (doesn't count), FPdc around st of same color of Round 2 below, ch 3, skip 2 sts of Round 3, [FPdc around next st of Round 2, ch 3, skip 2 sts of Round 3] 10 times, with MC sl st in first FPdc to join. (11 FPdc, 11 ch-3 sps)

Round 5 (MC) :

Ch 1, dc in marked st of Round 3, place marker in st just made, 2 dc in next dc of Round 3, [ch 1, skip FPdc of Round 4, dc in next dc of Round 3, 2 dc in next dc of Round 3] 10 times, with White sl st in first ch-1 to join. (22 dc, 11 ch-1 sps)

Assembly Instructions

  • Weave in all yarn tails on the wrong side of the coaster and trim close for a neat finish.
  • Block each coaster gently to flatten and even out stitches: dampen and pin to an 11 cm circle until dry.
  • Keep all yarn carries and tails on the wrong side when changing color as instructed so the right side stays tidy.
  • If desired, add a narrow border with contrasting color by working an even round of sc around edge to stabilize the coaster.

Important Notes

  • πŸ’‘Make color changes at the end of the round and complete the last slip stitch with the new color so joins are neat and tails are on the wrong side.
  • πŸ’‘Work FPdc and other stitches into the stitches two rounds below as indicated, always in front of the chain spaces for correct segment shaping.
  • πŸ’‘Use a stitch marker to mark the first stitch of rounds where instructed and remove it only when working in that marked stitch, not when working around it.

These citrus slice coasters are a fun, colorful addition to any table and make cheerful gifts for friends and family. Bright cotton yarn gives clear stitch definition and easy care for everyday use. Mix and match colors to create personalized sets for summer gatherings and kitchen accents. πŸ§ΆπŸ‹πŸŠ

You ask,

we answer.

FAQs

What size will the finished coaster be?

The finished coaster measures approximately 11 cm (4.5") in diameter when using the recommended yarn and 3 mm hook.

Can I use different yarn weights for this pattern?

Yes, you can use different yarn weights but the final size and stitch definition will change; choose an appropriate hook for your yarn and check gauge.

Do I need prior crochet experience to make these coasters?

This pattern is rated intermediate because it uses FPdc and working into stitches two rounds below, so familiarity with post stitches and reading rounds is recommended.

How long does it take to make one coaster?

Most crocheters complete a single coaster in about 20-45 minutes; a full set will vary but the whole project can be finished in a few hours.