🧶 Beautiful ✨ Detailed 💝 Adorable

Bunny with Colorful Ears Amigurumi Pattern

Bunny with Colorful Ears Amigurumi Pattern
4.1★ Rating
8-10 Hours Time Needed
2.6K Made This
✂️

Intermediate Level

Ideal for those with basic crochet experience, featuring slightly more advanced stitches and techniques to expand your skills.

⏱️

All-Day Adventure

Requires 8-10 hours, ideal for a full day of immersive crocheting.

🧸

Cute Companion

An adorable friend to cherish, handcrafted with love to bring comfort and joy for years to come.

About This Bunny with Colorful Ears Amigurumi Pattern

This pattern creates a charming plush bunny with long, colorful inner ears and a removable bow. You will make the body and head in one piece and then crochet legs, arms, ears, tail and bow to assemble. The pattern uses plush yarn for a soft, cuddly result and includes clear shaping and assembly guidance.

Bunny with Colorful Ears Amigurumi Pattern crochet pattern - detailed view of completed project

Detailed rounds and photos guide placement of eyes, cinching of the muzzle and final decoration. Suitable for crocheters comfortable with increases, decreases and working in the round.

Why You'll Love This Bunny with Colorful Ears Amigurumi Pattern

I absolutely love this pattern because it turns simple shapes into a lovable companion with personality. I enjoy how the long inner ears and little bow let you add a splash of color and character without complicated colorwork. The body-and-head-as-one approach makes assembly cleaner and quicker, which I find very satisfying. Sewing and finishing yield charming results that always make me smile when the eyes and muzzle come together.

Bunny with Colorful Ears Amigurumi Pattern step 1 - construction progress Bunny with Colorful Ears Amigurumi Pattern step 2 - assembly progress Bunny with Colorful Ears Amigurumi Pattern step 3 - details and accessories Bunny with Colorful Ears Amigurumi Pattern step 4 - final assembly and finishing

Switch Things Up

I love personalizing this bunny by changing the inner ear color — try pastels for a baby-friendly look or bold shades for a playful character.

I often experiment with yarn weight and hook size to make miniature or jumbo versions; thicker yarn with a larger hook gives a chunky, cuddle-sized bunny.

I sometimes swap the glitter safety eyes for embroidered eyes when making toys for small children for a fully soft, safe option.

To add posability, I add thin armature wire inside the limbs before stuffing so the bunny can hold small props or sit in different poses.

I like to embroider small details like freckles or a tiny heart on the belly to make each bunny unique and personal.

Try making a family set with matching bows in different colors and sizes — they make sweet gifts and a charming display.

If you want a different texture, you can substitute the plush yarn for a soft acrylic or cotton — just expect a firmer finish.

For a festive twist, use seasonal colors and tiny accessories like a crocheted scarf or felt appliques to suit holidays or themes.

I recommend practicing the ear sandwich technique (sc through both layers) on a sample before making the final ears so you feel confident sewing them together neatly.

When sewing pieces, I pin everything first to check symmetry and then use small whipstitches so seams are secure and invisible on the plush surface.

Common Mistakes & How to Fix Them

✗ Skipping the stitch marker when instructed can make eye placement confusing; place a marker between the 3rd and 4th decrease in R19 to mark the belly center before attaching eyes. ✗ Under-stuffing the neck area will leave the head wobbly and unstable; stuff the neck (between R26 and R27) firmly so the head sits securely on the body. ✗ Forgetting to change hook or check gauge may alter size and look; use the recommended hook size and the specified plush yarn for consistent sizing and softness. ✗ Not pinning parts before sewing causes misaligned limbs; pin legs and arms in place and check symmetry prior to final sewing. ✗ Pulling stitches too tight around decreases can pucker the fabric; maintain even tension and shape decreases gently to preserve a round silhouette.

Bunny with Colorful Ears Amigurumi Pattern

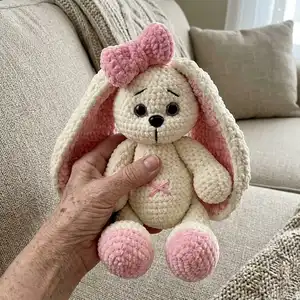
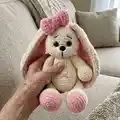
Make a sweet plush bunny with long colorful inner ears and a cute bow using plush Himalaya Dolphin Baby yarn. This pattern guides you step-by-step through all pieces — body/head, legs, arms, ears, tail and bow — with clear rounds and assembly notes so you can sew and decorate with confidence. Perfect for gifting or cuddling, the finished bunny is soft, squishy and full of personality.

Intermediate 8-10 Hours

Materials Needed for Bunny with Colorful Ears Amigurumi Pattern

— Main Fabric

  • 01
    Himalaya Dolphin Baby plush yarn, 100% polyester, 120 m/100 g (main yarn)
  • 02
    Cream color (main body) - use plush yarn in cream for body/head/outer ear/arms/legs/tail
  • 03
    Light pink color (inner ear and leg toes) - plush yarn in light pink for inner ears and leg toes
  • 04
    Bright pink color (bow and belly button) - plush yarn in bright pink for bow and small details
  • 05
    Black embroidery thread (cotton or acrylic) for muzzle and brows

— Tools Required

  • 01
    Crochet hook size 4
  • 02
    Stitch markers
  • 03
    Glitter safety eyes 9 mm (2 pieces)
  • 04
    Nose 19 mm wide
  • 05
    Black embroidery thread and a sewing/embroidery needle
  • 06
    Soft stuffing (e.g. fiberfill, polyester stuffing)
  • 07
    Tapestry needle for sewing pieces and weaving ends
  • 08
    Scissors
  • 09
    Moment Crystal glue from Henkel (or similar) for attaching nose

Progress Tracker

0% Complete

— Body and Head (made as one piece) :

Info :

Stuff the body as you go.

Info :

Cream color:

Round 1 :

6 sc in ml

Round 2 :

inc x6 (12)

Round 3 :

[1 sc, inc] x6 (18)

Round 4 :

[2 sc, inc] x6 (24)

Round 5 :

[3 sc, inc] x6 (30)

Round 6 :

[4 sc, inc] x6 (36)

Round 7 :

sc across (36)

Round 8 :

[5 sc, inc] x6 (42)

Round 9 :

[6 sc, inc] x6 (48)

Round 10-16 :

sc across (48)

Round 17 :

[6 sc, dec] x6 (42)

Round 18 :

[5 sc, dec] x6 (36)

Round 19 :

3 sc, 6 dec, 21 sc (30). It's the belly. In between 3rd and 4th dec, place a stitch marker, it'll guide us when we start to sew the muzzle.

Round 20-23 :

sc across (30)

Round 24 :

[3 sc, dec] x6 (24)

Round 25 :

sc across (24)

Round 26 :

dec x12 (12)

Info :

Remember to stuff.

Round 27 :

inc x12 (24)

Round 28 :

[1 sc, inc] x12 (36)

Round 29 :

[5 sc, inc] x6 (42)

Round 30 :

[6 sc, inc] x6 (48)

Round 31 :

[7 sc, inc] x6 (54)

Round 32 :

[8 sc, inc] x6 (60)

Round 33-37 :

sc across (60)

Round 38 :

[8 sc, dec] x6 (54)

Round 39 :

[7 sc, dec] x6 (48)

Round 40 :

[6 sc, dec] x6 (42)

Round 41 :

sc across (42)

Round 42 :

[5 sc, dec] x6 (36)

Round 43 :

[4 sc, dec] x6 (30)

Round 44 :

sc across (30)

Round 45 :

[3 sc, dec] x6 (24)

Round 46 :

sc across (24)

Info :

Stuff the head tightly but not too much so that you can do the cinching later.

Info :

Now place the eyes: your guide is the center of the belly (the marker). You can place the eyes higher or lower, closer to or farther from each other, whatever seems to you best. I myself place between R35 and 36 with 7-8 stitches apart.

Round 47 :

[2 sc, dec] x6 (18)

Round 48 :

[1 sc, dec] x6 (12)

Round 49 :

dec across, fasten off.

Info :

Fasten off, weave in the ends.

— Legs (make 2) :

Info :

Stuff the legs as you go.

Info :

Start with light pink yarn.

Round 1 :

7 ch. Starting from the 2nd ch from hook, work in rounds: 5 sc, 3 sc into the last ch, 4 sc, inc (14)

Round 2 :

inc, 4 sc, 3 inc, 4 sc, 2 inc (20)

Round 3 :

1 sc, inc, 5 sc, inc, 3 sc, inc, 5 sc, inc, 2 sc (24)

Round 4 :

2 sc, inc, [5 sc, inc] x3, 3 sc (28)

Round 5 :

[1 sc, inc] x2, 5 sc, inc, 1 sc, inc, 3 sc, inc, 1 sc inc, 5 sc, inc, 1 sc, inc, 2 sc (36)

Info :

Change to cream color:

Round 6 :

work through the BACK loop: sc across (36)

Round 7-8 :

sc across (36)

Round 9 :

9 sc, dec, [1 sc, dec] x5, 8 sc, dec (29)

Round 10 :

8 sc, 2 dec, 3 sc, 2 dec, 8 sc, dec (24)

Round 11 :

8 sc, 4 dec, 8 sc (20)

Round 12 :

6 sc, dec, 4 sc, dec, 6 sc (18)

Round 13 :

7 sc, 2 dec, 7 sc (16)

Round 14-20 :

sc across (16)

Round 21 :

dec x8 (8)

Info :

Make 2 sc, then fold the upper edge in half and make 4 sc into both edges.

Info :

Fasten off leaving a tail to sew the pieces.

— Arms (make 2) :

Info :

Stuff the arms as you go. Use cream color.

Round 1 :

4 ch. Starting from the 2nd ch from hook, work in rounds: 2 sc, 3 sc into the last ch, 1 sc, inc (8)

Round 2 :

inc, 1 sc, 3 inc, 1 sc, 2 inc (14)

Round 3 :

1 sc, inc, 3 sc, inc, [1 sc, inc] x2, 3 sc, inc (19)

Round 4-8 :

sc across (19)

Round 9 :

7 sc, dec, 1 sc, dec, 7 sc (17)

Round 10 :

4 sc, 2 dec, 1 sc, 2 dec, 4 sc (13)

Round 11-19 :

sc across (13)

Round 20 :

dec x6 (7)

Info :

Make 2 sc, then fold the upper edge in half and make 3 sc into both edges.

Info :

Fasten off leaving a tail to sew the pieces.

— Ears (make 4) :

Info :

Make 4 pieces: 2 light pink, 2 cream. Work in turning rows, in hdc, i.e. at the end of each row, turn the piece. However, for decreases I use sc.

Round 1 :

4 ch. Starting from the 2nd ch from hook, 2 inc, turn (4)

Round 2 :

2 ch, inc, 2 hdc, inc, turn (6)

Round 3 :

2 ch, [inc, 1 hdc] x3, turn (9)

Round 4 :

2 ch, [inc, 1 hdc] x4, inc, turn (14)

Round 5 :

2 ch, [inc, 2 hdc] x4, inc, 1 hdc, turn (19)

Round 6-10 :

hdc across (19)

Round 11 :

2 ch, [7 hdc, inc] x2, 3 hdc, turn (21)

Round 12 :

hdc across (21)

Round 13 :

2 ch, [7 hdc, dec] x2, 3 hdc, turn (19)

Round 14 :

2 ch, [6 hdc, dec] x2, 3 hdc, turn (17)

Round 15 :

2 ch, 8 hdc, dec, 7 hdc, turn (16)

Round 16 :

2 ch, 7 hdc, dec, 7 hdc, turn (15)

Round 17 :

2 ch, dec, 11 hdc, dec, turn (13)

Round 18-20 :

hdc across (13)

Round 21 :

2 ch, 5 hdc, 2 dec, 4 hdc, turn (11)

Round 22 :

2 ch, [2 hdc, dec] x2, 1 hdc, dec, turn (8)

Round 23 :

2 ch, 1 hdc, 2 dec, 1 hdc, dec, turn (5)

Round 24 :

2 ch, 2 hdc, dec, 1 hdc, turn (4)

Round 25 :

hdc across (4)

Info :

Do NOT fasten off the cream yarn. Place the light pink piece on top of the cream one and sc with the cream yarn in each of the stitches through both pieces. Leave a tail to sew the pieces.

— Tail :

Info :

Cream color:

Round 1 :

6 sc in ml

Round 2 :

inc x6 (12)

Round 3 :

[inc, 1 sc] x6 (18)

Round 4 :

dec x9 (9)

Info :

Slst. Fasten off leaving a tail to sew the pieces.

Info :

Stuff the tail with some stuffing.

— Bow :

Info :

Work in turning rows, i.e. at the end of each row, turn the piece. Start with the bright pink color.

Round 1 :

7 ch. R1: 6 sc starting from the 2nd ch from hook, turn (6)

Round 2-17 :

(16 rows): 2 ch, 6 hdc, turn (6)

Info :

Fasten off leaving a tail approximately 30 cm long.

Info :

Make a band to pinch the bow in the middle in a similar way: 3 ch. R1: 2 sc starting from the 2nd ch from hook, turn (2). R2-7 (6 rows): 2 ch, 2 hdc, turn (2). Fasten off leaving a tail approximately 30 cm long.

Info :

Sew the ends of the bow using the tail. Then fold the bow making 2 neat folds and secure them. It's more convenient to fold and secure the front and rear parts of the bow separately. Wrap the middle of the bow with the band and secure it with a needle.

— Assembling and Decorating :

Info :

Cinch the muzzle: Use the cream yarn for cinching. Insert the needle at the base of the muzzle, in between R26 and R27 (at Point 1, where we did 12 dec and 12 inc) and exit near the left eye (Point 2). Skip 1-2 sc and again insert the needle (Point 3) and back to the starting point (Point 1). Skip 1 sc to secure the end. Repeat for the second eye socket (insert the needle in Point, then 5, and go back to Point 1). Repeat if necessary. After cinching, weave in the ends.

Info :

Using the black embroidery thread, sew the brows and the line from the nose to the mouth (place of cinching in Point 1).

Info :

Attach the nose with glue.

Info :

Sew the hands in between R26 and 27.

Info :

Sew the legs precisely under the arms in R7.

Info :

Place the ears onto the head, choose the position you like most, sew. I sew on the top of the head, with 4-5 sc in between.

Info :

Sew the bow near the ear.

Info :

Sew the belly button with the bright pink yarn (the same color as the bow).

Info :

Your bunny is ready!

Assembly Instructions

  • Cinch the muzzle using cream yarn: insert needle at the base of the muzzle between R26 and R27, pass near the left eye, skip 1-2 sc, insert again and return to starting point; repeat for the second eye and weave in the ends.
  • Attach the glitter safety eyes using the belly center marker (placed between the 3rd and 4th dec in R19) as a guide; I place eyes between R35 and R36 about 7-8 stitches apart.
  • Sew the hands in between R26 and R27, and position the legs precisely under the arms at R7 before sewing to ensure balance and symmetry.
  • Place each ear on top of the head and sew in place leaving 4-5 stitches between them, then top-stitch the inner pink ear to the outer cream ear by single crocheting through both layers and leave a tail for sewing.
  • Glue the 19 mm nose in place and embroider brows and the line from the nose to mouth using black embroidery thread for facial expression.

Important Notes

  • 💡Use stitch markers to keep track of rounds and the belly center — the pattern relies on one marker placed between the 3rd and 4th decrease in R19.
  • 💡Stuff the neck area (between R26 and R27) firmly so the head is stable and does not wobble after assembly.
  • 💡Work with consistent tension when using plush yarn; too tight tension will flatten the plush texture while too loose will make gaps and reduce stability.
  • 💡When attaching inner ear pieces, sc through both layers with the cream yarn and leave a tail for sewing to ensure a neat, secure seam.

This plush Bunny with Colorful Ears is designed to be soft, huggable and full of charm for nursery shelves or handmade gift boxes. The pattern uses plush Dolphin Baby yarn for a super cozy finish, with long inner ears and a cute bright bow for personality. Enjoy every step of the crochet and sewing process — happy crafting! 🧶🎀

You ask,

we answer.

FAQs

What size will the finished piece be?

The size of a finished toy with ears using the suggested yarn is approximately 65 cm.

Can I use different yarn weights for this pattern?

Yes, you can use different yarn weights, but this will affect the final size and texture; choose an appropriate hook and test gauge before proceeding.

Do I need prior crochet experience for this pattern?

This pattern is rated intermediate; basic knowledge of single crochet, half double crochet, increases, decreases and working in the round is recommended.

How long does this project typically take to complete?

Most crocheters complete this project in 8-10 hours, depending on experience and how detailed you are with sewing and finishing.