🧢 Beautiful ✨ Detailed πŸ’ Adorable

Cherry Blossom Pattern

Cherry Blossom Pattern
4.5β˜… Rating
5-7 Hours Time Needed
1.8K Made This
βœ‚οΈ

Intermediate Level

Ideal for those with basic crochet experience, featuring slightly more advanced stitches and techniques to expand your skills.

⏱️

Weekend Treat

Takes 5-7 hours, making it an enjoyable project to finish over a couple of days.

🏑

Cozy Accent

A warm touch for your space that transforms ordinary corners into inviting nooks filled with handmade charm.

About This Cherry Blossom Pattern

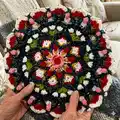
This pattern creates a layered floral mandala motif called Cherry Blossom that finishes approximately 33 x 33 cm after blocking. It uses DK weight yarns and a combination of puff, petal and cluster stitches for rich texture. The pattern includes written rounds, photographs and video references to help you achieve the correct shaping.

Cherry Blossom Pattern crochet pattern - detailed view of completed project

You'll work in the round to build petals and textured rounds using small color changes for contrast. The pattern is presented in clear numbered steps and includes yarn recommendations and abbreviations.

Why You'll Love This Cherry Blossom Pattern

I absolutely love this pattern because it combines delicate petals with bold texture to create a truly floral mandala. I enjoyed designing the layered colors to give depth and a handcrafted look that pops. The stitch combinations are playful but satisfying to work β€” each round builds into the next in a very tactile way. Making it felt like sculpting with yarn and I hope you feel the same joy while crocheting it.

Cherry Blossom Pattern step 1 - construction progress Cherry Blossom Pattern step 2 - assembly progress Cherry Blossom Pattern step 3 - details and accessories Cherry Blossom Pattern step 4 - final assembly and finishing

Switch Things Up

I love how easy it is to customize the Cherry Blossom motif by changing colors; try pastel tones for a soft vintage look or bold brights for a modern statement.

To make a larger piece, join multiple motifs and alternate colorways for a patchwork effect; arrange dark and light squares in a checkerboard for contrast.

I sometimes swap the DK yarn for a sport weight and a smaller hook to create a daintier, more delicate motif perfect for coasters or appliques.

If you want a chunkier version, use a heavier yarn and a larger hook and expect the finished square to grow in size and drape differently.

I often add embroidered centers or sewn-on beads to give more dimension and a little sparkle to the flower center.

Try different joining methods: whipstitch for a flat seam, mattress stitch for an invisible join, or joined-as-you-go to build a blanket without separate seaming.

I also experiment with making a border round in a neutral color to unify a multi-color blanket and to give the eye a clean edge to frame the motifs.

Change the number of repeats in early rounds to make five- or six-petal versions; just be careful to adjust later round stitch counts accordingly.

For a modern look, convert the motif into a cushion cover by lining and backing the square with fabric, then adding an invisible zipper.

Finally, don't be afraid to mix yarn brands β€” I sometimes combine Stylecraft Special DK with Batik DK for interesting variegated highlights that make the petals pop.

Common Mistakes & How to Fix Them

βœ— Working with inconsistent tension causes petals and puff stitches to vary in size; maintain even yarn tension and check your gauge frequently to keep motifs consistent. βœ— Skipping chain spaces or miscounting petals leads to uneven rounds and gaps; mark your starting point and count after each completed repeat to ensure correct stitch placement. βœ— Closing rounds incorrectly (wrong slip stitch location) can change stitch counts; always close with the slip stitch indicated and replace the first stitch with the correct chain height (Ch1/Ch2/Ch3/Ch4). βœ— Not blocking the finished motif results in a floppy or skewed square; pin and lightly steam/block the piece to open the petals and set the final dimensions.

Cherry Blossom Pattern

Create a bright, floral crochet mandala inspired by cherry blossoms. This pattern combines puff stitches, petals and layered motifs to build a textured square perfect for cushions, wall art or a special blanket. You will find step-by-step rounds, color notes and photos to guide you through every stage of the design.

Intermediate 5-7 Hours

Materials Needed for Cherry Blossom Pattern

β€” Main Fabric

  • 01
    Stylecraft Special DK (100g = 322 yds / 295 m) - main DK yarn
  • 02
    Stylecraft Batik DK (50g = 151 yds / 138 m) - used for variegated/batik effect
  • 03
    Lipstick 1246 (Special) - 18 g (approx 53 m / 58 yds)
  • 04
    Fondant 1241 (Special) - 9 g (approx 27 m / 29 yds)
  • 05
    Cream 1005 (Special) - 16 g (approx 47 m / 52 yds)
  • 06
    Indigo 1914 (Batik) - 67 g (approx 198 m / 216 yds)
  • 07
    Powder Pink 1843 (Special) - 11 g (approx 32 m / 35 yds)
  • 08
    Apple 1852 (Special) - 12 g (approx 35 m / 39 yds)
  • 09
    Gold 1709 (Special) - 8 g (approx 24 m / 26 yds)
  • 10
    Approximate yardage/metres for whole project: 450 g / 410 m (total shown in chart: 141 g shown per color example, totals 416 m, 454 yds)

β€” Tools Required

  • 01
    Crochet hook size 3.5 - 4.0 mm (depending on your tension)
  • 02
    DK weight yarns as listed in materials
  • 03
    Scissors
  • 04
    Yarn needle for weaving ends
  • 05
    Stitch markers
  • 06
    Blocking pins and a blocking mat (for final shaping)

Progress Tracker

0% Complete

β€” Round 1 to 5 :

Info :

In all rounds the first stitch is replaced as follows: Sc = Ch1. Hdc = Ch2. Dc = Ch3. Tr = Ch4.

Round 1 :

10sc in the MR. Close with 1 ss in the first sc. Total: 10 sc

Round 2 :

*1sc, ch2. Skip 1 st* Repeat ** 4 more times. Close with 1 ss in the first sc. Total: 5 sc, 5 ch2

Round 3 :

*Work in the ch2 space R2a: 1sc, ch3, 3tr, ch3, 1sc (1 petal). Skip to the next space* Repeat ** 4 more times. Close with 1 ss in the first sc. Total: 15tr, 10sc, 10 ch3

Round 4 :

Work in the back loop. Work 16 sc and 8 ch1, lifting 2 loops of the triples of the previous round. *1sc, 1sc, ch1* Close with 1 ss in the first sc. Total: 16 sc, 8 ch1

Round 5 :

*Work in the ch1 space: 1hdc, ch1, 1hdc in same space. Ch1* Repeat ** 7 more times. Close with 1 ss in the first hdc. Total: 16 hdc, 16 ch1

β€” Round 6 to 10 :

Round 6 :

*Work in the ch1 space R5a: 1puff4, ch4. Skip to the next space* Repeat ** 7 more times. Close with 1 ss in the closing chain of the first puff. Total: 8 puff4, 8 ch4

Round 7 :

*Dc2tog in the ch1 space R5a to the right of the puff, ch1. Dc2tog in the same space to the left of the puff, ch3* Repeat ** 7 more times. Close with 1 ss in the closing chain of the first dc2tog. Total: 16 dc2tog, 8 ch3, 8 ch1

Round 8 :

*1hdcfp in dc2tog R7a, ch1. Work in the ch1 space R7a. Close together the following stiches: 2tr, 1dtrfp in the puff R6a, 2tr. Ch1, 1hdcfp in the dc2tog R7b (1 petal). Ch3. Bring forward the 4 chains of R6a and work 1 sc. Ch3* Repeat ** 7 more times. Close with 1 ss in the first hdcfp. Total: 8 dtrfp, 32 tr (8 1 dtrfp and 4 tr close together, 8 petals), 16 hdcfp, 8 sc, 16 ch3, 16 ch1

Round 9 :

*Work in the ch1 space R5b: 2dc, ch8* Repeat ** 7 more times. Close with 1 ss in the first dc. Pass the 8 chains behind the petals. Total: 16 dc, 8 ch8

Round 10 :

*1dcfp in each dc R9a. 3sc in ch1 space R8a, ch1. 1hdcfp in the 5 stitches closed together R8b. Ch1, 3sc in ch1 space R8c* Repeat ** 7 more times. Close with 1 ss in the first sc. Total: 16 dcfp, 8hdcfp, 48 sc, 16 ch1

Assembly Instructions

  • Block the finished square to the final measurements (approx 33 x 33 cm) by pinning it square and lightly steaming or wet-blocking to open the petals and set the edges.
  • Weave in all ends on the wrong side with a yarn needle, trimming any excess and securing color changes so they do not slip.
  • If joining multiple squares, arrange motifs with matching color placement, then join with your preferred method (whipstitch, mattress stitch or joined-as-you-go) positioning seams between petals for a neat look.
  • Use stitch markers and pins to align petals and corners before sewing or joining to ensure symmetry and even spacing.

Important Notes

  • πŸ’‘Use a hook 3.5-4.0 mm depending on your tension to match the stated gauge; adjust hook size if your stitches are too tight or loose.
  • πŸ’‘Replace the first stitch of each round with the indicated chain height (Ch1/Ch2/Ch3/Ch4) rather than a turning chain to keep round counts accurate.
  • πŸ’‘Work petals and puff stitches with consistent tension and lift loops as instructed to achieve even petals and correct stitch counts.
  • πŸ’‘Block the finished motif to open up the petals and set the square shape, especially after color changes and textured rounds.

This Cherry Blossom mandala is a joyful blend of petals, puffs and contrasting rounds that brings floral charm to any project. Handcrafted texture and small color changes make every square unique and beautiful. Perfect for cushions, wall art or joined into a blanket β€” bring a little blossom magic into your home! 🧢🌸

You ask,

we answer.

FAQs

What size will the finished piece be?

The finished motif measures approximately 33 x 33 cm (13" x 13") after blocking when worked with DK yarn and the recommended hook size.

Can I use different yarn weights for this pattern?

Yes, you can use different yarn weights but the final size and texture will change; choose an appropriate hook and swatch to adjust gauge if you switch yarn weight.

Do I need prior crochet experience for this pattern?

This pattern is rated intermediate and includes puff, cluster and petal techniques, so basic experience with double crochet, treble and puff stitches is recommended.

How long does this project typically take to complete?

Most crocheters complete a single motif in about 5-7 hours, depending on experience, color changes and photography or blocking time.