About This Christmas Pudding Amigurumi Pattern
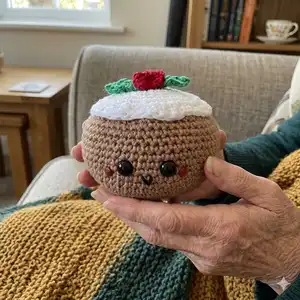
This pattern creates a small, squishy Christmas Pudding amigurumi complete with white icing, green leaves and little red berries. The design is compact (about 12cm across) and perfect for holiday gifts or festive decor. Youll work in continuous rounds with simple increases, decreases and a few decorative sewing steps to finish the details.
Includes full materials and stitch list, step-by-step round instructions and clear assembly notes. Suitable for crocheters who know basic stitches and want a quick, satisfying holiday project.
Why You'll Love This Christmas Pudding Amigurumi Pattern
I absolutely love this pattern because it turns simple stitches into an irresistibly cute holiday character. I enjoyed designing a compact shape that still has room for personality through embroidery and tiny details like brads and leaves. Making the icing and attaching the little berries is one of my favorite relaxing steps. I hope this pattern brings you the same cozy joy it gave me while creating it.
Switch Things Up
I love personalizing this pattern by changing yarn colors for a different look; try cream or pastel icings for a softer vibe.
You can make a mini keychain version by using a finer yarn and smaller hook to create tiny puddings perfect for gifts.
Make the pudding chunkier by using a bulkier yarn and a larger hook to produce a plush, squishy decoration.
I often swap the red brads for tiny embroidered berries or small beads for a different texture and safety for kids toys.
Try embroidering a sleepy or surprised mouth to change the puddings expression and personality.
Add a loop of yarn to the top before attaching the icing to turn it into a hanging ornament for the tree.
I sometimes make a whole set with varying sizes and cluster them as a festive table display for holiday parties.
Experiment with adding metallic yarn threads in the icing for a subtle shimmer and festive sparkle.
For a more realistic look, slightly vary the stuffing density between body and top so the icing sits more naturally on the pudding.
If you enjoy sewing, add a tiny crocheted ribbon or felt tag with a name to personalize each pudding as a gift tag keepsake.
Common Mistakes & How to Fix Them
✗ Skipping the placement of eyes and facial embroidery; follow the notes to place the eyes between rounds R14-15 and embroider the smile on R13 so features are balanced and symmetrical.
✗ Stuffing too firmly or too loosely will distort the puddings shape; stuff semi-firmly as you go and adjust filling gradually to maintain a tall pancake look.
✗ Forgetting to leave long tails when FOing small pieces like leaves and berries; leave a long tail for sewing so you can attach details cleanly without needing to rework ends.
✗ Not counting increases and decreases precisely causes mismatched stitch counts; count after each shaping round, especially R21-R29, to ensure the correct final circumference.


