🧢 Beautiful ✨ Detailed πŸ’ Adorable

Carnation Flower Pattern

Carnation Flower Pattern
3.9β˜… Rating
2-3 Hours Time Needed
2.3K Made This
βœ‚οΈ

Beginner Friendly Level

Perfect for those just starting their crochet journey, with clear instructions and simple techniques

⏱️

Bite-Sized Project

Finishes in 2-4 hoursβ€”perfect for an afternoon of creative relaxation.

🏑

Cozy Accent

A warm touch for your space that transforms ordinary corners into inviting nooks filled with handmade charm.

About This Carnation Flower Pattern

This pattern teaches you how to crochet a realistic carnation flower with a neat green base and a ruffled flower head. It uses DK (size 3) yarn and a 3.5 mm hook, and includes clear round-by-round instructions for shaping. A wire stem and florist tape are optional for a polished, posable finish.

Carnation Flower Pattern crochet pattern - detailed view of completed project

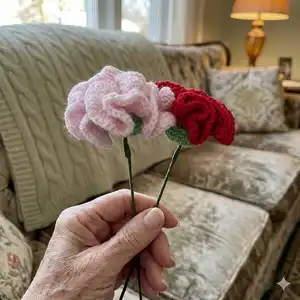
Perfect for beginners who can work basic stitches, the pattern includes front/back loop work and simple increases to form the ruffled petals. The finished flowers make lovely bouquets, gifts, or decorative accents for the home.

Why You'll Love This Carnation Flower Pattern

I absolutely love this pattern because it creates such a realistic and delicate carnation using just simple stitches. I enjoy how quickly a full, ruffled flower forms from only a few rounds and a bit of doubling up in the petal rounds. The option to add a wire stem and florist tape makes the flowers practical and display-ready, which I find really satisfying. I take joy in seeing how small changes in yarn color or tightness completely change the finished look, so it always feels like a creative little experiment.

Carnation Flower Pattern step 1 - construction progress Carnation Flower Pattern step 2 - assembly progress Carnation Flower Pattern step 3 - details and accessories Carnation Flower Pattern step 4 - final assembly and finishing

Switch Things Up

I love customizing this carnation by changing yarn colours; try ombre or two-tone petals for added depth.

I sometimes use a lighter DK yarn and a smaller hook to create a delicate mini version perfect for brooches.

I also make chunky versions using a bulkier yarn and a larger hook to create statement flowers for wreaths and home dΓ©cor.

I often add embroidered or beaded centers to transform the flower into a vintage-style bloom.

I recommend experimenting with the tightness of the central stitches to vary how ruffled or compact the petals become.

I like to use florist tape and multiple wires when making long-stemmed bouquets to make the stems stable and flexible.

I sometimes add felt leaves or crocheted leaves at the base of the calyx to make the flower look more finished and natural.

I enjoy grouping three different colours together to build small posies and tie them with ribbon for gifts.

I will occasionally stitch tiny beads or sequins into the petal layers for a subtle sparkle effect for special-occasion flowers.

I encourage you to try sewing two petal layers together with slightly offset stitches to increase volume and complexity.

Common Mistakes & How to Fix Them

βœ— Not using a stitch marker when working in continuous rounds can cause confusion and miscounted stitches; use a marker at the first stitch of each round and move it as you finish each round. βœ— Crocheting too loosely will create gaps in the calyx or ruffled petals; maintain consistently tight stitches and switch to a smaller hook if your stitches are too loose. βœ— Forgetting to work into the back loops where instructed will prevent the flower head from sitting correctly; identify the back loops from R3 of the green section and attach your yarn to one of those loops. βœ— Cutting tails too short makes sewing and finishing difficult; leave a generous tail for sewing the pieces together and for securing the flower to the stem. βœ— Inaccurate counting during the multiple-increase petal rounds can lead to fewer petals than intended; count after each round and use visual checks while making 3 DC clusters into each stitch.

Carnation Flower Pattern

Create beautiful, hand-crocheted carnation flowers with this easy-to-follow pattern. You will make a neat green calyx and a ruffled flower head, then attach a wire stem for a realistic finish. The pattern is compact, uses minimal yarn, and is perfect for bouquets or gifts. Follow step-by-step rounds and simple assembly instructions to finish a charming floral accent.

Beginner Friendly 2-3 Hours

Materials Needed for Carnation Flower Pattern

β€” Main Fabric

  • 01
    DK (size 3) yarn: small amount of green for the calyx (approximately a few grams)
  • 02
    DK (size 3) yarn: approximately 10 g of your chosen flower shade (red, pink, etc.) for the petal ruffles
  • 03
    You can use a different yarn weight with an appropriately sized hook; quantities will change accordingly

β€” Tools Required

  • 01
    Crochet hook size 3.5 mm
  • 02
    Yarn needle for sewing
  • 03
    Scissors
  • 04
    Stitch markers
  • 05
    Flower wire for the stem
  • 06
    Florist tape (optional)

Progress Tracker

0% Complete

β€” Carnation flower :

Info :

Start with green yarn.

Info :

Start by creating a magic circle. You will be working in a continuous circle.

Info :

Tip: Mark your first stitch with a stitch marker.

Round 1 :

6 sc into the mc (6 sts).

Round 2 :

inc 6 times (12 sts).

Round 3 :

*FLO sc, FLO inc* 6 times (18 sts).

Round 4-6 :

sc around (18 sts).

Info :

Do not turn your work right way round yet, you need to access the back loops created from R 3.

Info :

Fasten off and cut yarn but leave a bit of a tail for later. You can sew in the starter tail if you did not crochet over it.

β€” Flower head :

Info :

Continue with the colour of the flower head. You will now be working into the back loops from R 3. Attach your yarn to one of the loops.

Round 1 :

ch 1 (does not count as a stitch) BLO sc around, slst to beg ch-1 to finish (12 sts).

Round 2 :

ch 2 (does not count as a stitch), dc around, slst to top of first dc to finish (12 sts).

Round 3-5 :

ch 2 (does not count as a stitch), 3 dc into each stitch from the round below, slst to top of first dc to finish (36, 108, 324 sts).

Info :

Fasten off, leave a long tail for sewing. You can sew in the starter tail if you did not crochet over it.

β€” Assembly :

Info :

With your yarn needle, make a few stitches through the middle of the flower head to keep it in place, you can make the flower head tighter or looser depending on your own personal preference, see photo for the difference between tighter and looser heads.

Info :

Turn the green part of your work the right way around to cover the bottom part of the flower head and form the top of the stem, securing it to place with a few stitches all around.

Info :

Bend the top part of your flower wire and push it through the middle of the flower head to come out at the middle of the green magic circle.

Info :

Twist the ends of the wires together and add some florist tape all along the stem if you like.

Info :

Fasten off any remaining ends and weave them in neatly. Happy crocheting!

Assembly Instructions

  • Using the long tail from the flower head, make a few stitches through the middle of the ruffled head to secure the petal layers and adjust tightness to your preference.
  • Turn the green calyx the right way round to cover the bottom of the flower head, then sew the calyx all around to attach it securely to the base of the petals.
  • Bend the top of your flower wire and push it through the center of the flower head so the wire comes out in the middle of the green magic circle.
  • Twist the ends of the wire together for strength and wrap the stem with florist tape working downwards to cover and secure the wires.
  • Tidy up by weaving in any visible yarn tails into the calyx or petals and trim excess wire neatly beneath florist tape.

Important Notes

  • πŸ’‘Gauge/tension is not important for this pattern as long as your stitches are tight and without gaps.
  • πŸ’‘If you struggle getting tight enough stitches, try a smaller hook to achieve neater petal definition.
  • πŸ’‘Leave long tails when fastening off so you have enough yarn for sewing and securing the head to the stem.
  • πŸ’‘Work into the back loops created in R3 of the green section to attach the flower head correctly.
  • πŸ’‘Pin parts or hold pieces in place while sewing to ensure even placement and symmetry.

This Carnation Flower pattern is a sweet, small project that makes gorgeous bouquets or little handmade gifts. It uses minimal yarn and finishes into a realistic, ruffled bloom you can display anywhere. Make a bunch in different colours and arrange them as a vibrant bouquet. 🧢🌸

You ask,

we answer.

FAQs

What size will the finished piece be?

The finished carnation measures roughly a few centimetres across depending on yarn tension and colour choice, and the stem length depends on the wire you use.

Can I use different yarn weights for this pattern?

Yes, you can use different yarn weights but the final size and stitch counts may feel different; choose an appropriate hook for your yarn and expect changes in petal density.

Do I need prior crochet experience for this pattern?

This pattern is beginner friendly but assumes basic knowledge of single crochet, double crochet, magic ring, chains, and working in front/back loops.

How long does this project typically take to complete?

Most crocheters complete a single carnation in about 2-3 hours, depending on experience and how many flowers you make.