🧶 Beautiful ✨ Detailed 💝 Adorable

Cactus frog with removeable pot Amigurumi Pattern

Cactus frog with removeable pot Amigurumi Pattern
4.5★ Rating
2-4 Hours Time Needed
3.2K Made This
✂️

Intermediate Level

Ideal for those with basic crochet experience, featuring slightly more advanced stitches and techniques to expand your skills.

⏱️

Bite-Sized Project

Finishes in 2-4 hours—perfect for an afternoon of creative relaxation.

🎁

Tiny Treasure

Small, sweet, and gift-worthy creations that fit perfectly in the palm of your hand with detailed charm.

About This Cactus frog with removeable pot Amigurumi Pattern

This pattern creates an adorable cactus-inspired frog with a removable flower pot and a separate floral topper. It uses simple amigurumi construction with a few stitches like hdc and BLO/FLO techniques for texture. The finished piece is small — about 2½ inches tall and wide — making it ideal for gifts or keychain-style keepsakes. The pattern includes assembly and embroidery instructions for the finishing details.

Cactus frog with removeable pot Amigurumi Pattern crochet pattern - detailed view of completed project

You will crochet the head/body, legs, toes, flower, and a small pot that the frog fits into. Clear round-by-round instructions and photos guide you through each part and the final assembly.

Why You'll Love This Cactus frog with removeable pot Amigurumi Pattern

I absolutely love this pattern because it combines cute character design with a clever removable pot — it feels like a tiny surprise every time you lift the flower. I love how quickly it works up; you can finish one in an afternoon and still have time to add personalized details. I enjoy the small-scale embroidery steps that turn simple stitches into charming cactus markings. I also appreciate that the pattern is versatile: you can change colors or yarn types to create many variations quickly.

Cactus frog with removeable pot Amigurumi Pattern step 1 - construction progress Cactus frog with removeable pot Amigurumi Pattern step 2 - assembly progress Cactus frog with removeable pot Amigurumi Pattern step 3 - details and accessories Cactus frog with removeable pot Amigurumi Pattern step 4 - final assembly and finishing

Switch Things Up

I love changing colors to give each frog a different personality: try mint green, teal, or even pastel shades for a fresh look.

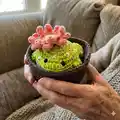
I often make the flower in contrasting tones — bright coral or deep pink work beautifully against green yarn.

I like using a slightly thicker cotton yarn and a larger hook for a chunkier, more tactile frog that makes a great desk buddy.

To make a tiny keychain version, use fingering weight yarn and a much smaller hook, then add a keyring to the pot rim.

I sometimes replace safety eyes with embroidered eyes for a fully child-safe toy or to match a soft, vintage style.

If I want a more realistic cactus effect, I embroider more X marks or tiny French knots around the body for added texture.

I recommend stitching the flower on with a removable stitch if you want to swap flowers for different seasons or occasions.

For gifts, I add a small ribbon around the pot or a bead inside the pot base to weight it so the frog sits nicely.

I occasionally add a tiny pocket or loop inside the pot so the frog stays in place during transport or display.

Don't be afraid to experiment with yarn fibers — acrylic for easy care, cotton for crisp stitches, or blends for softness all change the final feel of the frog.

Common Mistakes & How to Fix Them

✗ Skipping stitch markers during rounds can make you lose track of the beginning of rounds; place a stitch marker or a scrap of yarn at the start of every round to maintain correct stitch counts. ✗ Under- or over-stuffing the body leads to misshapen pieces; stuff gradually and evenly, adding small amounts of polyfill until you reach the desired firmness. ✗ Placing safety eyes too early or in the wrong spot can distort the face; follow the pattern instructions exactly and insert eyes between rounds 5 and 6, four stitches apart for correct placement. ✗ Not counting stitches after increases or decreases will cause sizes to drift; count your stitches at the end of each round, especially after shaping rounds with multiple increases or decreases.

Cactus frog with removeable pot Amigurumi Pattern

Make a tiny cactus frog with a removable pot and a pretty flower topper. This sweet amigurumi fits in the palm of your hand and is a fun, quick project for intermediate crocheters. You will love the playful details like embroidered ‘X’ markings and the detachable flower. Perfect as a gift or a small decorative companion for your desk.

Intermediate 2-4 Hours

Materials Needed for Cactus frog with removeable pot Amigurumi Pattern

— Main Fabric

  • 01
    Sugar and Cream cotton yarn (or any similar cotton yarn) - use small amounts of each color
  • 02
    Hot green - main body color (small skein/scrap for a 2½ inch frog)
  • 03
    White - belly and embroidery (small amount)
  • 04
    Yellow - flower center (small amount)
  • 05
    Light red / Tea rose - flower petals (small amount)
  • 06
    Warm brown - flower pot (small amount)

— Tools Required

  • 01
    Crochet hook size 3.5mm
  • 02
    Poly-fil fiber for stuffing
  • 03
    Yarn needle for sewing and embroidery
  • 04
    Safety eyes 6mm (2 pieces) (Not for children under 3)
  • 05
    Scissors
  • 06
    Stitch markers or a piece of yarn
  • 07
    Pins for assembly (optional)

Progress Tracker

0% Complete

— Head and body :

Info :

Start with green yarn.

Round 1 :

8sc in a MR (8)

Round 2 :

8inc (16)

Round 3 :

(sc, inc) x8 (24)

Round 4 :

(2sc, inc) x8 (32)

Round 5 :

(3sc, inc) x8 (40)

Round 6 :

16sc, inc, 5hdc-inc, inc, 17x (47)

Info :

Change to white yarn.

Round 7 :

BLO: 21sc, 3dec, 20sc (44)

Round 8 :

(3sc, inc) x2, 12sc, 2dec, 12sc, (3sc, inc) x2 (46)

Round 9-10 :

(2 rounds): 46sc (46)

Round 11 :

(3sc, dec) x2, 10sc, dec, 2sc, dec, 10sc, (3sc, dec) x2 (40)

Round 12 :

(2sc, dec) x10 (30)

Round 13 :

30sc (30)

Info :

Now it’s time to insert the safety eyes between round 5 and 6, 4 stitches apart. Make sure the nose is in the middle of the eyes.

Info :

Stuff the piece.

Round 14 :

(sc, dec) x10 (20)

Round 15 :

10dec (10)

Round 16 :

3 dec. F.O You don't have to finish this round.

Info :

Close the body by using needle and cut the yarn. Hide the end inside the body.

— Back legs x2 :

Info :

Start with green yarn.

Round 1 :

6sc in a MR (6)

Round 2 :

6inc (12)

Round 3 :

(sc, inc) x6 (18)

Round 4 :

18sc (18) F.O

Info :

Leave long end to connect with the body.

— Toes x2 :

Info :

Start with green yarn.

Round 1 :

8sc in a MR (8)

Round 2 :

do not break the working yarn, continue to work the toes with it: chain 3, turn work, start from the second chain from the hook, hdc, 1 slst in the chain, 1 slst on the MR)x3, 4sc, slst on the last stitch. (8) F.O

Info :

Leave long end to connect with the back legs.

— Front legs x2 :

Info :

Start with green yarn.

Round 1 :

5sc in a MR (5)

Round 2 :

inc, 2sc, inc, sc (7)

Round 3-10 :

(8 rounds): 7sc (7) F.O

Info :

Do not close the piece. Do not stuff the piece. Leave long end to connect with the body.

— Flower :

Info :

Start with yellow yarn.

Round 1 :

BLO: 6sc in a MR (6)

Round 2 :

BLO: 6inc (12)

Round 3 :

BLO: (sc, inc) x6 (18)

Info :

Change to light red yarn.

Round 4 :

BLO: slst, (chain 5, start from the 2nd chain from the hook, 4hdc along the chain, skip 1 stitch, slst on the next stitch of the base) x 8.

Info :

After you finished all the petals in the back loop (8 petals) , change to the front loop and do the same step (8 petals) . F.O the last stitch.

Info :

At the end you should have 16 petals. Leave long end to sew into the frog's body.

— Flower Pot :

Info :

Start with brown yarn.

Round 1 :

8sc in a MR (8)

Round 2 :

8inc (16)

Round 3 :

(sc, inc) x8 (24)

Round 4 :

(2sc, inc) x8 (32)

Round 5 :

(3sc, inc) x8 (40)

Round 6 :

(4sc, inc) x8 (48)

Round 7 :

(5sc, inc) x8 (56)

Round 8 :

BLO: 56sc (56)

Round 9-14 :

56sc (56)

Round 15 :

FLO: 56hdc (56), slst to the first stitch.

Info :

F.O

Info :

Leave long end and sew around the pot to secure and hide the end. Cut off the yarn.

— Assembly :

Info :

Back legs and toes: Start sewing the back legs on two side of the thighs and make sure to stuff it before closing it all the way. Sew the toes to the bottom of the legs. Make sure 3 toes pointed out.

Info :

Front legs: Sew the front leg two stitches away from the back leg, 3 stitches long. Then sew the tip of the leg into the belly. Repeat the same steps on the other side.

Info :

Using white yarn, embroider "X" around the frog body.

Info :

Sew the flower to one side of the frog. You can also sew it on the top of the frog. It's completely up to you ☺

Info :

Now you have a cactus frog. Please take care of it by handwashing when dirty.

Assembly Instructions

  • Sew the back legs onto the two sides of the thighs, stuffing each leg before closing it completely to maintain shape.
  • Attach the toes to the bottom of the back legs, making sure three toes point outward for each foot.
  • Sew the front legs two stitches away from the back legs, about three stitches long, and secure the tip of each front leg into the belly.
  • Embroider small X-shaped markings around the frog body using white yarn for the cactus look, then sew the flower onto one side or the top of the frog as desired.
  • Place the finished frog inside the flower pot; use the long ends to sew and secure parts where needed, hiding ends inside the pot or body.

Important Notes

  • 💡Work in continuous spiral rounds and use a stitch marker or a piece of yarn to mark the start of each round.
  • 💡Insert safety eyes between rounds 5 and 6, leaving four stitches between eyes, and secure tightly before stuffing.
  • 💡Stuff the body firmly but evenly; overstuffing can distort the shape while understuffing will make sewing and shaping difficult.
  • 💡Weave in and hide yarn ends as you go to keep the assembly tidy and to avoid bulky seams when sewing parts together.

This tiny cactus frog is a delightful make that brings a bit of green charm to any shelf or desk. 🌵 It’s designed to be small, quick, and endlessly customizable — swap yarn colors for fresh looks. 🐸 Enjoy gifting it or keeping it as your own little handmade friend. 🧶

You ask,

we answer.

FAQs

What size will the finished piece be?

The finished amigurumi measures about 2½ inches height and 2½ inches wide when made with cotton yarn and a 3.5mm hook.

Can I use different yarn weights for this pattern?

Yes, but changing yarn weight will affect the final size — use an appropriate hook for your chosen yarn and expect a different finished scale.

Where do I place the safety eyes?

Insert the safety eyes between rounds 5 and 6 of the body, spacing them four stitches apart as instructed for the correct facial placement.

Do I need experience with BLO and FLO?

Basic familiarity with back loop only (BLO) and front loop only (FLO) is helpful because the flower and some shaping use these techniques.