🧶 Beautiful ✨ Detailed 💝 Adorable

By Your Side Basket Bag Pattern

By Your Side Basket Bag Pattern
4.6★ Rating
5-7 Hours Time Needed
2.2K Made This
✂️

Intermediate Level

Ideal for those with basic crochet experience, featuring slightly more advanced stitches and techniques to expand your skills.

⏱️

Weekend Treat

Takes 5-7 hours, making it an enjoyable project to finish over a couple of days.

Stylish Touch

An elegant detail to elevate any look, combining traditional techniques with contemporary design sensibilities.

About This By Your Side Basket Bag Pattern

This pattern creates a roomy, striped basket bag worked in single (double) crochet using Paintbox Yarns Recycled Crafty Pots. Youll work an oval base, increase rounds to shape the body, then work the body and handles for a finished tote. The pattern uses stitch markers for shaping and includes clear round-by-round instructions for accuracy.

By Your Side Basket Bag Pattern crochet pattern - detailed view of completed project

Perfect for market trips or everyday use, the bag finishes approximately 12½in/32cm high and 17¾in/45cm wide at its widest point. The design is striped and can be adapted by changing colour placement for a personalised look.

Why You'll Love This By Your Side Basket Bag Pattern

I absolutely love this pattern because it combines simple stitches with clever shaping to make a professional-looking bag without complicated techniques. I enjoy how the recycled Paintbox Yarns create soft, subtle stripes that look more expensive than they are. The construction is dependable and uses stitch markers, which makes shaping predictable and neat. I also love that the pattern is adaptable — you can change colours or yarn weight to create a different finished size and feel. Making this bag feels rewarding and useful, and it becomes a frequent go-to accessory.

By Your Side Basket Bag Pattern step 1 - construction progress By Your Side Basket Bag Pattern step 2 - assembly progress By Your Side Basket Bag Pattern step 3 - details and accessories By Your Side Basket Bag Pattern step 4 - final assembly and finishing

Switch Things Up

I love using different colour placements to make this bag my own; try rearranging the stripes to create a bolder or more subtle look.

If you want a larger or smaller bag I change the yarn weight and hook size; thicker yarn with a larger hook gives a chunky tote while thinner yarn makes a delicate smaller bag.

I sometimes add a lining for extra structure and tidiness; sew a simple fabric lining into the bag before finishing to protect contents and hide inside ends.

For sturdier handles you can crochet additional rounds or use two strands held together for the handle chain to create a firmer grip.

I like to embroider small motifs or add a crocheted flower to the front for a personalized touch that makes each bag unique.

Consider adding a button-and-loop closure or inside pocket to keep small items secure and organized while on the go.

If you want structured sides, I occasionally add a lightweight interfacing to the lining to keep the bag upright while still remaining flexible.

I also enjoy modifying the handle length by reducing or increasing the chain stitches to create a shoulder bag or handheld tote version.

Try substituting a single solid colour for a minimalist look or use variegated yarn for an effortless stripe without changing colours frequently.

For gifting, I change the colour palette seasonally and include a matching crocheted pouch for keys or coins to make a thoughtful handmade set.

Common Mistakes & How to Fix Them

✗ Not placing stitch markers correctly will make the increase placements inaccurate; place lockable markers in the second stitch of the three-st increase as instructed and move them up each round. ✗ Skipping the front loop only (flo) instruction on the 10th round will flatten the texture incorrectly; work the 10th round in the front loop only to keep the body shape consistent. ✗ Forgetting to remove markers when instructed will leave them trapped in the fabric and confuse later counts; remove markers as you work the handle openings and as noted in the pattern. ✗ Using inconsistent tension throughout the piece causes an uneven bag shape and distorted stripes; keep a steady, even tension and check gauge before starting the project.

By Your Side Basket Bag Pattern

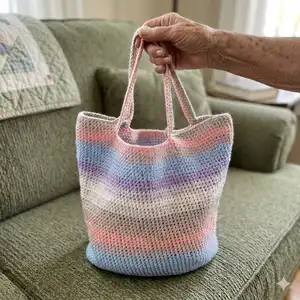
Make a stylish, striped basket bag using Paintbox Yarns Recycled Crafty Pots. This intermediate crochet pattern walks you through the oval base, body shaping with stitch markers, and handle shaping to create a sturdy, everyday tote. The finished bag is roomy and perfect for markets, beach days, or everyday errands. Youll love the soft colour changes and simple construction.

Intermediate 5-7 Hours

Materials Needed for By Your Side Basket Bag Pattern

— Main Fabric

  • 01
    Paintbox Yarns Recycled Crafty Pots (8¾oz/250g balls) - 2 balls in Neapolitan (main colour and stripes)

— Tools Required

  • 01
    H-8 (5mm) crochet hook
  • 02
    Darning needle
  • 03
    3 buttons size 1/2in/1.5cm
  • 04
    2 lockable stitch markers

Progress Tracker

0% Complete

— Sizes :

Info :

Height 12½in/32cm. Width at widest point 17¾in/45cm.

— You Will Need :

Infos :

Paintbox Yarns is exclusively available at lovecrafts.com. 8¾oz/250g balls of Paintbox Yarns Recycled Crafty Pots: 2 balls in Neapolitan. 3 buttons size 1/2in/1.5cm. H-8 (5mm) crochet hook. Darning needle. 2 lockable stitch markers.

— Gauge (Tension) :

Info :

14 sts and 15 rows to 4in/10cm in single (double) crochet stitch using H-8 (5mm) crochet hook.

— Good to Know :

Infos :

Paintbox Yarns cannot accept responsibility for the finished item if any yarn other than the recommended yarn is used. Yarn quantities are based on average requirements and are therefore approximate. Instructions are written using US terminology with UK terminology given in italics in round brackets () afterwards. Where the figure 0 appears, no stitches, times or rows are worked for this size. Stripes may vary from those shown.

— Abbreviations :

Infos :

cm centimetres. ch chain. flo front loop only. g grams. in inches. mm millimetres. oz ounces. PM place marker. rep repeat. sc(dc) single (double) crochet. sl st slip stitch. st/s stitch(es).

— Base :

Info :

Using H-8 (5mm) hook ch 13.

Round 1 :

1 sc(dc) in second ch from hook, and in each ch to last ch, 3 sc(dc) in last ch (PM in second of these 3 sts), turn, work back along other side of foundation chain, working 11 sc(dc), 3 sc(dc) in last ch (PM in second of these 3 sts), sl st to join. (26 sts)

Round 2 :

Ch 1 (does not count as a st), *1 sc(dc) in every st to 1 st before marker, 2 sc(dc) in next st, 3 sc(dc) in marked st, 2 sc(dc) in next st, PM in centre st of three-st increase; rep from * to complete the increases, 1 sc(dc) in each st to end of round seam, sl st to join. (34 sts)

Round 3 :

Rep 2nd round. (increase 8 sts) (42 sts)

Round 4 :

Rep 2nd round. (50 sts)

Round 5 :

Rep 2nd round. (58 sts)

Round 6 :

Rep 2nd round. (66 sts)

Round 7 :

Rep 2nd round. (74 sts)

Round 8 :

Rep 2nd round. (82 sts)

Round 9 :

Rep 2nd round. (90 sts)

Round 10 :

Ch 1, 1 sc(dc) flo in each st around, keeping markers in place, sl st to join.

Round 11-18 :

Ch 1, sc(dc) around, move markers up in place each round, sl st to join.

Round 19 :

Ch 1, *sc(dc) to 1 st before marker, 2 sc(dc) in this st, 1 sc(dc) in marked st, PM in new st, 2 sc(dc) in st after marker; rep from * once more, sc(dc) to end of round seam, sl st to join. (94 sts)

Round 20 :

Ch 1, sc(dc) around, move markers up in place each round, sl st to join. (94 sts)

Round 21 :

Ch 1, sc(dc) around, move markers up in place each round, sl st to join. (94 sts)

Round 22 :

Ch 1, sc(dc) around, move markers up in place each round, sl st to join. (94 sts)

Info :

Rep 19th-22nd rounds 7 more times, increasing 4 sts in every repeat. (122 sts)

Next round :

Ch 1, *sc(dc) to 1 st before marker, 2 sc(dc) in this st, 1 sc(dc) in marked st, PM in this new st, 2 sc(dc) in st after marker; rep from * once more, sc(dc) to end of round seam, sl st to join. (126 sts)

Next round :

Ch 1, sc(dc) around, move markers up in place each round, sl st to join. "Seam" should now be 26 sts away from closest marker.

Next round (handle shaping) :

Turn, sl st in next 10 sts, turn, ch 50, skip next 29 sts, 1 sc(dc) in following st and all sts to marker, remove marker, 18 sc(dc), ch 50, skip next 29 sts, 1 sc(dc) in following st and next 34 sts, removing markers as you go, sl st at bottom of original handle to join. (168 sts)

Next 4 rounds :

Ch 1, sc(dc) around, sl st to join at seam. Break yarn and secure. (Work 4 rounds evenly around after rejoining)

— To Finish :

Info :

Weave in all loose ends and block bag to shape to finish.

Assembly Instructions

  • Weave in all loose ends securely and trim excess yarn, then block the bag to the given measurements to shape the base and body.
  • When creating the handle openings follow the handle shaping round exactly: sl st in next 10 sts, ch 50 for handle chain, skip 29 sts to leave the opening, work across to marker and remove marker as instructed.
  • Work the 4 rounds after handle shaping evenly around to finish the top edge, slip stitching to join at the seam for a neat finish.
  • Move and check stitch markers each round during shaping to ensure increases remain symmetrical; remove markers as you work the handle section and rejoin securely.

Important Notes

  • 💡Use stitch markers to keep track of the increases and the centre st of the three-st increase so the oval base remains even.
  • 💡Keep consistent tension so that the bag shape and stripe pattern match the gauge and measurements provided.
  • 💡Remove markers as instructed when working the handle opening and rejoin carefully to avoid trapped markers within the fabric.

This By Your Side Basket Bag pattern makes a beautiful, practical everyday tote with soft recycled yarn colours and sturdy construction. The striped finish and easy-to-follow shaping create a bag youll reach for again and again. Whether for markets, beach days, or errands, this handmade tote adds charm to every outing. 🧶👜

You ask,

we answer.

FAQs

What size will the finished piece be?

The finished bag measures approximately 12½in/32cm in height and 17¾in/45cm across at the widest point when using the recommended yarn and hook size.

Can I use different yarn weights for this pattern?

Yes, you can use a different yarn weight, but this will affect the final size and drape; check your gauge and adjust hook size accordingly to achieve desired dimensions.

Do I need prior crochet experience for this pattern?

This pattern is rated intermediate, so basic crochet knowledge such as single (double) crochet, increases, and working in rounds is recommended for best results.

How long does this project typically take to complete?

Most crocheters complete this project in 5-7 hours, though time can vary depending on experience, tension, and whether you change colours frequently for stripes.