🧢 Beautiful ✨ Detailed πŸ’ Adorable

Brighten Your Day Crochet Rainbow Stuffie Amigurumi Pattern

Brighten Your Day Crochet Rainbow Stuffie Amigurumi Pattern
4.4β˜… Rating
2-4 Hours Time Needed
3.7K Made This
βœ‚οΈ

Beginner Friendly Level

Perfect for those just starting their crochet journey, with clear instructions and simple techniques

⏱️

Bite-Sized Project

Finishes in 2-4 hoursβ€”perfect for an afternoon of creative relaxation.

🧸

Cute Companion

An adorable friend to cherish, handcrafted with love to bring comfort and joy for years to come.

About This Brighten Your Day Crochet Rainbow Stuffie Amigurumi Pattern

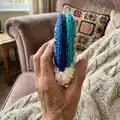
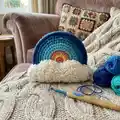
This bright crochet rainbow stuffie is a small stuffed decor piece made from two single-crochet arcs seamed together and finished with pom-pom clouds. It uses Bernat Softee Chunky yarn for a squishy, chunky look and is perfect for gifting or cheerful home accents. The pattern is written in Standard US terms and includes a simple flat slip stitch join for neat seaming.

Brighten Your Day Crochet Rainbow Stuffie Amigurumi Pattern crochet pattern - detailed view of completed project

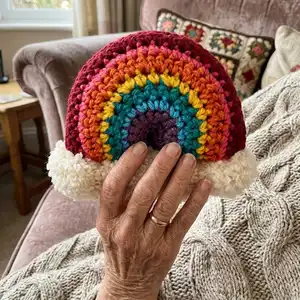
Both front and back pieces are worked identically in contrasting yarn stripes and then seamed. The finished piece is approximately 7" [18 cm] wide by 6" [15 cm] tall.

Why You'll Love This Brighten Your Day Crochet Rainbow Stuffie Amigurumi Pattern

I absolutely love this pattern because it packs a huge dose of color and happiness into a tiny, fast project. I enjoy how quickly the stripes build and how satisfying the final pom-pom clouds look sewn across the base. The pattern uses simple single crochet shaping so I can relax and enjoy the making instead of worrying about complex stitches. Sharing these as little gifts always brings smiles, and I love imagining them brightening someone's shelf or nursery.

Brighten Your Day Crochet Rainbow Stuffie Amigurumi Pattern step 1 - construction progress Brighten Your Day Crochet Rainbow Stuffie Amigurumi Pattern step 2 - assembly progress Brighten Your Day Crochet Rainbow Stuffie Amigurumi Pattern step 3 - details and accessories Brighten Your Day Crochet Rainbow Stuffie Amigurumi Pattern step 4 - final assembly and finishing

Switch Things Up

I love customizing this rainbow by swapping color orders to match nursery themes or seasonal palettes.

You can use a softer pastel palette for a baby-friendly version or bright neons for a playful, modern look.

To make a larger or smaller rainbow, change yarn weight and hook size; bulky yarn with a larger hook makes a chunkier version, while DK or sport weight and a smaller hook creates a mini version.

Try different textures for the clouds: use faux fur yarn or eyelash yarn instead of pom-poms for a fluffy effect.

I sometimes embroider little stars or hearts on the arcs to personalize gifts and add subtle detail.

Use felt cutouts instead of pom-poms for a flatter, quieter cloud option that is great for wall garlands.

Make a set of rainbows in graduated sizes and string them into a colorful garland for nursery decor or party bunting.

If you want a wearable option, add a loop at the top and use a lighter yarn to create a keychain or bag charm version.

For extra durability, sew seams with a doubled strand instead of a single strand when joining arcs, especially if the piece will be handled frequently.

I also like to experiment with metallic or sparkly yarn accents for a touch of shine on special occasion versions.

Common Mistakes & How to Fix Them

βœ— Skipping the color change technique can leave loose loops and messy joins; work to the last two loops on hook, yarn over with the new color and pull through both loops to secure a clean color change. βœ— Not aligning stripes when seaming front and back causes mismatched bands; pin the pieces with right sides together and align each stripe carefully before using the flat slip stitch join to sew them together. βœ— Overstuffing the rainbow distorts its arc and makes seaming difficult; stuff gradually, checking the shape as you go so the rainbow remains rounded and natural. βœ— Cutting pom-pom loops unevenly results in lumpy clouds; trim loops carefully and shape the pom-pom roundly before attaching, and use a long tail to securely sew each pom-pom in place.

Brighten Your Day Crochet Rainbow Stuffie Amigurumi Pattern

Bring a little cheer to your day with this colorful crochet rainbow stuffie. Youll make two striped single-crochet arcs, seam them together, stuff, and add fluffy pom-pom clouds for a playful finish. The pattern is designed to be quick, satisfying, and accessible for crafters who want a bright, handmade gift.

Beginner Friendly 2-4 Hours

Materials Needed for Brighten Your Day Crochet Rainbow Stuffie Amigurumi Pattern

β€” Main Fabric

  • 01
    Bernat Softee Chunky Yarn (#6 Bulky Yarn) 3.5 oz [100 g] / 108 yds [99 m] main skeins
  • 02
    Contrast A - Dark Mauve (28323) 1 ball or 7 yds [7 m]
  • 03
    Contrast B - Ultra Blue (28742) 1 ball or 4 yds [4 m]
  • 04
    Contrast C - Emerald (28200) 1 ball or 6 yds [6 m]
  • 05
    Contrast D - Glowing Gold (28607) 1 ball or 6 yds [6 m]
  • 06
    Contrast E - Pumpkin (28630) 1 ball or 8 yds [8 m]
  • 07
    Contrast F - Hot Pink (28416) 1 ball or 9 yds [9 m]
  • 08
    Contrast G - Wine (28532) 1 ball or 21 yds [20 m]
  • 09
    Contrast H - Natural (28008) 1 ball or 21 yds [20 m]

β€” Tools Required

  • 01
    US J/10 (6 mm) crochet hook or size needed to obtain gauge
  • 02
    Polyester stuffing
  • 03
    Scissors
  • 04
    Yarn needle for sewing
  • 05
    Cardboard piece 2" [5 cm] for making pom-poms (or pom-pom maker)
  • 06
    Stitch markers (optional)
  • 07
    Pins for positioning pieces (optional)

Progress Tracker

0% Complete

β€” Pattern Instructions :

Info :

A cute little rainbow to brighten your day! This colorful stuffie is worked in two simply shaped single crochet stitch pieces that are seamed together and stuffed before fluffy pom-pom clouds are attached across the bottom.

Info :

Note: To change color, work to last 2 loops on hook, yoh with new color. Pull through 2 loops on hook to complete st and proceed in new color.

Item - Front and Back (make alike) :

With A, ch 8.

Round 1 :

(RS). 1 sc in 2nd ch from hook (counts as ch 1. 1 sc). 1 sc in next ch. 2 sc in next ch. 1 sc in next ch. 2 sc in next ch. 1 sc in each of last 2 ch. Turn. (9 sc).

Round 2 :

Ch 1. 1 sc in each of first 2 sc. 2 sc in each of next 5 sc. 1 sc in each of last 2 sc. Join B. Break A. Turn. (14 sc).

Round 3 :

With B, ch 1. 1 sc in each sc across. Join C. Break B. Turn.

Round 4 :

With C, ch 1. 1 sc in each of first 3 sc. 2 sc in next sc. 1 sc in next sc. 2 sc in next sc. 1 sc in each of next 3 sc. Join D. Break C. Turn. (18 sc).

Round 5 :

With D, ch 1. 1 sc in each of first 5 sc. 2 sc in next sc. 1 sc in next sc. 2 sc in next sc. 1 sc in each of next 2 sc. 2 sc in next sc. 1 sc in next sc. 2 sc in next sc. 1 sc in each of next 5 sc. Join E. Break D. Turn. (22 sc).

Round 6 :

With E, ch 1. 1 sc in each of first 4 sc. 2 sc in next sc. (1 sc in next sc. 2 sc in next sc) 3 times. (2 sc in next sc. 1 sc in next sc) 4 times. 1 sc in each of last 3 sc. Join F. Break E. Turn. (30 sc).

Round 7 :

With F, ch 1. 1 sc in each sc across. Join G. Break F. Turn.

Round 8 :

With G, ch 1. 1 sc in each of first 10 sc. (2 sc in next sc. 1 sc in next sc) twice. 2 sc in each of next 2 sc. (1 sc in next sc. 2 sc in next sc) twice. 1 sc in each of last 10 sc. Turn. (36 sc).

Round 9 :

Ch 1. 1 sc in each sc across. Fasten off.

Info :

Make two pieces (Front and Back) as directed above, making sure to change colors as noted at the end of rows. Align stripes so front and back match when seaming.

β€” Finishing :

Info :

Flat Slip Stitch Join Method = With RS facing, insert hook into back loop only of first stitch on one side of seam and into back loop only of first stitch on other side of seam. With working yarn behind both pieces, pull up a loop through back loops and loop on hook to slip stitch the seams together. Repeat for each set of stitches along seam.

Info :

With WS facing each other, sew Front and Back tog using appropriate color while aligning stripes and leaving a small opening for stuffing. Stuff stuffie, making sure to maintain Rainbow shape. Sew opening closed.

Info :

Note: To sew the inner arc of Rainbow closed, I used a strand of A and a flat slip stitch join method across. To seam top arc of Rainbow closed, I used a strand of G and flat slip stitch join method across. To sew the bottoms of the Rainbow closed, I used a strand of yarn (any shade) and sewed them together.

2" [5 cm] Pom-Poms (make 4) :

Wind yarn around 2" [5 cm] piece of cardboard 40 times. Tie tightly in the middle and leave a long end for attaching to Rainbow. Cut loops at both ends and trim to smooth round shape.

Info :

Using long ends, sew 2 pom-poms evenly across each bottom of Rainbow (as shown in photo).

Assembly Instructions

  • Align the Front and Back pieces with right sides facing each other and use the flat slip stitch join across the inner arc with a strand of A to close the inner curve.
  • Seam the top arc using a strand of G with the flat slip stitch join method to create a neat outer curve.
  • Sew the bottoms of the rainbow together using a strand of any shade of yarn, leaving a small opening to stuff and then closing with sewing stitches.
  • Stuff the rainbow firmly but not overstuffed to maintain the curved shape, then sew the opening closed securely.
  • Make four 2" [5 cm] pom-poms and sew two evenly across each bottom of the rainbow using the long tails from the pom-poms to secure them.

Important Notes

  • πŸ’‘Gauge: 10 sc and 11 rows = 4" [10 cm]; check your gauge to ensure final dimensions match approximately 7" [18 cm] wide x 6" [15 cm] tall.
  • πŸ’‘Use the color change method described (yoh with new color on last 2 loops) for clean stripe transitions.
  • πŸ’‘When using the flat slip stitch join, insert hook into back loops only for a tidy seam that mimics the back loop join.

This little rainbow stuffie is a bright and cozy pocket of handmade joy you can make in an afternoon. It combines chunky yarn stripes and fluffy pom-pom clouds for maximum charm and minimal fuss. Perfect for gifting, shelf decor, or a cheerful desk companionβ€”happy crocheting! 🧢🌈✨

You ask,

we answer.

FAQs

What size will the finished piece be?

The finished stuffie measures approximately 7" [18 cm] wide x 6" [15 cm] tall when using the recommended Bernat Softee Chunky yarn and a 6 mm hook.

Can I use different yarn weights for this pattern?

Yes, you can use different yarn weights, but the finished size will change; choose an appropriate hook for your yarn and check gauge to achieve your desired dimensions.

Do I need prior crochet experience for this pattern?

This pattern is beginner friendly, using basic single crochet stitches and simple shaping, but you should be comfortable with single crochet and basic color changes.

How long does this project typically take to complete?

Most crocheters finish this small project in about 2-4 hours, depending on experience and how quickly you make pom-poms and assembly.