🧢 Beautiful ✨ Detailed πŸ’ Adorable

Bee No Sew Amigurumi Pattern

Bee No Sew Amigurumi Pattern
3.9β˜… Rating
2-4 Hours Time Needed
2.1K Made This
βœ‚οΈ

Intermediate Level

Ideal for those with basic crochet experience, featuring slightly more advanced stitches and techniques to expand your skills.

⏱️

Bite-Sized Project

Finishes in 2-4 hoursβ€”perfect for an afternoon of creative relaxation.

🎁

Tiny Treasure

Small, sweet, and gift-worthy creations that fit perfectly in the palm of your hand with detailed charm.

About This Bee No Sew Amigurumi Pattern

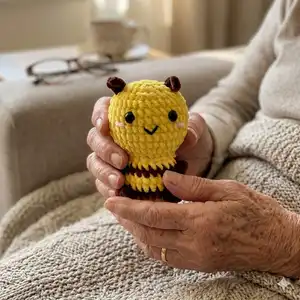
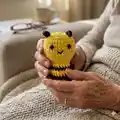
This pattern creates a small, no-sew crocheted bee using super bulky yarn for a plush, chunky texture. The body is crocheted from the body up to the head in one piece, with color changes to form stripes. Simple finishing instructions show how to add eyes, embroider the face, and create tiny brown accents for feet and antennae.

Bee No Sew Amigurumi Pattern crochet pattern - detailed view of completed project

No-sew construction makes assembly fast and neat, ideal for makers who prefer minimal finishing. Uses common amigurumi techniques like magic ring, increases, decreases, and working in the back loop.

Why You'll Love This Bee No Sew Amigurumi Pattern

I absolutely love this pattern because the no-sew construction keeps everything tidy and quick to finish. The super bulky yarn creates an irresistibly squishy texture that looks more complex than it is. I enjoy the striped color changes β€” they add personality without complicated shaping. The small size makes it perfect for gifting or making a few variations in an afternoon.

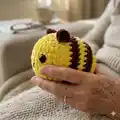
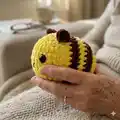
Bee No Sew Amigurumi Pattern step 1 - construction progress Bee No Sew Amigurumi Pattern step 2 - assembly progress Bee No Sew Amigurumi Pattern step 3 - details and accessories Bee No Sew Amigurumi Pattern step 4 - final assembly and finishing

Switch Things Up

I love how easy it is to customize this pattern to create different characters; change the color stripes to make a bumblebird, wasp, or pastel friend.

I often adjust size by changing yarn weight and hook; using a bulkier yarn makes a chunkier, cuddlier bee while thinner yarn creates a mini keychain version.

I like to swap safety eyes for embroidered eyes for a fully baby-safe toy β€” it changes the look and makes it toddler friendly.

Try different mouth shapes with embroidery to give each bee a unique personality β€” a small curve becomes a smile or a surprised O.

For texture, add a tiny collar or scarf using leftover yarn scraps to create seasonal or themed bees, perfect as gifts.

If you want posable antennae or limbs, lightly add thin craft wire inside during stuffing for subtle shaping.

Use felt wings glued with a dab of hot glue for a quick wing option, or crochet tiny wings with the same yarn for a seamless look.

Mix and match face placement to experiment with cute or mischievous expressions; move the eyes up or down a row to see instant personality changes.

I sometimes embroider freckles or little stars on the cheeks for a whimsical touch that makes each piece special.

Keep a small set of alternate yarns on hand to make themed sets quickly β€” I like holiday colors or pastels for baby gifts.

Common Mistakes & How to Fix Them

βœ— Skipping stitch markers during rounds with repeated increases or decreases; place a marker at the start of each round to maintain correct stitch counts. βœ— Forgetting to stuff gradually when instructed as 'Stuffing' appears; add fiberfill little by little to keep the shape smooth and evenly stuffed. βœ— Changing colors without securing ends can cause unraveling and messy joins; carry the yarn carefully or weave in ends as you switch color rows. βœ— Not counting stitches after rounds with complex BLO/FLO instructions can lead to mis-shaped areas; always count stitches after each round that changes stitch type. βœ— Using a different yarn weight without adjusting hook size leads to incorrect finished size; match the recommended hook to your yarn weight or calculate gauge and adjust accordingly.

Bee No Sew Amigurumi Pattern

Make a small no-sew bee amigurumi using super bulky yarn and simple stitches. This pattern walks you through the body-up construction so you can crochet the whole piece without sewing separate parts. With clear rounds and photo references, you can create a cute, striped bee with embroidered features and tiny brown accents. Perfect as a small gift or desk companion.

Intermediate 2-4 Hours

Materials Needed for Bee No Sew Amigurumi Pattern

β€” Main Fabric

  • 01
    Super Bulky yarn (Category 6) - Yellow (Bee main color) approx 50g
  • 02
    Super Bulky yarn (Category 6) - Brown (Bee accent color) approx 30g
  • 03
    Super Bulky yarn (Category 6) - Grey (Mouse main color) approx 50g
  • 04
    Super Bulky yarn (Category 6) - Pink (Mouse ear inner) small amount
  • 05
    Super Bulky yarn (Category 6) - Black (nose/embroidery) small amount
  • 06
    Super Bulky yarn (Category 6) - Brown, White, Skin tones (Puppy dog) small amounts for features

β€” Tools Required

  • 01
    Crochet hook size 3.5mm (E)
  • 02
    Stitch markers
  • 03
    Sewing needle (yarn needle)
  • 04
    Scissors
  • 05
    Plastic safety eyes 8mm (2 pieces per toy)
  • 06
    Hot glue gun (optional for fixing small parts)
  • 07
    Polyester stuffing (fiberfill)
  • 08
    Short pieces of pink and black yarn for cheeks and mouth

Progress Tracker

0% Complete

β€” Bee (Body up to the Head) :

Round 1 :

6 SC in an MR (6)

Round 2 :

6 INC (12)

Round 3 :

(SC, INC) 6 times (18)

Round 4 :

(2 SC, INC) 6 times (24)

Info :

Change to Brown yarn

Round 5 :

8 SC, BO, 6 SC, BO, 8 SC (24)

Info :

Change to Yellow yarn

Round 6 :

8 SC, SC into the stitch's BO, 6 SC, SC into the stitch's BO, 8 SC (24)

Round 7 :

24 SC (24)

Info :

Change to Brown yarn

Round 8 :

6 SC, BO, 10 SC, BO, 6 SC (24)

Info :

Change to Yellow yarn

Round 9 :

6 SC, SC into the stitch's BO, 10 SC, SC into the stitch's BO, 6 SC (24)

Round 10 :

(SC, DEC) 8 times (16)

Round 11 :

FLO, (SC, INC) 8 times (24)

Round 12 :

(SC, INC) 12 times (36)

Round 13-18 :

36 SC (36)

Round 19 :

(2 SC, DEC) 9 times (27)

Info :

*Stuffing*

Round 20 :

(SC, DEC) 9 times (18)

Round 21 :

(SC, DEC) 6 times (12)

Round 22 :

6 DEC (6)

Info :

Weave in the yarn end and cut

β€” Beard :

Info :

Begin with brown. Pick up the yarn from row 19: 4 CH, turn: 3 SC. Cut the yarn.

β€” Bee Face & Finishing :

Info :

Attach the eyes between rows 16 and 17.

Info :

Use black yarn to embroider the mouth and pink yarn to embroider the cheeks.

β€” Mouse (Body up to the Head) :

Info :

Begin with Grey yarn. Join the new round with a slip stitch and chain 1.

Round 1 :

6 SC in an MR (6)

Round 2 :

6 INC (12)

Round 3 :

(SC, INC) 6 times (18)

Round 4 :

(2 SC, INC) 6 times (24)

Round 5 :

8 SC, BO, 6 SC, BO, 8 SC (24)

Round 6-7 :

24 SC (24)

Round 8 :

6 SC, BO, 10 SC, BO, 6 SC (24)

Round 9 :

24 SC (24)

Round 10 :

(SC, DEC) 8 times (16)

Round 11 :

FLO, 6 SC, (3 SC in one st) 4 times, 6 SC (24)

Round 12 :

(SC, INC) 12 times (36)

Round 13 :

16 SC, (BLO: 4 SC), 16 SC (36)

Round 14-15 :

15 SC, (BLO: SC), 4 SC, (BLO: SC), 15 SC (36)

Round 16 :

(2 SC, DEC) 4 times, (BLO: 2 SC, DEC), (2 SC, DEC) 4 times (30)

Round 17-19 :

27 SC (27)

Info :

*Stuffing*

Round 20 :

(SC, DEC) 9 times (18)

Round 21 :

(SC, DEC) 6 times (12)

Round 22 :

6 DEC (6)

Info :

Weave in the yarn end and cut

β€” Mouse Ears (Make 2) :

Info :

Begin with Pink yarn. Join the new round with a slip stitch and chain 1.

Round 1 :

6 SC in an MR (6)

Round 2 :

(SC, INC) 3 times (9)

Round 3 :

(2 SC, INC) 3 times (12)

Info :

Change to Grey yarn

Round 4 :

(SC, INC) 6 times (18)

Info :

Attach the ear point straight from the arm going up with 3 SLST at R18-20

β€” Mouse Nose :

Info :

Begin with Black yarn. Join the new round with a slip stitch and chain 1.

Round 1 :

4 SC in an MR (4)

Info :

Change to Grey yarn

Round 2 :

(SC, INC) 2 times (6)

Round 3 :

(2 SC, INC) 2 times (8)

Round 4 :

(SC, INC) 4 times (12)

Info :

Attach the nose to the head with 12 SLST at BLO of R13-16. Attach the eyes at R15-16, 6 st apart. Sew the line as shown in photos.

β€” Puppy Dog Ear (Make 2) :

Round 1 :

6 SC in an MR (6)

Round 2 :

6 INC (12)

Round 3-4 :

12 SC (12)

Round 5 :

(2 SC, DEC) 3 times (9)

Round 6-7 :

9 SC (9)

Round 8 :

(SC, DEC) 3 times (6)

Info :

Cut the yarn

β€” Puppy Dog (Body up to the Head) :

Info :

Begin with Brown yarn

Round 1 :

6 SC in an MR (6)

Round 2 :

6 INC (12)

Round 3 :

(SC, INC) 6 times (18)

Round 4 :

(2 SC, INC) 6 times (24)

Round 5 :

8 SC, BO, 6 SC, BO, 8 SC (24)

Round 6 :

8 SC, SC into the stitch's BO, 6 SC, SC into the stitch's BO, 8 SC (24)

Round 7 :

24 SC (24)

Round 8 :

6 SC, BO, 10 SC, BO, 6 SC (24)

Round 9 :

6 SC, SC into the stitch's BO, 10 SC, SC into the stitch's BO, 6 SC (24)

Round 10 :

(SC, DEC) 8 times (16)

Round 11 :

FLO, (SC, INC) 8 times (24)

Round 12 :

(SC, INC) 12 times (36)

Round 13-15 :

36 SC (36)

Round 16 :

(2 SC, DEC) 9 times (27)

Round 17-19 :

27 SC (27)

Info :

*Stuffing*

Round 20 :

2 SC, DEC, fold the ears in half and crochet them together at the head 3 SC, (DEC, 2 SC) 2 times, DEC, SC, DEC, fold the ears in half and crochet them together at the head 3 SC, DEC, 2 SC (21)

Round 21 :

(SC, DEC) 7 times (14)

Round 22 :

7 DEC (7)

Info :

Weave in the yarn end and cut

β€” Puppy Dog Nose :

Info :

Use White yarn

Round 1 :

Crochet 12 SLst from rows 14-16 in a circular shape as the photo

Round 2 :

Crochet 12 SC into the 12 slip stitches

Round 3 :

(SC, DEC) 4 times (8)

Info :

*Stuffing*

Round 4 :

4 DEC

Info :

Cut the yarn. Attach the eyes at row 16.

Assembly Instructions

  • Attach eyes between rows 16 and 17 (or at the indicated row for each pattern) with safety eyes and secure with washers.
  • Embroider the mouth with black yarn and add pink yarn stitches for cheeks according to the face photos to achieve the same expression.
  • Attach ears to the head points as directed: for mouse attach ear point straight from the arm going up with 3 SLST at rows 18-20; for puppy fold ears and sew into place following Row 20 instructions.
  • For the nose: sew the crocheted nose piece to the head at the specified rows (example: attach the nose to the head with 12 SLST at BLO of R13-16 for mouse) and secure firmly.
  • Weave in all yarn ends and cut; use hot glue sparingly if small parts need extra hold but rely on stitching for durability.

Important Notes

  • πŸ’‘Work with consistent tension throughout; super bulky yarn will show tension changes easily and affect shape.
  • πŸ’‘Use stitch markers to mark the beginning of rounds, especially when rounds include BLO/FLO or color changes.
  • πŸ’‘Stuff gradually at 'Stuffing' markers to shape head and body evenly and avoid lumps.
  • πŸ’‘Weave in tails as you go when possible to keep finishing quick and avoid loose ends showing through the plush surface.

This delightful Bee amigurumi is designed to be quick, squishy, and endlessly adorable β€” perfect for gifts or decorating a small space. The no-sew construction keeps assembly simple while the striped body adds playful character you can customize. Make a whole set in different colors for a charming collection of tiny creatures. 🧢🐝✨

You ask,

we answer.

FAQs

What size will the finished piece be?

The finished amigurumi measures approximately 8-12 cm tall when using super bulky yarn and a 3.5mm hook; exact size depends on yarn and tension.

Can I use different yarn weights for this pattern?

Yes, you can use different yarn weights, but this will affect the final size and stitch counts; adjust hook size and be prepared for size changes.

Do I need prior crochet experience for this pattern?

This pattern is rated intermediate and assumes familiarity with magic ring, single crochet, increases, decreases, BLO/FLO, and basic embroidery.

How long does this project typically take to complete?

Most crocheters complete this small amigurumi in 2-4 hours depending on experience and whether you make additional features like embroidered cheeks.